Self-assessment activity using the question bank: Difference between revisions
No edit summary |
No edit summary |
||
| Line 150: | Line 150: | ||
==Concept of Qpractice Module== | |||
The basic idea is that the teacher sets up a bank of questions organised into categories. Then the student can then choose what questions they want to practice when. This is about student-centred learning based on the capabilities of the Moodle question bank. | The basic idea is that the teacher sets up a bank of questions organised into categories. Then the student can then choose what questions they want to practice when. This is about student-centred learning based on the capabilities of the Moodle question bank. | ||
==Steps to follow to set-up module== | |||
Below are some steps with snapshots that teacher can follow in order to create a working qpractice instance. | Below are some steps with snapshots that teacher can follow in order to create a working qpractice instance. | ||
| Line 190: | Line 188: | ||
# Questions should be added only in context space of that instance. | # Questions should be added only in context space of that instance. | ||
# All the parent level categories created by teacher are visible to students | # All the parent level categories created by teacher are visible to students: Example: If a teacher has 3 parent level categories ie: Topic 1 , Topic 2, Topic 3. These top level categories will be visible to student. Whenever a student starts practice he will be provided with option to select category from list of available categories. After that students are asked questions randomly from that category without being repetated. | ||
Example: If a teacher has 3 parent level categories ie: Topic 1 , Topic 2, Topic 3. These top level categories will be visible to student. Whenever a student starts practice he will be provided with option to select category from list of available categories. After that students are asked questions randomly from that category without being repetated. | |||
# Teacher can create any number of sub-categories inside parent level category. Only parent level category are visible to student. | # Teacher can create any number of sub-categories inside parent level category. Only parent level category are visible to student. | ||
| Line 231: | Line 228: | ||
This page gives students option for selecting how a session should be. Student can select the category they want to practice and also select the behaviour that they want for a particular session. | This page gives students option for selecting how a session should be. Student can select the category they want to practice and also select the behaviour that they want for a particular session. | ||
Revision as of 15:17, 23 September 2013
Note: This page is a work-in-progress. Feedback and suggested improvements are welcome. Please join the discussion on moodle.org or use the page comments.
| Self-assessment activity using the question bank | |
|---|---|
| Project state | Coding period |
| Tracker issue | CONTRIB-4334 |
| Discussion | Forum Discussion-1,Forum Discussion-2 |
| Assignee | Jayesh Anandani |
GSOC '13
Introduction
Self-assessment is the ability of a student to observe, analyze, and judge one’s performance on the basis of criteria and determine how one can improve it.
I have gone throught the IDEAS page and have read the information regarding the same, on Tim Hunt's blog about the layout/structure of a project. What I want to Build Next
Schedule
GSoC divides the summer into two main periods
- The first phase, 17th June - 29th July, leading up to the mid-term evaluation.
- The second phase from, 2nd August – 15th September.
- There is also a pre-phase and a post-phase.
Requirements
Moodle 2.6 is required.
Features
The practice module will consist of mainly two interfaces.
Student User Interface
Student will be allowed to:
- Create a new practice session and select choices accordingly(shown in mock-ups).
- See their report of all practice sessions in either tabular manner or graphical manner.
- Download a report of all their practice sessions course wise.
Teacher User Interface
Teacher will be able to:
- Create a new practice accessible by all students.
- Add and update Questions to practice created by teacher.
Community Bonding Period
Milestones
- DONE: Refine the project proposal with Tim, Jean-Michel and the community.
- DONE: Feature Discussion.
- DONE: Create mockups.
- DONE: Create a Practice Interface Overview.
- DONE: Attend Orientation meeting.
- DONE: Add GSOC timeline to moodle calendar(iCal).
Coding Period
Milestones
- DONE: Finalize the Interface for student's side.
- DONE: Create module plugin structure from template (including version.php, db/access.php, lang/en/mod_practice.php)
- DONE: Student interface: basic view.php page with two buttons (Create a new practice session button and View past sessions button).
- DONE: Student interface: start new practice session UI (startattempt.php & startattempt_form.php).
- DONE: Student interface: create database tables to store attempt data (db/install.xml and db/upgrade).
- DONE: Student interface: attempting a question page (attempt.php).
- DONE: Student interface: summary at the end of a practice session (summary.php).
- DONE: Student interface: add list of past sessions on the report.php page.
- DONE: Prepare of mid-term evaluation.
- DONE: Teacher interface: create/update database tables to store attempt data (db/install.xml and db/upgrade).
- DONE: Teacher interface: create instance form (modform.php & code in lib.php).
- DONE: Teacher interface: teacher's view of the reports & past sessions.
- DONE: Teacher interface: ensure teachers can access the question bank and add questions.
- DONE: Administration: ensure all significant actions are logged (db/logs.php, review all scripts).
- DONE: Administration: backup and restore (backup/moodle2/*.php - 4 files).
- Administration: consider whether we should trigger any events (db/events.php).
- Administration: course reset (_reset_course_form_definition, _reset_course_form_defaults, _reset_userdata in lib.php).
- DONE: Administration: other standard module functions in lib.php (_delete_instance, _user_outline, _user_complete, _print_recent_activity).
- Final tidy up: implement index.php
- Final tidy up: readme.md, pix/icon.png, ...
- Final testing of the whole system (Behat tests?)
- Submit final evalution.
Practice User Interface Overview
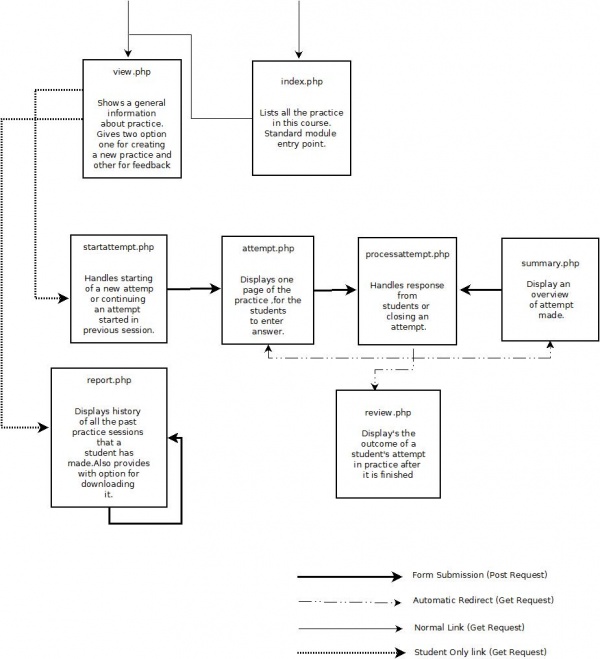
This diagram summarises the various pages that make up the practice user interface.
Mockups
Student User Interface Mockups
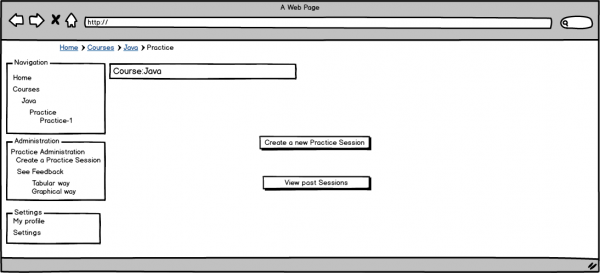
Practice Home page
This mock-up shows what view.php will look like to a student.
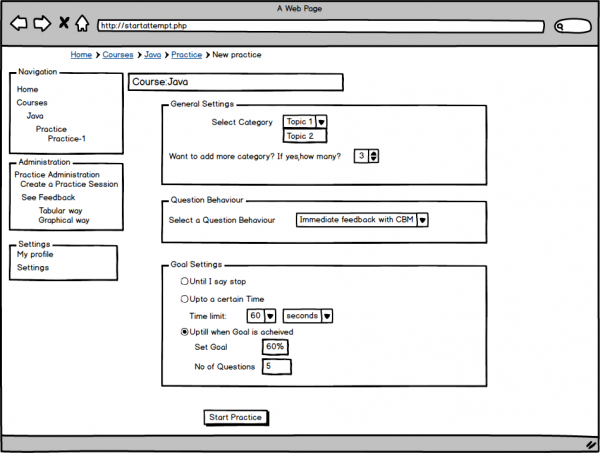
Creating a new practice Session
This mock-up shows what startattempt_form.php will look like to a student.
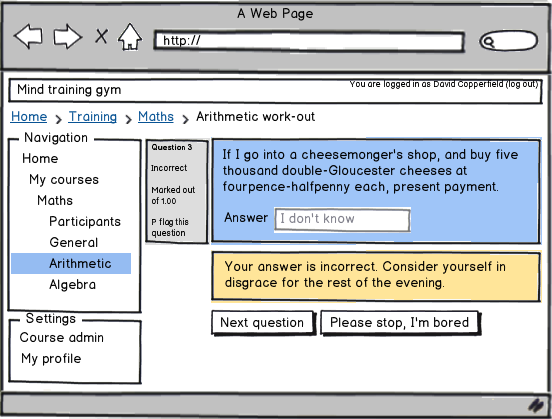
Attempt page for Student
This mock-up shows what attempt.php will look like to a student.
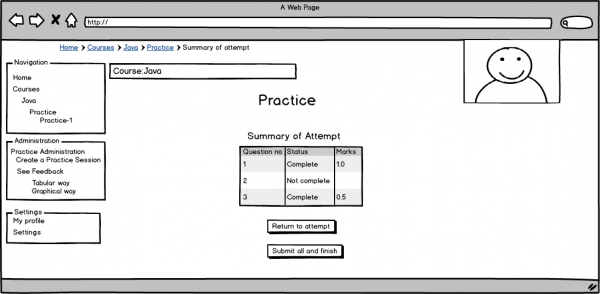
View Summary of Practice Session
This mock-up shows what summary.php will look like to a student.
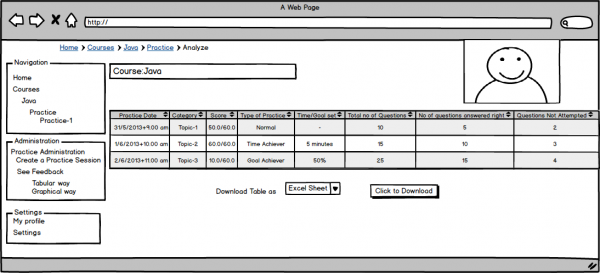
View all Past practice Sessions
This mock-up shows what report.php will look like to a student.
Concept of Qpractice Module
The basic idea is that the teacher sets up a bank of questions organised into categories. Then the student can then choose what questions they want to practice when. This is about student-centred learning based on the capabilities of the Moodle question bank.
Steps to follow to set-up module
Below are some steps with snapshots that teacher can follow in order to create a working qpractice instance.
Teacher side
Step 1
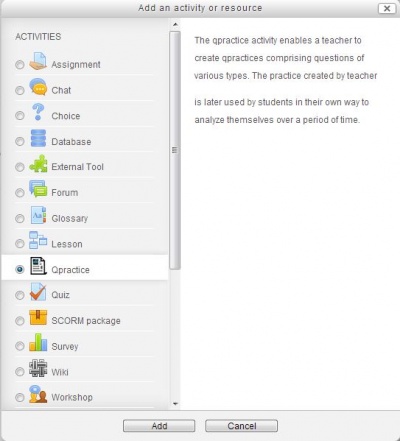
First step for any teacher is to create an instance of module.
Creating a new instance
Step 2
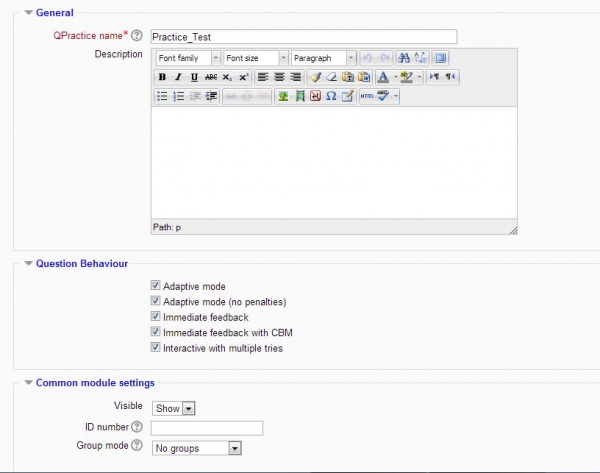
After the instance for qpractice module has been created, teacher is redirected to setting form for that instance. The setting form contains some general options like name, introduction and behaviour. The behaviour selected by teacher in settings are the only ones that will be visible to student ie: the student will have to select only from those behaviour.
Settings for Qpractice
This is an overview of settings available in qpractice module.
Step 3
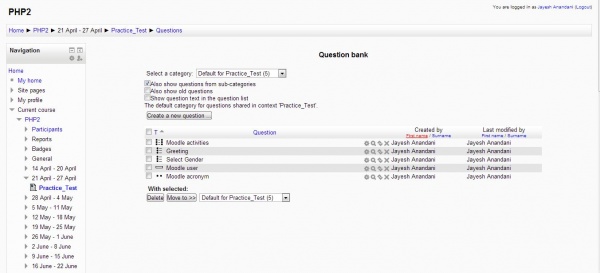
After editing settings for an instance, the next step for teacher is to add questions to question bank. There are certain rules to be followed while adding questions to question bank.
- Questions should be added only in context space of that instance.
- All the parent level categories created by teacher are visible to students: Example: If a teacher has 3 parent level categories ie: Topic 1 , Topic 2, Topic 3. These top level categories will be visible to student. Whenever a student starts practice he will be provided with option to select category from list of available categories. After that students are asked questions randomly from that category without being repetated.
- Teacher can create any number of sub-categories inside parent level category. Only parent level category are visible to student.
Adding Questions to module
This is an overview of question bank for Qpractice instance. Teacher can create categories and add or update questions here. Parent level categories created by teacher will be available to students for practice. Questions present in each category will be made available to students.
Step 4
After setting up module , if a teacher wants to view history of all sessions for all students they can simply click on view past sessions as shown in screenshot and the list will appear.
View all Reports by Teacher
This is an overview of report.php at teacher's side. Teacher will be able to view all the data of all students.
Student Side
Options visible to students
This is an overview of view.php. Students on start-up will be provided with 2 options. Either they can start a new session or can view history of all past sessions that they have done uptill now.
Creating a new session
This page gives students option for selecting how a session should be. Student can select the category they want to practice and also select the behaviour that they want for a particular session.
Attempt page as visible to students
This page shows how a question is visible to student. He can attempt as many questions as he wishes to or stop the practice when he gets bored.
Checking current Question
This page briefs on how answers are checked once students clicks on check button, therby giving accurate information about marks for same.
Summary of Current Session
This page shows summary of current session in progress.
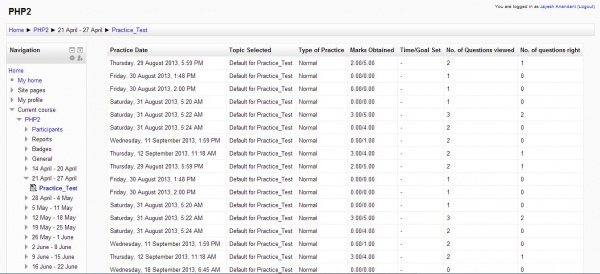
View individual report of all Past Sessions
This page shows the history of all practices of the student logged in.
Credits
Mentors: Jean-Michel Vedrine & Tim Hunt.
Tracker
- CONTRIB-4334 Practice Module
