Overriding a renderer: Difference between revisions
Sam Hemelryk (talk | contribs) |
|||
| Line 249: | Line 249: | ||
'''Note''': Currently not much of Moodle utilises renderers to their full extent. This will change after the release of Moodle 2.0 at which point the core modules will be overhauled to make full use of them. | '''Note''': Currently not much of Moodle utilises renderers to their full extent. This will change after the release of Moodle 2.0 at which point the core modules will be overhauled to make full use of them. | ||
==Overriding a | ==Overriding a component's renderer== | ||
Under construction still sorry | Under construction still sorry | ||
Revision as of 11:04, 1 April 2010
This quick tutorial looks to introduce you to the wonderful world of renderers and how you would go about overriding a renderer within a theme in order to achieve the totally unique look that you desire. This document is targeted at the very ambitious theme designer who either has a good grounding in PHP or easy access to a PHP developer who is happy to be pestered.
Before we start
I strongly recommend that if you have not already read the Themes 2.0 page that you go off an do that now, I will try not to convolute this quick tutorial with any information on the themes system so please make sure you understand it.
What you will need:
- A Moodle 2.0 install with Administrator access and write permission on the source.
- A theme that you wish to extend. We will create a test them based on it so don't worry there are not permanent changes.
- A good understanding of PHP, HTML, and CSS within Moodle.
- Time... lots of time.
A quick overview of renderers
One the major changes within Moodle 2.0 was the addition of the output library ($OUTPUT) that saw the introduction of the renderer.
In a nutshell a renderer is a class that handles all of the output for a component of Moodle. It should contain no logic other than what is required to generate the display and should be compartmentalised into functional chunks each of which should be responsible for producing a widget or control used within the component. This output will vary depending on what the component is, for example the forum will have a method for displaying a forum post, displaying a thread (which most likely calls the forum post method), and displaying a search form.
These renderers are used as much as possible in Moodle and code is constantly being converted. As Moodle progresses more and more of the code should be utilising renderers.
As well as the component renderers there is of course a core renderer as well which is responsible for producing the display for many general things within Moodle. The display for things such as tables, action icons, and block regions are all produced by this core renderer.
Now why use these renderers? They help developers separate the logic and the display when writing code and for theme designers they allow a means by which to to take total control of the HTML that Moodle produces.
How do you do that you ask? By overriding them!
Getting started
Alright so lets get into it!
For the purposes of this tutorial we will create a test theme that extends the standard theme and does nothing other than override renderers. This ensures that at the end of the day we don't do any real damage to any theme and it also helps keep things nice and separate for this tutorial.
So open your Moodle installations theme directory and within it create a new directory call overridetest.
Within the newly created overridetest directory create a config.php file and add the following PHP to it:
<?php
$THEME->name = 'overridetest';
$THEME->parents = Array('base','standard');
This tells Moodle that our theme is called overridetest and that it extends both the base and standard themes.
Now the next step is to tell the theme that we want to override renderers. Telling Moodle we want to override renderers in our theme is very simple we just need to tell Moodle which render factory we want our theme to use.
A render factory is a class that Moodle will use to find renderers. It is required by Moodle because renderers can exist in several locations within Moodle but don't need to exist at all. These factories are what allow us to override only the renderers we want to rather than having to override them all.
So to the bottom of the config.php add the following line:
$THEME->rendererfactory = 'theme_overridden_renderer_factory';
This line tells Moodle that for this theme we want to use the theme_overridden_render_factory, a special class tells Moodle to look for renderers first within the theme first and then in all of the other default locations.
Now before we start overriding renderers there is one last thing we need to look at, the html_writer class.
All about html_writer
As we get into overriding renderer methods you are going to see this class being used quite a bit and it is going to be important to understand what it is actually doing.
While you could write all of your HTML manually within a renderer method it is strongly encouraged to use the html_writer where possible to keep all renderer code similar and easily readable.
The following examples will introduce you to the html_writer, what some of it's core methods are, and what they produce.
html_writer::start_tag
This is used to produce an opening tag and takes two arguments the first the tag to open and the second is the attributes to give the tag. The attributes is an array of key value pairs where the key is the attribute and the value is of course the value. Things such as class, id, and type are attributes that can be specified in this way.
<?php echo html_writer::start_tag('div', array('class'=>'blah')); ?>
<?php echo html_writer::start_tag('table', array('class'=>'generaltable', 'id'=>'mytable')); ?>
html_writer::end_tag
This method is used to simply produce a closing tag for a tag that has been opened by html_writer::start_tag.
It takes just one argument the tag to close.
<?php echo html_writer::end_tag('div'); ?>
<?php echo html_writer::end_tag('table'); ?>
html_writer::tag
This method takes three arguments and is for all intensive purposes the combination of start_tag and end_tag plus the inclusion of content.
<?php echo html_writer::start_tag('div', 'I am some content to go into the string', array('class'=>'blah')); ?>
I am some content to go into the string
html_writer::empty_tag
The final method empty_tag is used to create a self closing tag. This is useful in situations such as producing image tags, or input fields.
It takes two arguments tag and attributes, the same as start_tag.
<?php echo html_writer::empty_tag('img', array('src'=>'myimage.png', 'alt'=>'This is my image')); ?>
<img src="myimage.png" alt="This is my image" />
<?php echo html_writer::empty_tag('input', array('type'=>'text', 'name'=>'afield', 'value'=>'This is a field')); ?>
<input type="input" name="afield" value="This is a field" />
And now that you have a little understanding of the html_writer class we can look at creating our first renderer.
Our first renderer
At this point we first need to create a file renderers.php within the theme's directory, create that now and open it ready for editing.
The first renderer that we will override is the core renderer for Moodle. Once you get into this on your own it is entirely up to you which renderers you override, however for the purposes of learning how to override renderers the core renderer is the starting point.
So within your renderers.php add the following:
<?php
class theme_overridetest_core_renderer extends core_renderer {
}
So what we have added is the class definition for our first renderer. What should you note about this:
- The name of the renderer is VERY important it is made up of three sections joined by underscores:
- theme : This will always be the same when overriding renderers from the theme.
- overridetest : This is of course the name of our theme, and should be the name of the theme the renderer is being overridden from.
- core_renderer : This is the renderer that we are overriding.
- The renderer should always extend the renderer it is overriding. This ensures we don't need to override every method the renderer offers.
With our renderer class defined it's now time to override our first display method.
In this case you we will override the heading() method that the core renderer has. This method is used to display a simple header in the page consisting of an h* tag (h2, h3, etc) and the heading itself.
The existing code for the function is as follows:
/**
* Outputs a heading
* @param string $text The text of the heading
* @param int $level The level of importance of the heading. Defaulting to 2
* @param string $classes A space-separated list of CSS classes
* @param string $id An optional ID
* @return string the HTML to output.
*/
public function heading($text, $level = 2, $classes = 'main', $id = null) {
$level = (integer) $level;
if ($level < 1 or $level > 6) {
throw new coding_exception('Heading level must be an integer between 1 and 6.');
}
return html_writer::tag('h' . $level, $text, array('id' => $id, 'class' => renderer_base::prepare_classes($classes)));
}
Pretty simple really, it takes four standard arguments, and outputs a h* tag.
There are several important things to take away from this very simple bit of code:
- The first three lines are to check that $level is an integer between 1 and 6, this is because that integer gets written to the tag.
- The final line creates a h* tag with the arguments and returns it as a string.
- The output is returned rather than being echoed to the page. ALL renderer methods must do this.
- The html_writer class is used to generate the output rather than creating the string within the function. This is highly recommended for all renderer methods.
So lets override this method within our themes renderer. Within our method we will aim to wrap the h* tag in a div with a class name we choose and then also add an image right before the h* tag is printed.
The following is a quick bit of code I've written that does exactly this:
public function heading($text, $level = 2, $classes = 'main', $id = null) {
$content = html_writer::start_tag('div', array('class'=>'headingcontainer'));
$content .= html_writer::empty_tag('img', array('src'=>$this->pix_url('headingpic', 'theme'), 'alt'=>, 'class'=>'headingimage'));
$content .= parent::heading($text, $level, $classes, $id);
$content .= html_writer::end_tag('div');
return $content;
}
Lets look at this code line by line:
$content = html_writer::start_tag('div', array('class'=>'headingcontainer'));
Here we are opening a div and giving it a class of headingcontainer using the html_writer.
$content .= html_writer::empty_tag('img', array('src'=>$this->pix_url('headingpic', 'theme'), 'alt'=>, 'class'=>'headingimage'));
Again we are using the html_writer to do the work, however this time we are producing an img tag. You'll also notice the use of the pix_url function. Because our renderer is extending the core_renderer we can make use of all of its functions, pix_url being a useful one in this case.
$content .= parent::heading($text, $level, $classes, $id);
Of course the other cool thing we can do in this case is still use the core_renderers heading method to produce the h* tag as we are just adding content around it.
$content .= html_writer::end_tag('div');
The final thing to do is close the div that we opened on line one. Again we can do this with the html_writer.
Now before you go and test it of course there are a couple of things we need to do:
1. Create an image called headingpic.png and put it into a directory called pix located within your theme directory - /theme/overridetest/pix/headingpic.png
2. Create a CSS file called overridetest.css within a directory called style within your theme directory - /theme/overridetest/style/overridetest.css
3. Add into overridetest.css the following two lines of css.
.headingcontainer .headingimage {float:left;margin-right:1em;}
.headingcontainer h2,
.headingcontainer h3,
.headingcontainer h4,
.headingcontainer h5,
.headingcontainer h6 {text-align:left;}
4. Add the following line to the bottom of the config.php file
$THEME->sheets = Array('overridetest');
With that done if you now view a page within your Moodle installation you should see the difference.
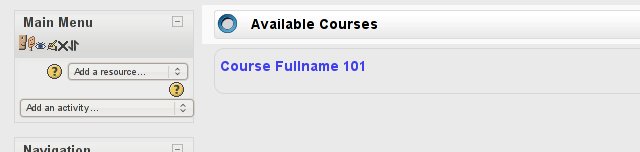
As you can see from the clipping above heading now have our image next to the text and are left aligned.
Congratulations you've now overridden your first renderer.
Finding renderers to override
Identifying renderers and locating the files that they are located within is critical to being able to override them. If you can't find them you can't override them.
Just like the smarts that Moodle tries to take into account for designers (all the things it does automatically) there are several things that developers can bet on as well. This is both advantageous to developers as it makes code quicker to structure and more routine, and to designers as well because you will always be able to easily work out where a renderer is located to check if one is being used.
In regards to renderers they should always be located in a file called renderer.php. It doesn't matter if it is core code or a plugin it should always be the same.
That renderer.php file should always be located in the base directory of a component, e.g.
- /webservice/renderer.php
- /mod/forum/renderer.php
- /mod/workshop/allocation/manual/renderer.php
The only exception to that is the core renderer which is located in /lib/outputrenderers.php.
There is also a routine way to name renderers much like the process for naming a theme's overriding renderer.
It should always be made up of the following three components joined by underscores:
- component This is the component the renderer belongs too, e.g. block, mod, or core.
- name This is the name of what ever the component is, e.g. forum, workshop, or wiki.
- renderer They should always be completed by the word renderer.
The following are examples of renderers currently in use within Moodle:
class core_webservice_renderer {}
class mod_forum_renderer {}
class workshopallocation_manual_renderer {}
Again the only exception to this is the core renderer which is just core_renderer.
So now that you know where to find renderers it's as simple as checking to find out if the bit of HTML you wish to change is produced by a renderer by looking in the component the HTML is produced by to find out if it is using a renderer.
Note: Currently not much of Moodle utilises renderers to their full extent. This will change after the release of Moodle 2.0 at which point the core modules will be overhauled to make full use of them.
Overriding a component's renderer
Under construction still sorry
Related pages
