Moodle Mobile 2 (Ionic 1) Developing a plugin tutorial part 2
Note: This page is a work-in-progress. Feedback and suggested improvements are welcome. Please join the discussion on moodle.org or use the page comments.
Introduction
In this tutorial we are going to extend the notes add-on functionality
Add-on spec
We want to develop a plugin that will display a new option at course level (at the same line that contents, participants and grades).
This option will display all the course notes for all the participants in the course (it's suitable for teachers).
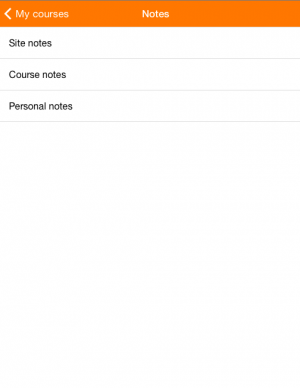
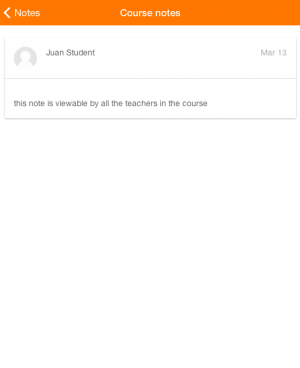
A couple of screenshots with the desired result:
Steps
Set up your development environment
Please, read Setting up your development environment for Moodle Mobile 2
Set up your Moodle installation
Enable debugging, disable caches, etc... the typical settings for developing.
Enable the Mobile Service via Admin / Plugins / Web Services / Mobile
Develop the Moodle Web Services you are going to need
In this case we'll use an existing web service (core_notes_get_course_notes) that is already available in the Moodle Mobile app service, if you need custom functions you will need to develop a local plugin including there your new Web Services (see https://moodle.org/plugins/view/local_wstemplate) and create a custom service.
Develop the Moodle Mobile add-on
The full source code can be found here: https://github.com/moodlehq/moodlemobile2/tree/master/www/addons/notes
www/addons/notes/main.js
angular.module('mm.addons.notes', [])
.config(function($stateProvider) {
$stateProvider
   .state('site.notes-types', {
       url: '/notes-types',
       views: {
           'site': {
               templateUrl: 'addons/notes/templates/types.html',
               controller: 'mmaNotesTypesCtrl'
           }
       },
       params: {
           course: null
       }
   })
   .state('site.notes-list', {
       url: '/notes-list',
       views: {
           'site': {
               templateUrl: 'addons/notes/templates/list.html',
               controller: 'mmaNotesListCtrl'
           }
       },
       params: {
           courseid: null,
           type: null
       }
   });
})
.run(function($mmUserDelegate, $mmaNotesHandlers, $mmCoursesDelegate, $mmaNotes) {
   // Register plugin on course list.
   $mmCoursesDelegate.registerPlugin('mmaNotes', function() {
       if ($mmaNotes.isPluginViewNotesEnabled()) {
           return {
               icon: 'ion-ios-list',
               state: 'site.notes-types',
               title: 'mma.notes.notes'
           };
       }
   });
});
Here we declare the plugin, and register the Plugin (this means that the plugin will be displayed in the course main menu.
Note also that we are declaring the states (views) the plugin will support, in this case there are two views:
- notes-types: Is a list that display the different note types available (site, course, personal).
- notes-lists: that will display a list of notes for the type selected in the previous view.
www/addons/notes/templates/types.html and www/addons/notes/templates/list.html
These files contains the templates used for the view, the first one is very simple since it only links to the different note types.
The second one is more complex since requires a controller that is going to do all the logic for retrieving the note and prepare them to be displayed.
www/addons/notes/controllers/types.js
This is the controller that inject data in the types.html view, the code is pretty simple:
angular.module('mm.addons.notes')
.controller('mmaNotesTypesCtrl', function($scope, $stateParams) {
   var course = $stateParams.course,
       courseid = course.id;
$scope.courseid = courseid;
});
It just make available in the $scope the courseid, that is required because is passed as a state parameter for the list view.
www/addons/notes/controllers/list.js
This controller is the one that will render in the list view the notes:
.controller('mmaNotesListCtrl', function($scope, $stateParams, $mmUtil, $mmaNotes, $mmSite, $translate) {
   var courseid = $stateParams.courseid,
       type = $stateParams.type;
Here we retrieved the state parameters (the course id and the type of notes) that were declared in the types.html view.
   function fetchNotes(refresh) {
       return $mmaNotes.getNotes(courseid, refresh).then(function(notes) {
           notes = notes[type + 'notes'];
           return $mmaNotes.getNotesUserData(notes, courseid).then(function(notes) {
               $scope.notes = notes;
           });
       }, function(message) {
           $mmUtil.showErrorModal(message);
       });
   }
The fetchNotes function is responsible of using the Notes service getNotes to retrieve the data, note that we use an additional function getNotesUserData to retrieve the full user profile information (since via getNotes we only get the userid)
fetchNotes().then(function() {
       // Add log in Moodle.
       $mmSite.write('core_notes_view_notes', {
           courseid: courseid,
           userid: 0
       });
   })
After retrieving the notes, we do logging in Moodle (so the actions are registered in the web interface)
   $scope.refreshNotes = function() {
       fetchNotes(true).finally(function() {
           $scope.$broadcast('scroll.refreshComplete');
       });
   };
This function is triggered by the "Pull down to refresh" action in order to refresh the view (empty the cache), note that the true parameter in the fetchNotes function means to not use cache.
www/addons/notes/services/notes.js
The notes services holds all the main plugin logic, it's responsible of checking if the plugin is available, retrieve information for the server and format the information so it can be rendered in the view by the controller.
   self.isPluginViewNotesEnabled = function() {
       var infos;
       if (!$mmSite.isLoggedIn()) {
           return false;
       } else if (!$mmSite.canUseAdvancedFeature('enablenotes')) {
           return false;
       } else if (!$mmSite.wsAvailable('core_notes_get_course_notes')) {
           return false;
       }
       return true;
   };
Here we checked if the plugin is enabled, the user must logged in, enablenotes should be enabled in the Moodle global settings and the core_notes_get_course_notes function should be available.
self.getNotes = function(courseid, refresh) {
$log.debug('Get notes for course ' + courseid);
       var data = {
               courseid : courseid
           },
           presets = {};
       if (refresh) {
           presets.getFromCache = false;
       }
       return $mmSite.read('core_notes_get_course_notes', data, presets);
   };
Here we retrieve the notes information from Moodle via Web Services, note that the refresh function is used for invalidating the cache (for example, when the user performs a pull down to refresh).
   self.getNotesUserData = function(notes, courseid) {
       var promises = [];
       angular.forEach(notes, function(note) {
           var promise = $mmUser.getProfile(note.userid, courseid, true);
           promises.push(promise);
           promise.then(function(user) {
               note.userfullname = user.fullname;
               note.userprofileimageurl = user.profileimageurl;
           }, function() {
               // Error getting profile. Set default data.
               return $translate('mma.notes.userwithid', {id: note.userid}).then(function(str) {
                   note.userfullname = str;
               });
           });
       });
       return $q.all(promises).then(function() {
           return notes;
       });
   };
Since getNotes returns only userids, we need to retrieve the complete user information in order to be able to display his full name and profile image. We use the $mmUser service getProfile function.

