Diferencia entre revisiones de «Usando servicios web»
(added page) |
([https://en.wikipedia.org/wiki/Token token]) |
||
| (No se muestran 3 ediciones intermedias del mismo usuario) | |||
| Línea 3: | Línea 3: | ||
This document explains how an administrator can set up a web service for users to access a service. Each user will have a specific and unique security key (also known as a "token") to access the service. | This document explains how an administrator can set up a web service for users to access a service. Each user will have a specific and unique security key (also known as a "token") to access the service. | ||
== | == Habilitar servicios web== | ||
[[Image:Enable_web_service.jpg|thumb|Enabling web services]] | [[Image:Enable_web_service.jpg|thumb|Enabling web services]] | ||
# Access ''Settings > Site administration > Advanced features'' | # Access ''Settings > Site administration > Advanced features'' | ||
| Línea 10: | Línea 10: | ||
Note: For security reasons, web services should only be enabled if you intend to make use of it. | Note: For security reasons, web services should only be enabled if you intend to make use of it. | ||
== | == Habilitar protocolos == | ||
[[Image:Enable_protocol.jpg|thumb|left|Enabling protocols]] | [[Image:Enable_protocol.jpg|thumb|left|Enabling protocols]] | ||
Usually external applications that users wish to use dictate which protocols should be enabled. | Usually external applications that users wish to use dictate which protocols should be enabled. | ||
| Línea 17: | Línea 17: | ||
# Enable the protocols (SOAP, REST, XMLRPC, AMF, ...) as required | # Enable the protocols (SOAP, REST, XMLRPC, AMF, ...) as required | ||
== | == Documentación acerca de funcioón de habilitar servicio web == | ||
[[Image:Security keys and documentation.jpg|thumb|Security keys page with documentation link]] | [[Image:Security keys and documentation.jpg|thumb|Security keys page with documentation link]] | ||
Enabling web service function documentation (also on the Manage protocols page) results in user-specific web service documentation being available for each user on their [[ | Enabling web service function documentation (also on the Manage protocols page) results in user-specific web service documentation being available for each user on their [[Claves de seguridad]] page. This option is mainly useful to web service client developers. If nobody is creating a web service client, there is no need to enable this feature. | ||
== | == Crear un servicio == | ||
If none of the pre-build web services match your needs, you can create a custom service i.e. select which of the standard web service functions are available via that service. | If none of the pre-build web services match your needs, you can create a custom service i.e. select which of the standard web service functions are available via that service. | ||
| Línea 41: | Línea 41: | ||
You should be back to the service functions list. 'Required capabilities' are indicated for each function. Users need the required capabilities to run a function. The function descriptions in the API Documentation can also give you more information about the required capabilities (''Settings > Site administration > Plugins > Web services > API Documentation''). | You should be back to the service functions list. 'Required capabilities' are indicated for each function. Users need the required capabilities to run a function. The function descriptions in the API Documentation can also give you more information about the required capabilities (''Settings > Site administration > Plugins > Web services > API Documentation''). | ||
== | ==Habilitar capacidades== | ||
The final step is to grant appropriate permissions. The following capabilities should be allowed: | The final step is to grant appropriate permissions. The following capabilities should be allowed: | ||
| Línea 48: | Línea 48: | ||
* [[Capabilities/webservice/rest:use | webservice/rest:use]], [[Capabilities/webservice/soap:use | webservice/soap:use]], [[Capabilities/webservice/xmlrpc:use | webservice/xmlrpc:use]], [[Capabilities/webservice/amf:use | webservice/amf:use]] which match the enabled protocols. | * [[Capabilities/webservice/rest:use | webservice/rest:use]], [[Capabilities/webservice/soap:use | webservice/soap:use]], [[Capabilities/webservice/xmlrpc:use | webservice/xmlrpc:use]], [[Capabilities/webservice/amf:use | webservice/amf:use]] which match the enabled protocols. | ||
* The service ''Required capability'' if set (''Settings > Site administration > Plugins > Web services > Manage services >'''Edit''' link''). | * The service ''Required capability'' if set (''Settings > Site administration > Plugins > Web services > Manage services >'''Edit''' link''). | ||
* The required capabilities for the web service functions. These required capabilities are listed when you add a function to the service. For more information about roles and capabilities, read the [[ | * The required capabilities for the web service functions. These required capabilities are listed when you add a function to the service. For more information about roles and capabilities, read the [[Gestionar roles]] documentation. | ||
Once done, the web service should be set up. Users should be able to [[ | Once done, the web service should be set up. Users should be able to [[Claves de seguridad|obtener una clave de seguridad personal]]. | ||
= | = Configuraciones alternativas = | ||
== Authorise only specific users== | == Authorise only specific users== | ||
| Línea 62: | Línea 62: | ||
Moodle indicates if some capabilities need to be assigned to an authorised user. Moreover if you click on the authorised user fullname, you can set up some specific options: ''IP restriction'' and ''Valid until''. | Moodle indicates if some capabilities need to be assigned to an authorised user. Moreover if you click on the authorised user fullname, you can set up some specific options: ''IP restriction'' and ''Valid until''. | ||
== | == Crar un [https://en.wikipedia.org/wiki/Token token] == | ||
[[Image:Create_token.jpg|thumb]] | [[Image:Create_token.jpg|thumb]] | ||
Esta característica le permite crear un [https://en.wikipedia.org/wiki/Token token] para un usuario específico. It can be useful if a user doesn't have the moodle/create:token capability. This is also the only way to create a [https://en.wikipedia.org/wiki/Token token] for an administrator. For security reason, tokens are not automatically generated in the administrator security keys page. | |||
# ''Settings > Site Administration > Plugins > Web services > Manage tokens'' | # ''Settings > Site Administration > Plugins > Web services > Manage tokens'' | ||
| Línea 74: | Línea 74: | ||
Finally, note that, as for authorised users, you can also set ''IP restriction'' and ''Valid until'' on a token. | Finally, note that, as for authorised users, you can also set ''IP restriction'' and ''Valid until'' on a token. | ||
== | == Vea también == | ||
*[http://www.joomdle.com/wiki/Preparing_Moodle_20#Setting_up_Moodle_Web_services Joomdle documentation about setting Moodle web services] | *[http://www.joomdle.com/wiki/Preparing_Moodle_20#Setting_up_Moodle_Web_services Joomdle documentation about setting Moodle web services] | ||
[[en:Using web services]] | [[en:Using web services]] | ||
Revisión del 14:54 9 abr 2018
Nota: Pendiente de Traducir. ¡Anímese a traducir esta página!. ( y otras páginas pendientes)
This document explains how an administrator can set up a web service for users to access a service. Each user will have a specific and unique security key (also known as a "token") to access the service.
Habilitar servicios web
- Access Settings > Site administration > Advanced features
- Check 'Enable web services' then click 'Save Changes'
Note: For security reasons, web services should only be enabled if you intend to make use of it.
Habilitar protocolos
Usually external applications that users wish to use dictate which protocols should be enabled.
- Access Settings > Site administration > Plugins > Web services > Manage protocols
- Enable the protocols (SOAP, REST, XMLRPC, AMF, ...) as required
Documentación acerca de funcioón de habilitar servicio web
Enabling web service function documentation (also on the Manage protocols page) results in user-specific web service documentation being available for each user on their Claves de seguridad page. This option is mainly useful to web service client developers. If nobody is creating a web service client, there is no need to enable this feature.
Crear un servicio
If none of the pre-build web services match your needs, you can create a custom service i.e. select which of the standard web service functions are available via that service.
You can enable only the specific functions that you need to expose, so not compromising on security.
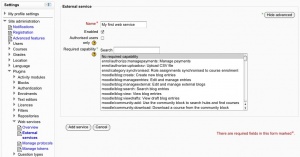
- Access Settings > Site administration > Plugins > Web services > External services
- Click Add new custom service
- 'Authorised users only' - If enabled, you will need to select the authorised users manually. Otherwise all users with appropriate permissions are allowed
- 'Required capability' - If enabled, any user accessing the web service will be checked against this selected capability. (This is just an additional optional security layer.)
- Enter a name and check Enabled
- Click the button 'Add service'
Adding functions to the service
Your service is currently empty and doesn't do anything. Web service functions need to be added. Your choice will be dictated by what you allow the external application to do. For this example, select 'Create group'.
- Click 'Add functions' link
- Select 'create group' function and click the 'Add functions' button
You should be back to the service functions list. 'Required capabilities' are indicated for each function. Users need the required capabilities to run a function. The function descriptions in the API Documentation can also give you more information about the required capabilities (Settings > Site administration > Plugins > Web services > API Documentation).
Habilitar capacidades
The final step is to grant appropriate permissions. The following capabilities should be allowed:
- moodle/webservice:createtoken - for allowing users to generate a security key
- webservice/rest:use, webservice/soap:use, webservice/xmlrpc:use, webservice/amf:use which match the enabled protocols.
- The service Required capability if set (Settings > Site administration > Plugins > Web services > Manage services >Edit link).
- The required capabilities for the web service functions. These required capabilities are listed when you add a function to the service. For more information about roles and capabilities, read the Gestionar roles documentation.
Once done, the web service should be set up. Users should be able to obtener una clave de seguridad personal.
Configuraciones alternativas
Authorise only specific users
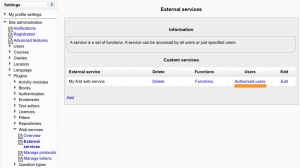
- Settings > Site Administration > Plugins > Web services > External Services
- Select Authorised users link (the service must have been set as Authorised users only in the Edit link)
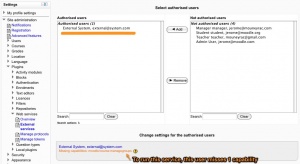
- Select some users and click Add
Moodle indicates if some capabilities need to be assigned to an authorised user. Moreover if you click on the authorised user fullname, you can set up some specific options: IP restriction and Valid until.
Crar un token
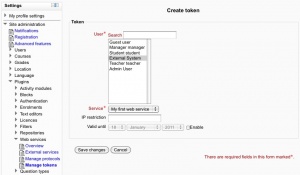
Esta característica le permite crear un token para un usuario específico. It can be useful if a user doesn't have the moodle/create:token capability. This is also the only way to create a token for an administrator. For security reason, tokens are not automatically generated in the administrator security keys page.
- Settings > Site Administration > Plugins > Web services > Manage tokens
- Click on Add
- Select the created user and service
- Click on Saves changes
As you created a token for this user, you do not need to assign "moodle/webservice:createtoken" to him/her. Finally, note that, as for authorised users, you can also set IP restriction and Valid until on a token.


