|
|
| (No se muestran 5 ediciones intermedias del mismo usuario) |
| Línea 32: |
Línea 32: |
|
| |
|
| ==Añadir imágenes a una etiqueta== | | ==Añadir imágenes a una etiqueta== |
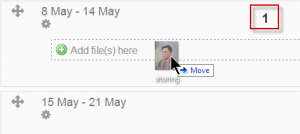
| If you already have a label available and are using the [[Atto editor]] you can drag and drop an image directly into the label. | | If you already have a label available and are using the [[Editor Atto]] you can drag and drop an image directly into the label. |
| *Alternatively, you can create a label as you drag an image directly onto the course page: | | *Alternatively, you can create a label as you drag an image directly onto the course page: |
| ** Turn on the editing and in the box that follows, choose 'Add image'. It will appear embedded in a label. | | ** Turn on the editing and in the box that follows, choose 'Add image'. It will appear embedded in a label. |
| Línea 38: |
Línea 38: |
|
| |
|
| {| | | {| |
| | [[File:dragdrop1.png|thumb|Drag an image onto your course page]] | | | [[File:dragdrop1.png|thumb|Arrastre una imagen hacia su página de curso]] |
| |[[File:dragdrop2.png|thumb|Choose "add image.."]] | | |[[File:dragdrop2.png|thumb|Elija "añadir imagen.."]] |
| |[[File:dragdrop3.png|thumb|And here it is!]] | | |[[File:dragdrop3.png|thumb|¡Y funciona!]] |
| |} | | |} |
| Note that if you cannot drag and drop images then ask your admin to check the site settings for Label.
| |
|
| |
| ==Adding text and links to a label==
| |
| As the label uses the [[Text editor]] it is straightforward to enter text, links and other required symbols and equations.
| |
|
| |
| There is an experimental setting which the administrator must enable in ''Administration > Site administration > Development > Experimental > Experimental settings'' which allows you to drag and drop text and links into labels.
| |
|
| |
| ===(Experimental) Drag and drop ===
| |
| ''Note: this does not work with IE, Safari 6 or below and is unreliable with Firefox''
| |
| *Drag and drop upload of text/links must be enabled in ''Administration > Site administration > Development > Experimental > Experimental settings''
| |
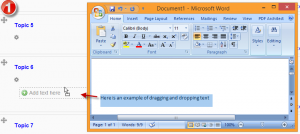
| * '''For text:''' Select the text you wish to use, for example in a Word document.
| |
| *With the editing turned on, drag the text over to the section you want it to appear.
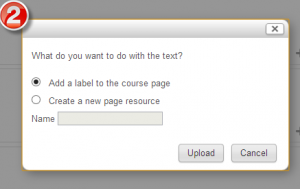
| |
| *From the box that appears, choose "add a label" and then "upload".
| |
| '''*For links:''' Open up a new window with the URL you wish to link to. Select the link in the browser bar.
| |
| *With the editing turned on, drag the URL over to the section you want it to appear.
| |
| *From the box that appears, name the link and then click "upload".
| |
|
| |
|
| {|
| |
| |[[File:textdragdrop1.png|thumb|Text selected from a Word document is dragged over]]
| |
| |[[File:textdragdrop2.png|thumb|Choose "add a label" (or page if you prefer)]]
| |
| |[[File:textdragdrop3.png|thumb|And here it is!]]
| |
| |}
| |
|
| |
|
| |
| {|
| |
| |[[File:linkdragdrop1.png|thumb|Select your URL]]
| |
| |[[File:linkdragdrop2.png|thumb|Name the link]]
| |
| |[[File:linkdragdrop3.png|thumb|Here it is!]]
| |
| |}
| |
|
| |
|
| |
| If you already have a label available and are using the [[Atto editor]] you can drag and drop an image directly into the label.
| |
| *Alternatively, you can create a label as you drag an image directly onto the course page:
| |
| ** Turn on the editing and in the box that follows, choose 'Add image'. It will appear embedded in a label.
| |
| **In the box that follows, choose "add image"
| |
|
| |
| {|
| |
| | [[File:dragdrop1.png|thumb|Drag an image onto your course page]]
| |
| |[[File:dragdrop2.png|thumb|Choose "add image.."]]
| |
| |[[File:dragdrop3.png|thumb|And here it is!]]
| |
| |}
| |
| Note that if you cannot drag and drop images then ask your admin to check the site settings for Label. | | Note that if you cannot drag and drop images then ask your admin to check the site settings for Label. |
|
| |
|
| ==Adding text and links to a label== | | ==Adding text and links to a label== |
| As the label uses the [[Text editor]] it is straightforward to enter text, links and other required symbols and equations. | | As the label uses the [[Editor de texto]] it is straightforward to enter text, links and other required symbols and equations. |
|
| |
|
| There is an experimental setting which the administrator must enable in ''Administration > Site administration > Development > Experimental > Experimental settings'' which allows you to drag and drop text and links into labels. | | There is an experimental setting which the administrator must enable in ''Administration > Site administration > Development > Experimental > Experimental settings'' which allows you to drag and drop text and links into labels. |
| Línea 99: |
Línea 59: |
| *With the editing turned on, drag the URL over to the section you want it to appear. | | *With the editing turned on, drag the URL over to the section you want it to appear. |
| *From the box that appears, name the link and then click "upload". | | *From the box that appears, name the link and then click "upload". |
|
| |
| {|
| |
| |[[File:textdragdrop1.png|thumb|Text selected from a Word document is dragged over]]
| |
| |[[File:textdragdrop2.png|thumb|Choose "add a label" (or page if you prefer)]]
| |
| |[[File:textdragdrop3.png|thumb|And here it is!]]
| |
| |}
| |
|
| |
|
| |
| {|
| |
| |[[File:linkdragdrop1.png|thumb|Select your URL]]
| |
| |[[File:linkdragdrop2.png|thumb|Name the link]]
| |
| |[[File:linkdragdrop3.png|thumb|Here it is!]]
| |
| |}
| |
|
| |
|
| |
| ***** TEXTO ANTIGUO ********
| |
| ===Arrastrar y soiltar imágenes===
| |
| ''Note: this does not work with IE 9, Safari 6 or below or earlier versions of Firefox)'' {{Nuevas características de Moodle 2.5}}
| |
| *Media drag and drop must be enabled in ''Administration > Site administration > Plugins > Activity modules > Label''
| |
| *With the editing turned on, drag your image into the section you want it to appear.
| |
| *In the box that follows, choose "add image"
| |
| *It will appear embedded in a label.
| |
|
| |
| {|
| |
| | [[File:dragdrop1.png|thumb|Arrastre una imagen hacia su página de curso]]
| |
| |[[File:dragdrop2.png|thumb|Elija "añadir imagen.."]]
| |
| |[[File:dragdrop3.png|thumb|¡Y funciona!]]
| |
| |}
| |
|
| |
| ===Método convencional===
| |
| *Follow the instructions for [[Configuraciones_de_módulo_etiqueta| añadir una etiqueta]]
| |
| *Click the image icon in the [[Editor_HTML|editor de texto]]
| |
| [[File:Imageinlabel.png]]
| |
| *Click "Find or upload an image"
| |
| *Choose and upload your image using the filepicker.(Details on how to do this [[Selector_de_archivos| aquí]])
| |
| *Leave Common module settings at "show" if you wish the label to be visible
| |
| *Click "Save and return to course"
| |
|
| |
| [[File:Labelbanner2.png]]
| |
|
| |
| ==Añadir texto a una etiqueta==
| |
| ===Método convencional===
| |
| As the label uses the [[Editor de texto]] it is straightforward to enter text and other required symbols and equations. It is however possible also to drag and drop text directly into a label.
| |
|
| |
| ===Arrastrar y soltar texto===
| |
| ''Note: this does not work with IE, Safari 6 or below and is unreliable with Firefox''
| |
| *Drag and drop upload of text/links must be enabled in ''Administration > Site administration > Development > Experimental > Experimental settings''
| |
| *Select the text you wish to use, for example in a Word document.
| |
| *With the editing turned on, drag the text over to the section you want it to appear.
| |
| *From the box that appears, choose "add a label" and then "upload".
| |
|
| |
|
| {| | | {| |
| Línea 156: |
Línea 66: |
| |} | | |} |
|
| |
|
| ==Añadir un enlace a una etiqueta==
| |
| ===Método convencional===
| |
| As the label uses the [[Editor de texto]] it is straightforward to click the "link" icon and enter your linked URL. It is however possible also to drag and drop links directly into a label.
| |
|
| |
| ===Arrastrar y soltar enlaces===
| |
| ''Note: this does not work with IE, Safari 6 or below and is unreliable with Firefox''
| |
| *Drag and drop upload of text/links must be enabled in ''Administration > Site administration > Development > Experimental > Experimental settings''
| |
| *Open up a new window with the URL you wish to link to. Select the link in the browser bar.
| |
| *With the editing turned on, drag the URL over to the section you want it to appear.
| |
| *From the box that appears, name the link and then click "upload".
| |
|
| |
|
| {| | | {| |
| Línea 172: |
Línea 72: |
| |[[File:linkdragdrop3.png|thumb|¡Y funciona!]] | | |[[File:linkdragdrop3.png|thumb|¡Y funciona!]] |
| |} | | |} |
|
| |
| ==Añadir sonido o video a una etiqueta==
| |
| If multimedia filters are enabled, a label is a neat way of displaying sound or video in an inline player on the course page.
| |
| *Follow the instructions for [[Configuraciones_de_módulo_etiqueta| añadiendo un aetiqueta]]
| |
| *Click the media icon in the [[Editor_HTML|editor de texto]]
| |
|
| |
| [[File:Addmedia.png]]
| |
|
| |
| *Click "Find or upload an sound,video or applet"
| |
| *Choose and upload your sound or video file using the filepicker.(Details on how to do this[[Selector_de_archivos| aquí]])
| |
| *Note: You can search youtube for a video to embed if your admin has enabled the youtube repository.
| |
| *Leave Common module settings at "show" if you wish the label to be visible.
| |
| *Click "Save and return to course"
| |
|
| |
| [[File:Videoinlabel.png]]
| |
|
| |
| ==Añadir código a una etiqueta==
| |
| An example of this is the ability to embed a Google map into a label.
| |
| *Follow the instructions for [[Configuraciones_de_módulo_etiqueta| añadir una etiqueta]]
| |
| *Expand the toolbar and click the HTML icon in the [[Editor_HTML|editor de texto]]
| |
|
| |
| [[File:Codelabel.png]]
| |
|
| |
| *This brings up the screen in code (HTML) view.
| |
| *Paste the code you grabbed from Google maps into this screen
| |
| *Scroll down and click "Update"
| |
| [[File:Addcode.png]]
| |
|
| |
| *Leave Common module settings at "show" if you wish the label to be visible.
| |
| *Click "Save and return to course"
| |
|
| |
| [[File:Googlemaplabel.png]]
| |
|
| |
| Note: The success in adding code to a label depends both on the type of code and the permissions of the user. (Details to follow)
| |
|
| |
|
| ==Vea también== | | ==Vea también== |
Nota: Urgente de Traducir. ¡ Anímese a traducir esta muy importante página !.
( y otras páginas muy importantes que urge traducir)
Esta página explora las maneras en que una Etiqueta puede ser usada en su curso Moodle.
Una etiqueta es un recurso versátil que puede servir como un espaciador entre recursos en una página de curso. Puede proporcionar un espacio para incrustar banners, archivos de sonido o video, o para mostrar código.
Añadir sonido o video a una etiqueta
If multimedia filters are enabled, a label is a neat way of displaying sound or video in an inline player on the course page.
- You can link to or upload audio and video from the media icon (1)
- With the Editor Atto you can record short audio (2) or video (3) clips directly into the label.
Añadir código a una etiqueta
Note: The success in adding code to a label depends both on the type of code and the permissions of the user.
An example of this is the ability to embed a Google map into a label.
- Go to Google maps (or wherever you can get your embed code and copy it.
- Follow the instructions for añadir una Etiqueta
- Expand the toolbar and click the code icon:
- This brings up the screen in code (HTML) view.
- Paste the code you got from Google maps (or other site) into this screen
- Click "Save and return to course"
Añadir imágenes a una etiqueta
If you already have a label available and are using the Editor Atto you can drag and drop an image directly into the label.
- Alternatively, you can create a label as you drag an image directly onto the course page:
- Turn on the editing and in the box that follows, choose 'Add image'. It will appear embedded in a label.
- In the box that follows, choose "add image"
 Arrastre una imagen hacia su página de curso |
|
|
Note that if you cannot drag and drop images then ask your admin to check the site settings for Label.
Adding text and links to a label
As the label uses the Editor de texto it is straightforward to enter text, links and other required symbols and equations.
There is an experimental setting which the administrator must enable in Administration > Site administration > Development > Experimental > Experimental settings which allows you to drag and drop text and links into labels.
(Experimental) Drag and drop
Note: this does not work with IE, Safari 6 or below and is unreliable with Firefox
- Drag and drop upload of text/links must be enabled in Administration > Site administration > Development > Experimental > Experimental settings
- For text: Select the text you wish to use, for example in a Word document.
- With the editing turned on, drag the text over to the section you want it to appear.
- From the box that appears, choose "add a label" and then "upload".
*For links: Open up a new window with the URL you wish to link to. Select the link in the browser bar.
- With the editing turned on, drag the URL over to the section you want it to appear.
- From the box that appears, name the link and then click "upload".
 El texto seleccionado desde un documento de Word es arrastrado |
 Elija "añadir una etiqueta" (o una página, si lo prefiere) |
|
Vea también
Using Moodle forum discussions:


