Paquetes para Instalación Completa para Windows
Nota: Pendiente de Traducir. ¡Anímese a traducir esta página!. ( y otras páginas pendientes)
En Moodle Downloads se encuentran disponibles paquetes para Instalación Completa. Estos paquetes están diseñados para instalaciones nuevas en un computador/servidor Windows, como puede ser una PC o un pequeño servidor, pero no se recomiendan para usarse en un sitio de producción. Para la instalación de un sitio en producción real en servidor, es una buena práctica llevar a cabo una instalación manual (vea la sección de instalación manual en Instalación).
Este documento proporciona instrucciones para el uso de los paquetes Windows. Las instrucciones para paquetes Mac OS X están disponibles en Paquetes de Instalación Completos para Mac OS X.
Después de la instalación del paquete Windows, puede ver que hay otras descargas (como módulos adicionales y plugins), que pueden ofrecer mayor personalización de archivos de configuración.
Los paquetes para instalación completa permiten instalar tanto Moodle como los requerimientos para que funcione como son: un servidor web, base de datos y otros (Apache, MySQL y PHP, una herramienta administrativa, phpMyAdmin en este caso); todo envuelto en un shell Xampp-lite. Se encuentran disponibles varias versiones del paquete para instalación completa. Las intrucciones en la página de descargas le sirven de guía acerca de cuál versión es probablemente la más apropiada.
En resumen, los paquetes para instalación completa están diseñados para crear un servidor web y un sitio Moodle compatibles dentro de una computadora independiente con el mínimo de esfuerzo.
Nota: Las componentes de la última versión del paquete para la instalación completa, pueden no ser compatibles con versiones anteriores. Siempre revise la compatibilidad de la versión de cada componente si intenta desarrollar materiales en una versión de Moodle posterior a la que estuviera instalada en su sitio "principal" de Moodle. En resumen, los paquetes para instalación completa están diseñados para una primera instalación en una máquina "limpia".
Requisitos del sistema
 + 256 MB RAM (mínimo), 512 MB RAM (recomendado)
 + 160 MB de espacio libre en disco (se requerirá más espacio en función de los archivos que se requiera subir)
 + Windows 98/ME (mínimo)
 + Windows NT/2000/XP (recomendado)
Proceso para Instalar el Paquete Completo
El paquete de instalación completo es un archivo ZIP que contiene un servidor web llamado Apache, además de la BasedeDatos MySQL y el programa PHP que necesita Moodle.
Hay tres partes básicas del proceso de instalación: 1. Descarque y descomprima el paquete de instalación completo. 2. Inicie el servidor web. 3. Instale Moodle usando un navegador web.
Primero cree la estructura de archivos
Descargue el paquete
Download Windows packed-zip file from Moodle.
Descomprima el paquete
Unpack (extract files by clicking on) the zip file you downloaded to a drive or partition of your choice. The extract process will create three files ("Start Moodle", "Stop Moodle", and "README") and a subfolder called "server".
- Do NOT rename the "server" subfolder
- Note: There will also be a folder under this server subfolder, called \moodle that holds the Moodle program.
- TIP: Create a folder and extract the files there. For example, you might have one folder called Moodle193 and another one called Moodle187 for different versions or purposes.
- TIP: Make path to "server" subfolder simple. Best way if it will be in drive root. Like "D:\moodle193\server". A long path, especially with any strange symbols, can prevent XAMPP from working properly.
Segundo - inicie el servidor web
Now you are ready to start the webserver. Use the "Start Moodle.exe" file which you should find in the top directory. Once the "Start Moodle.exe" program is open, don't close it; use "Stop Moodle.exe" for that purpose.
- Note: These programs control both Apache and MySQL programs that operate the webserver. Some sites will individually start and stop Apache and MySQL with the Xampp bat files found in the "server" subfolder.
- Tip: Alternatively, on a standalone computer with several potential webservers that might be running, you can use the "xampp_restart.exe" file in the "server" subfolder.
- Tip: You can also add shortcuts to the commands that start and stop the site in your Windows "start" menu.
Now you are ready to start the Moodle installation.
- Warning: Windows XP requires the msvcr71.dll library file in order to run Xampp. Installing the .Net 1.1 framework (not .Net 2.0 and upper) could resolve it. You can also search for the file on Google, download it and copy it into the server/apache/bin folder.
Tercero - inicie la instalación de Moodle
Start your web browser and type localhost, or http://127.0.0.1 or http://localhost in the address bar. You will either start your first time Moodle installation or if it is already installed you will enter the Moodle site's Front Page or Login screen.
- Tip: After Moodle installs, put the site in your "favorites" or as a "bookmark" in you browser.
Configurar Idioma
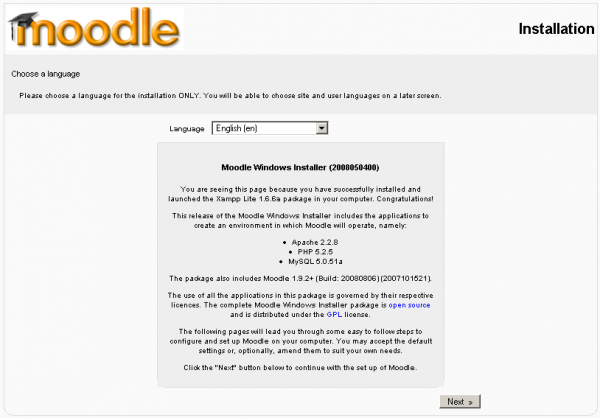
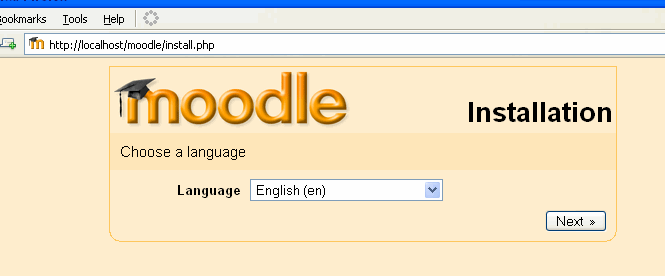
The initial install page will be displayed after you type "localhost".
- Choose your preferred language (English is used in this example) and click the “Next” button.
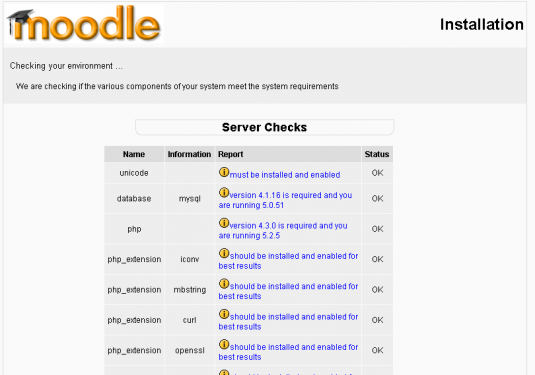
Diagnostic results
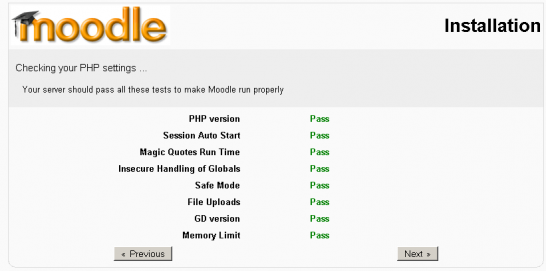
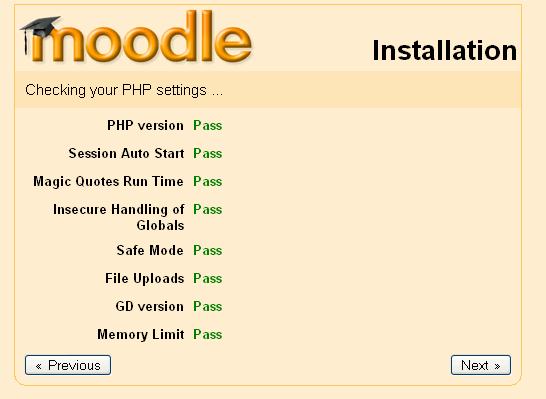
A diagnostic report is displayed – hopefully it will look like this, if not you may need to address some issues.
- Click the “Next” button to continue.
Moodle paths
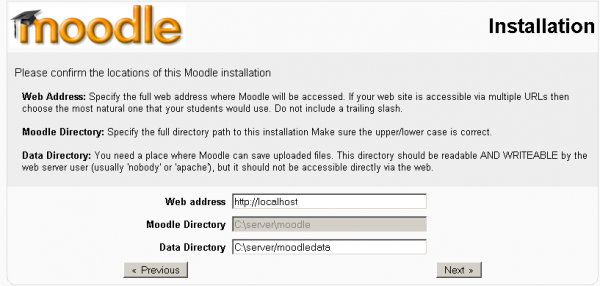
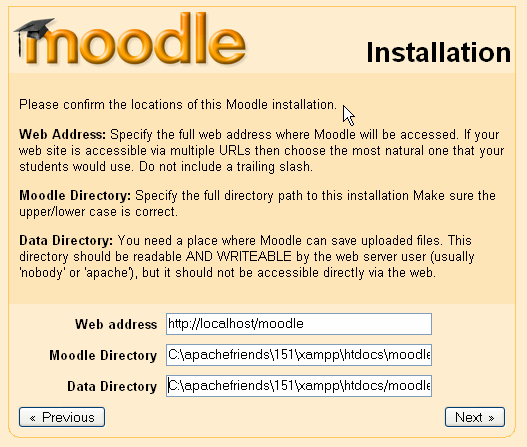
The paths for your Moodle installation are shown – if you are only using this as a local testing server, accept the ones that are shown on your screen.
What you enter in the "Web Address" field depends on what you intend to use the new Moodle installation for. If you are just going to use it for local testing, then use 'http://localhost'. If you are going to test the new installation on a LAN, and will be accessing it from other machines on that LAN, then put the private IP address or network name of the serving machine, followed by a forward slash and moodle: Web Address - http://192.168.1.1/moodle If you are going to test the installation on the internet, then you will need to put the public ip address followed by a forward slash and moodle: http://your_ip_address/moodle or you can put your domain name here instead.
- Click the “Next” button to continue.
Database configuration
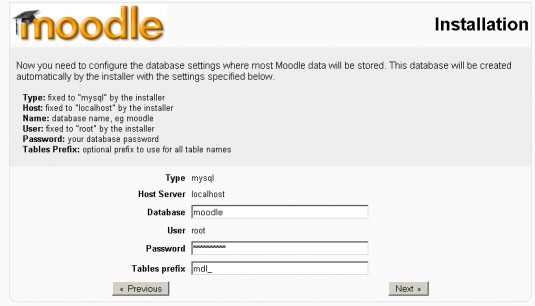
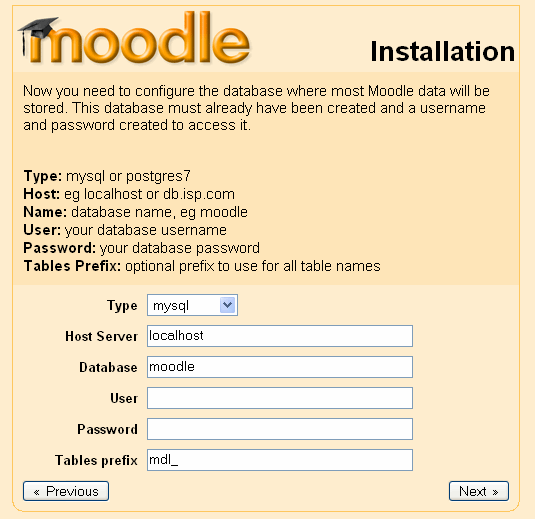
- In the next fields, we enter the database settings. The fields are populated with some suggested values.
- We strongly recommend you place a user name and password in this screen. (Don't forget them).
- DO NOT USE THE “ROOT” USER WITHOUT A PASSWORD FOR PRODUCTION INSTALLATIONS AS THIS CREATES A SECURITY VULNERABILITY
- When the fields have been populated, click the “Next” button to continue.
Check server
The install process checks the server it installed.
- Click the “Next” button to continue.
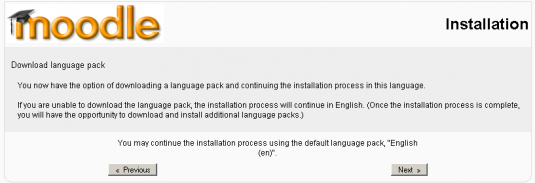
Confirm initial language pack
Moodle will now check to see if the language pack is available for the language you selected at the first step. If it is not, Moodle will continue with the install in English.
Confirm config.php
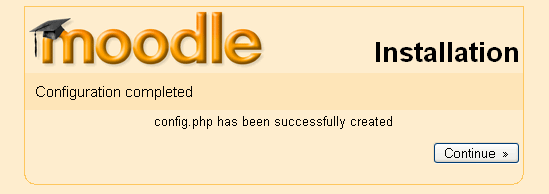
Provided the Moodle folder is writable, a message confirming the configuration has been completed will be displayed.
- Click the “ Continue” button to proceed.
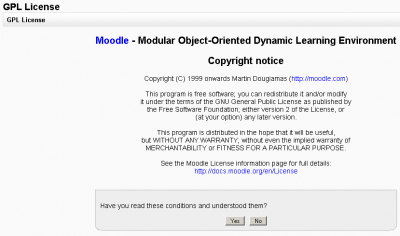
Moodle copyright & agreement
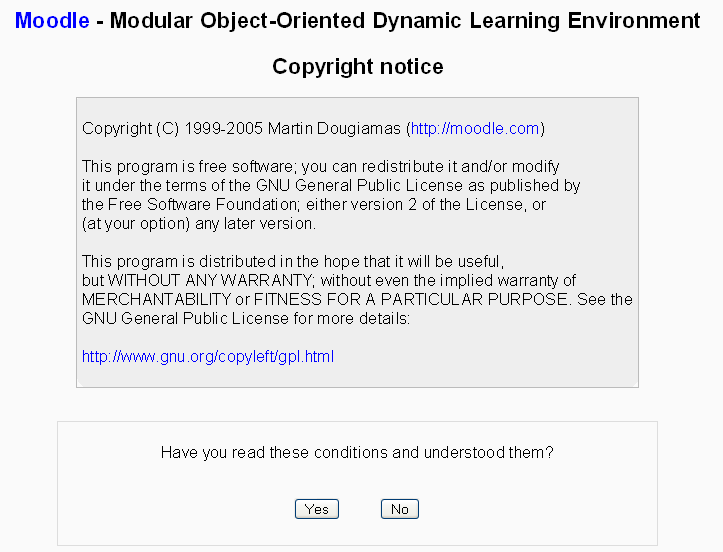
The Moodle copyright / license notices are displayed.
- Click the “Yes” button to continue.
Current release and unattended option
The current release information is shown. Check off the unattended operations box. This will automatically advance through many screens. If you would like to watch the install screen by screen, do not check this box and be prepared to press the "continute button" many times.
- Click the "Continue" button and wait.
Installation modules and blocks screens
In most cases this will be followed by a series of screens that have a continue button on the bottom. This process stops with Admin user profile settings which needs to be filled out.
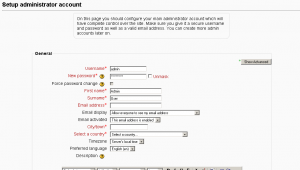
Perfil del usuario Administrador
Fill out the required fields.
- Click on "Save" to continue
Configuraciones de la Portada
The next screen is the Front Page settings page. There are two parts to it. The first part will ask for your Full site name and a short name for the navigation bar. There is also a place for a description. You can change these later.
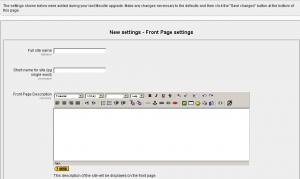
The second part on the bottom instructs Moodle if you will disable the new user self authentication through email process. The default is to disable. This can be changed later in the site administration block.
- Click on "Save changes" button to go to Moodle sites home page.
Moodle activado
Now you are ready to Moodle !
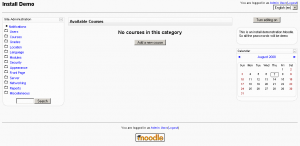
The Site Administration block is on the left, the "Turn edit on" button in the upper right corner, withe the site description block just below it.
Felicitaciones - Moodle ha sido instalado
This finishes the installation of a complete package. Type http://localhost (or what ever you set for web address earlier in the setup!) in your browser and Moodle will open.
Your next task will be to configure Moodle to meet your needs. Don't worry, it is easy to change any of the settings now that Moodle is up and running.
- Check Settings > Site administration for further links.
Más sugerencias y precauciones
- For installation on a Windows 2000 or Windows 2003 production server it is good practice to perform a manual install (see the manual installation section in Windows Installation).
- After installing the Windows package, you may wish to add additional contributed modules and plugins. Theset may involve more customization of configuration files.
- The latest complete install package version components, may not be backwardly compatible. Always check version compatibility of each component if you intend to develop materials on a later version of Moodle than the version installed on your "main" Moodle site. In short, complete install packages are designed for first time install on a "clean" machine.
Asuntos de seguridad (¡LECTURA OBLIGATORIA!)
As mentioned before, XAMPP is not meant for production use but only for developers in a development environment. The way XAMPP is configured is to be open as possible and allowing the developer anything he/she wants. For development environments this is great but in a production environment it could be fatal. Here a list of missing security in XAMPP:
The MySQL administrator (root) has no password. The MySQL daemon is accessible via network. phpMyAdmin is accessible via network. Examples are accessible via network.
To fix most of the security weaknesses simply call the following URL:
http://localhost/security/
The root password for MySQL + phpMyAdmin and also a XAMPP directory protection can be established here.
Note that on the Windows installer package, some (all?) of these issues have been fixed already by default and the above link does not work.
If in doubt, more info is here
Ajustes de Apache y MySQL
Most of the time it is not necessary to tweak Apache or MySQL after completing the complete install package. Nor is it necessary to individually start and stop them because that is what the Xampp_start, Xampp_restart and Xammp_stop files are for.
Instalación de Apache y MySQL como servicios
(This is only for NT4 | Windows 2000 | Windows XP operating systems)
\xampplite\apache\apache_installservice.bat = ==> Install Apache 2 as service
\xampplite\apache\apache_uninstallservice.bat = ==> Uninstall Apache 2 as service
\xampplite\mysql\mysql_installservice.bat = ==> Install MySQL as service
\xampplite\mysql\mysql_uninstallservice.bat = ==> Uninstall MySQL as service
==> After all Service (un)installations, please restart your system!
Notas sobre Apache
You can use the apache_start and apache_stop bat files to start and stop apache from running. However the Xampp_start or Xampp_restart and Xampp_stop is recommended to turn on/off both Apache and MySQL.
Solución de problemas
If you find that Apache is very flaky, with the page often not loading properly or even at all (especially on localhost), try adding these lines to the end of C:\your_moodle_installer_directory\apache\conf\httpd.conf
 EnableSendfile Off
 EnableMMAP Off
 Win32DisableAcceptEx
If You edit some .php files but browser still show old state of them, try to disable eAccelerator extension in \server\php\php.ini
[eAccelerator]
;extension=eaccelerator.dll
Notas sobre MySQL
Again, the recommendation to start and stop the entire webserver is to use the xampp_start or Xampp_restart and the Xampp_stop. The following maybe useful if you wish to tweak the system further. Please be careful.
(1) The MySQL server can be started by double-clicking (executing) mysql_start.bat. This file can be found in the same folder you installed xampp in, most likely this will be C:\xampplite\. The exact path to this file is X:\xampplite\mysql_start.bat, where "X" indicates the letter of the drive you unpacked xampp into.This batch file starts the MySQL server in console mode. The first intialization might take a few minutes.
Do not close the DOS window or you'll crash the server! To stop the server, please use mysql_shutdown.bat, which is located in the same directory.
(2) To use the MySQL Daemon with "innodb" for better performance, please edit the "my" (or "my.cnf") file in the /xampplite/mysql/bin directory or for services the c:\my.cnf for windows NT/2000/XP. In that director, activate the
"innodb_data_file_path=ibdata1:30M"
statement. Attention, "innodb" is not recommended for 95/98/ME.
- To use MySQL as Service for NT/2000/XP, simply copy the "my" / "my.cnf" file to C:\my, or C:\my.cnf. Please note that this file has to be placed in C:\ (root), other locations are not permitted. Then execute the "mysql_installservice.bat" in the mysql folder.
(3) MySQL starts with standard values for the user id and the password. The preset user id is "root", the password is "" (= no password). To access MySQL via PHP with the preset values, you'll have to use the following syntax:
mysql_connect("localhost","root","");
If you want to set a password for MySQL access, please use of mysqladmin. To set the password "secret" for the user "root", type the following:
\xampplite\mysql\bin\mysqladmin -u root password secret
After changing the password you'll have to reconfigure phpMyAdmin to use the new password, otherwise it won't be able to access the databases. To do that, open the file config.inc.php in \xampplite\phpmyadmin\ and edit the following lines:
   $cfg['Servers'][$i]['user']            = 'root';   // MySQL user
   $cfg['Servers'][$i]['auth_type']       = 'http';   // HTTP authentificate
So first the 'root' password is queried by the MySQL server, before phpMyAdmin may access.
Have a lot of fun! Viel Spaß! Bonne Chance!
Vista y Windows 7
Many people have trouble installing the packages for Windows on Vista and Windows 7.
One simple solution is to use http://bitnami.org/stack/moodle (from amazon.com).
Vea también
- Installation guide - Moodle 1.9 for Windows on a USB Memory Stick
- Return to Windows installation
- Multiple web servers, on 1 computer similar to windows installation page, with some tips
- Troubleshootingif you are running Skype.
- Installing_AMP lots of XAMPP stuff. XAMPP stands for X (cross platform), Apache, MySQL,PHP and Perl. XAMPP used in Moodle does not include Perl. MAMP stands for Mac, Apache, MySQL and PHP.
- Complete Install Packages for Mac OS X
Primero instale Apache, MySQL, PHP
Paso 1: Descargue el archivo comprimido zip desde Moodle.
Paso 2: Descomprima el archivo que descargó, en un disco o partición de su elección y permita que se cree de manera predeterminada C:\moodle o W:\moodle o algo parecido. En este punto es una buena recomendación que renombre su carpeta C:\moodle a algo como C:\Web or C:\Xampplite. Habrá otra carpeta bajo este nivel llamada \moodle.
Paso 3: Corra el archivo "setup_xampp.bat" que se encuentra en el folder principal. esto configurará Xampplite. Nota: XAMPP no le genera entradas en el registro de Windows ni hace ajustes a las variables del sistema.
Paso 4: Ahora ya está listo para iniciar su servidor web. Use el archivo Xampp_start. Una vez que esté abierto no lo cierre, para terminar el servicio se debe usar el archivo Xampp_stop. Los programas de Xampp controlan ambos: Apache y MySQL. Alternativamente usted puede iniciar o detener de manera individual Apache y MySQL con los archivos bat que se encuentran en la carpeta principal, tal como C:\xampplite.
Paso 5: Inicie su navegador y teclée http://127.0.0.1 or http://localhost en la barra de direcciones. Usted comenzará su primera instalación Moodle , o si ya se encontrara instalada, entrará a su página inicial.
Comenzar la instalación de Moodle
- En su navegador teclée en la barra de direcciones, la ruta hacia el directorio que contiene los archivos de Moodle - en este ejemplo sería http://localhost/moodle, en el ejemplo de arriba sería http://localhost.
- Se despliega la página inicial de instalación.
- Escoja el idioma de su preferencia (En este ejemplo se emplea el Inglés) y pulse el botón "Next" (continuar, o siguiente).
- Se despliega un reporte de diagnóstico – esperamos que se vea así, de otra manera deberá necesitar arreglar algunos elementos. REVISAR: hopefully it will look like this, if not you may need to address some issues.
- Oprima el botón "Next" para continuar.
- Se muestran las rutas para la instalación de Moodle - acepte las que se muestran en su pantalla.
- Oprima el botón "Next" para continuar.
- En esta pantalla ingresamos los ajustes de la base de datos. En los campos se encuentran algunos valores sugeridos
- Recomendamos fervientemente que usted coloque un usuario y contraseña en esta pantalla (No olvide estos datos).
- NO UTILICE EL USUARIO "ROOT" SIN UNA CONTRASEÑA PARA INSTALACIONES DE PRODUCCIÓN PUES ESTO CREA UNA VULNERABILIDAD DE SEGURIDAD.
- Una vez que llene los campos, oprima "Next" para continuar.
- Teniendo en cuenta que la carpeta Moodle tiene permiso de escritura, se despliega un mensaje confirmando que la configuración se ha completado.
- Oprima el botón “ Continue” para proseguir.
Se despliegan las noticias de licencia y derechos de Moodle.
- Oprima en el botón "Yes" para continuar. En la mayoría de los casos lo que sigue son una serie de pantallas con un botón de "continuar" en la parte inferior.
Felicidades
Con esto se termina la instalación del paquete completo. Teclée http://localhost en su navegador y se abrirá Moodle.
Su siguiente tarea será la configuración de Moodle. Vea Documentación para Administradores. No se preocupe, es fácil cambiar cualquiera de los ajustes una vez que Moodle esté en operación.
Instalando Apache y MySQL como servicios
(Esto es solamente para los sistemas operativos NT4 | Windows 2000 | Windows XP )
\xampplite\apache\apache_installservice.bat = ==> Instala Apache 2 como servicio
\xampplite\apache\apache_uninstallservice.bat = ==> Desinstala Apache 2 como servicio
\xampplite\mysql\mysql_installservice.bat = ==> Instala MySQL como servicio
\xampplite\mysql\mysql_uninstallservice.bat = ==> Desinstala MySQL como servicio
==> Después de todas las instalaciones/desinstalaciones, por favor ¡Reinicie su sistema!
Cuestiones de Seguridad (¡NO DEJE DE LEER ESTO!)
Como se mencionó anteriormente, XAMPP no es idóneo para producción sino solamente para desarrolladores en un ambiente de diseño. XAMPP está configurado en la forma más abierta posible permitiendo al desarrollador cualquier cosa que quiera realizar. Para ambientes de desarrollo esto es genial, pero en un ambiente de producción puede ser fatal. Aquí hay una lista de carencias en la seguridad de XAMPP:
El administrador de MySQL (root) no tiene contraseña.
El daemon MySQL es accesible desde la red.
phpMyAdmin es accesible desde la red.
Los Ejemplos son accesibles desde la red.
Para corregir la mayoría de las vulnerabilidades, simplemente llame a la siguiente URL:
Aquí se pueden establecer las contraseñas para root de MySQL y phpMyAdmin, así como la protección del directorio XAMPP
Notas sobre Apache
Usted debe emplear los archivos apache_start y apache_stop para ejecutar y para detener la ejecución de apache.
Notas sobre MySQL
(1) El servidor de MySQL se puede iniciar pulsando dos veces (ejecutando)
   mysql_start.bat. Este archivo por lotes se puede encontrar en la misma carpeta donde instaló xampp, muy
   probablemente será C:\xampplite\.La ruta exacta para este archivo es X:\xampplite\mysql_start.bat, donde
   "X" indica la letra de la unidad en la cual descomprimió xampp.
   Este archivo por lotes arranca el servidor MySQL en modo de consola. La primera
   inicialización podría tomar unos pocos minutos.

   ¡No cierre la ventana DOS pues colapsará el servidor!
   Para detenerlo, use por favor el archivo mysql_shutdown.bat, el cual se localiza en el mismo
   directorio.
(2) Para usar el Daemon de MySQL con "innodb" para un mejor desempeño,
   edite por favor el archivo "my" (o "my.cnf") en el directorio /xampplite/mysql/bin
   o para servicios, el c:\my.cnf para windows NT/2000/XP.
   Estando ahí, active la declaración "innodb_data_file_path=ibdata1:30M".
   Atención: "innodb" no es recomendable para 95/98/ME.

   Para usar MySQL como Servicio para NT/2000/XP, simplemente copie el archivo "my"
   / "my.cnf" a C:\my, or C:\my.cnf. Note por favor que este
   archivo se tiene qué colocar en C:\ (raíz), no sepermiten otras ubicaciones. Luego
   ejecute el archivo "mysql_installservice.bat" en la carpeta mysql.
(3) MySQL se inicia con valores estándar para el usuario y la contraseña. El identificador de
   usuario predefinido es "root", la contraseña es "" (= sin contraseña). Para acceder a MySQL mediante PHP
   con los valores predeterminados, deberá emplear la siguiente sintaxis:
   mysql_connect("localhost","root","");
   Si desea establecer una contraseña para el acceso a MySQL, por favor use mysqladmin.
   Para establecer la contraseña "secret" para el usuario "root", teclée lo siguiente:
   \xampplite\mysql\bin\mysqladmin -u root password secret

   Después de cambiar la contraseña deberá reconfigurar phpMyAdmin para usar la
   nueva contraseña, de otra manera no podrá accesar a las bases de datos. Para ello,
   abra el archivo config.inc.php en \xampplite\phpmyadmin\ y edite las
   líneas siguientes:

   $cfg['Servers'][$i]['user']            = 'root';   // MySQL user
   $cfg['Servers'][$i]['auth_type']       = 'http';   // HTTP authentificate
   De esta manera se requerirá primero la contraseña de 'root' para el servidor MySQL, antes de
   que se pueda accesar a phpMyAdmin.
¡Que se divierta! Have a lot of fun! Viel Spaß! Bonne Chance!
See also
- for links that help configure Moodle.
- Moodle 1.9 for Windows on a USB Memory Stick
- Return to Windows installation
- Troubleshootingif you are running Skype.
- Instalación AMP lots of XAMPP stuff. XAMPP stands for XP, Apache, MySQL,PHP and Perl. XAMPPlite does not include Perl. MAMP stands for Mac, Apache, MySQL and PHP.
