ELIS Campos personalizados
Nota: Pendiente 2. ¡Corresponden a complementos (add-ons) y serán traducidas después de traducir la documentación del núcleo de Moodle!. (otras páginas pendientes)
Many users have expressed a need to add new information fields to different places in ELIS, such as Programs, Course Descriptions, Tracks, User Sets, and user profiles. Some of the uses for custom fields have included Program and/or Course Description meta-data, as required books, assessment types, expiration dates, etc. For Class Instances custom fields might include room numbers, days of the week, directions, etc. Class Instance custom fields can also be used in the new Class Instance Request block.
User custom fields might add user data not in the standard form (for example Job Title or work skills) and these can be used for User Set assignment, as well as in the Profile Update survey.
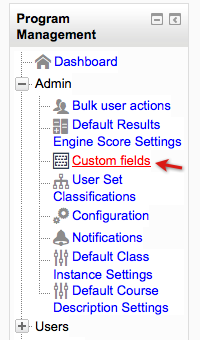
The Custom Fields screen enables the creation of fields for:
- Program
- Track
- Course Description
- Class Instance
- User
- User Set
When a custom field is added to one of these areas it will be shown on the adding/editing screens.
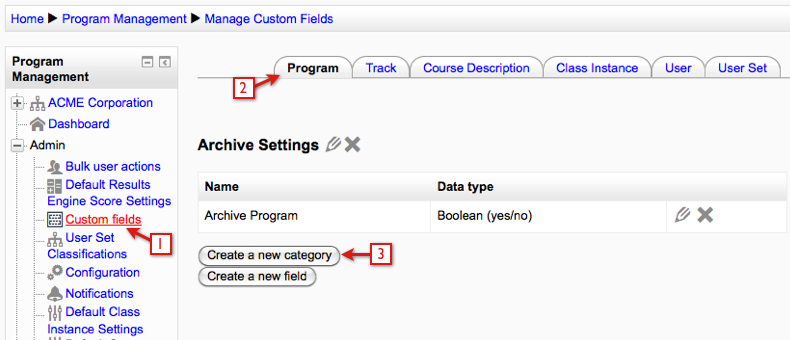
To add a new custom field, click on the tab for the ELIS Context you would like to add a field for. In the example below we will add a couple of new fields to the Program Context.
First we need to create a category to put the new fields in, so we click the "Create a new category" button.
Then we enter a name for the category and click the "Save Changes" button.
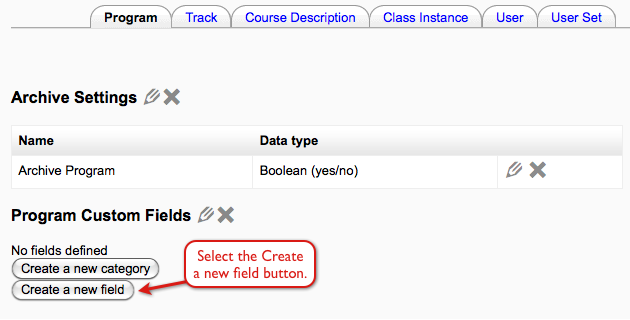
After a category is created there is a new button for creating a new field. Select the "Create a new field" button to fill in the custom form information.
In the following images the "Show more + " link was selected, it is located at the bottom of each section of the form.
- We'll need a 'short name' - this name will identify the field programatically. It must be a unique name, if you enter a name that is used elsewhere you will get an error.
- Next enter the "Name" for the field - this is the name usually shown to general users, and does not have to be unique.
- Select the Category for the new field.
- Then enter some optional information about the field.
Next, we'll choose the data type for the field - this is the kind of data users (who have permission to edit the ELIS Context - in this case the Program) can enter or edit for the Program. There are six different data types.
- Long text is an information field, with HTML.
- Short text is a single line of text, without HTML
- Integer is a number without decimals - for example "1"
- Decimal this is a number with decimals - for example "1.1"
- Boolean - this is a "Yes/No" choice radio button
- Date/Time - Date/Time are chosen using drop down menus.
Next we choose how the field can be edited. In the image below the "Show Advanced" button was selected for the Manual editing section. The entries for "Who can edit/view this field" are only shown in the advanced settings.
- Some fields might be entirely hidden, and only for reporting purposes. If this field is meant to be visible by any user, select "Allow viewing/editing".
- If the field is required on the context (Program, track, Course Description, Class Description, User Set, or user creation/editing tab) then check "Is this field required".
- With the the "Who can edit this field" drop down menu, you can select which users can edit the values of the field - these are users who are in a role in the context with the described permission. For example, if you create a Program Administrator role, and one of the permissions given to that role is permission to edit Programs, then any user in that role in the current Programs can edit the values of the field. This setting enables site administrators to finely tune who can edit which fields.
- Similarly, the "Who can view this field" menu controls which users can view the values in the field.
- Next, we set what type of input the field will have (text, checkbox, etc.).
- Enter the source for the menu options. The options are listed in the following bullet points. The first two options are included with each field, the other options are an additional option with some types of custom fields, e.g., Class Description fields.
- Manually entered list (below) - this option is referring to the menu option list shown by #7 in the image.
- Moodle themes - this selection provides a drop down menu of the Moodle themes on the site. A default theme can be selected when creating/editing the custom field.
- Completion elements - this option is available with Course Description/Class Instance custom fields only.
- User Set Classifications - this option is available with User Set custom fields only.
- For inputs with multiple options (like a drop down menu) you can specify the options here by typing the options with each option on it's own line. For example, to enter options "blue" and "red", type "blue" then select Enter to go to the next line and type "red".
- For text inputs you can control the size of the text input fields.
Note: sections of the custom field editing form become active/inactive depending on the data type chosen. For example, in below a Boolean data type is chosen for the custom field (1)
Incompatible options are disabled (2). If we select "short text" for the Data type then the menu options would be active, and then a checkbox for "blue" or "red" could be selected for this field.
In another example we can see how a menu of choice field can be created.
When the above form is viewed in the Program setup page, the user can select from a list of choices when setting up the Program.
Custom fields in other contexts are setup similarly. For example, the following image is showing the User tab. User fields are created from an existing Moodle profile field.
When creating the custom user field all the Moodle profile field information is automatically added to the form. The last setting on the screen is for synchronization between the Moodle profile field and the ELIS custom user field. In the following image this setting is set to "Use values from Moodle".
This means that any values entered for this Moodle profile field will update the associated ELIS custom user field when the cron runs. For example, if I enter the value PM1 for a user's Project Management Level Moodle profile field, it will update their Project Management Level custom user field in ELIS with the same value.
Once a field has been setup, you can edit the field by clicking the edit icon, or delete the field by clicking the delete icon.
- Click this to edit the category
- Click this to delete the category and all fields
- Click this to to edit the field
- Click this to delete the field
Finally, when setting up new items in a context, such as new Programs, users, etc. the custom fields are now available on the setup form. Reports can be generated using the custom fields, and in currently two cases they are used in custom forms - one the Profile Update Survey which enables users to update their profile information, and allows site administrators to require profile updates on a regular basis. They other tool that currently uses the custom fields is the Class Request block, which can be used to gather Class Instance meta-data from the user requesting a Class Instance.


