Diferencia entre revisiones de «Construyendo una lección»
De MoodleDocs
m (tidy up) |
(tidy up) |
||
| Línea 18: | Línea 18: | ||
[[File:importquestions.png]] | [[File:importquestions.png]] | ||
===Importar un | ===Importar un [[PowerPoint]]=== | ||
* | *Usted tendrá esta configuración solamente si su Moodle 2.3 fuera de fecha anterior a Octubre 18 del 2012. Ha sido eliminada porque no funcionaba bien. (MDL-21801) Vea [[Importar PowerPoint]] para alternativas. | ||
===Añadir un cluster=== | ===Añadir un ''cluster''=== | ||
*A cluster is a group of question pages which will be offered randomly to a student as they work through the lesson.It is best if you have made the question pages beforehand and can then decide where to mark the start and end of the cluster. The start is marked by a "cluster" page and the end by an "end of cluster" page. See [[Clusters]] for more information. | *A cluster is a group of question pages which will be offered randomly to a student as they work through the lesson.It is best if you have made the question pages beforehand and can then decide where to mark the start and end of the cluster. The start is marked by a "cluster" page and the end by an "end of cluster" page. See [[Clusters]] for more information. | ||
| Línea 34: | Línea 34: | ||
*The title in a content page is also used with the "display left menu" setting. | *The title in a content page is also used with the "display left menu" setting. | ||
==== | ====Contenidos de la página==== | ||
* | *Aquí es donde el profesor puede añadir información paar el estudiante, usando el [[Editor de texto]] y sus características de multimedia. | ||
====Contenido==== | ====Contenido==== | ||
* | *Aquí es donde el profesor escribe las palabras que desea que el alumno elija para continuar a la parte siguiente de la lección. | ||
* | *Estas palabras le aparecerán añ estudiante como un botón. | ||
* | *El profesor puede elegir la casilla parq ue los botones aprezcan horizontalmente, o dejarla sin seleccionar para que aparezcan centradas verticalmente. | ||
====Formato==== | ====Formato==== | ||
| Línea 47: | Línea 47: | ||
[[File:lessoncontentbuttons.png]] | [[File:lessoncontentbuttons.png]] | ||
==== | ====Número de opciones disponibles==== | ||
*How many of these you have depends on your choice in the ''Maximum Number of Answers'' setting in [[Configuraciones de lección]] | *How many of these you have depends on your choice in the ''Maximum Number of Answers'' setting in [[Configuraciones de lección]] | ||
==== | ==== El Salto ==== | ||
*Each Description in a Content page has a Jumps menu. "Jumps" take a student from one page to another. | *Each Description in a Content page has a Jumps menu. "Jumps" take a student from one page to another. | ||
*A "relative jump" is "next page" or "end of lesson" whereas an "absolute jump" gives the actual name of a page. | *A "relative jump" is "next page" or "end of lesson" whereas an "absolute jump" gives the actual name of a page. | ||
| Línea 84: | Línea 84: | ||
*The student is given a sentence and must decide if it is true or false. | *The student is given a sentence and must decide if it is true or false. | ||
== | ==Moviendo su lección hacia adelante== | ||
*Once you have added your first content or question page, you reach the next screen which displays your page title/type/jumps (ie where the responses take the student to) and actions you can take next: | *Once you have added your first content or question page, you reach the next screen which displays your page title/type/jumps (ie where the responses take the student to) and actions you can take next: | ||
[[File:lessonactions.png]] | [[File:lessonactions.png]] | ||
| Línea 93: | Línea 93: | ||
*Note the different view options: | *Note the different view options: | ||
==== | ====Vista colapsada==== | ||
*This gives a brief outline of the lesson structure as in the two screenshots above. | *This gives a brief outline of the lesson structure as in the two screenshots above. | ||
==== | ====Vista expandida==== | ||
*This shows more detail as in the screenshot below: | *This shows more detail as in the screenshot below: | ||
[[File:expandedview.png]] | [[File:expandedview.png]] | ||
== | ==Terminando su lección== | ||
* | *Para cerrar la lección, elija la opción de "Fin de Lección" del menú de salto en cualquier página relevante. | ||
* | *El estudiante verá entonces un mensaje genérico como el de la pantalla siguiente, con una dirección de regreso al menú principal o para ver sus calificaciones: | ||
[[File:endoflesson1.png]] | [[File:endoflesson1.png]] | ||
[[Category:Lección]] | |||
[[de:Lektion erstellen]] | [[de:Lektion erstellen]] | ||
[[ja:レッスンの作成]] | [[ja:レッスンの作成]] | ||
[[en:Building Lesson]] | [[en:Building Lesson]] | ||
Revisión del 17:49 28 ene 2014
Nota: Pendiente de Traducir. ¡Anímese a traducir esta página!. ( y otras páginas pendientes)
Esta página es acerca de cómo estructurar una lección de Moodle una vez que Usted la haya creado con las Configuraciones de lección. Para información acerca de cómo emplear mejor una lección de Moodle y cómo la ven los estudiantes, vea Usando lección
Planeando su lección
- Una lección se compone de páginas que pueden tener contenido para el estudiante lea o preguntas para que responda. Las preguntas pueden ser creadas o importados por el profesor . El profesor decide el orden en que aparecen estas páginas.
- Usted debe tener una idea clara de lo que desea lograr con una lección. ¿Es para desarrollar una experiencia de aprendizaje lineal ? O una sesión de práctica, sin clasificar, no lineal? ¿Los estudiantes serán capaces de volver atrás y revisar las áreas o es sólo una sección de una única oportunidad?
- Aún aquellos que están muy cómodos trabajando directamente en línea podrían encontrar útil el apuntar en papel la dirección hacia donde quieren que vayan las páginas de la lección, en lugar de tener que recordarla y visualizar la navegación en su cabeza
- Para consejos e ideas de cómo usar el módulo lección, veáse Usando lección y Lección FAQ
Adicionando contenido y preguntas a su lección
- Cuando usted haya configurado su lección con el Configuraciones de lección, haga clic en la opción "Guardar y Mostrar" y se mostrará la pantalla que se muestra en la siguiente imágen.
- Si en lugar de esto, Usted elige "Guardar y regresar al curso" y después elige el ícono para "actualizar" que está junto a la lección en la página y elige "editar" en Bloque de configuraciones > Administración de la lección

Importar preguntas
- If you have some questions in the following formats, you can import them to use in your lesson by clicking the Import questions link. For general information about these question types, see Importar preguntas

Importar un PowerPoint
- Usted tendrá esta configuración solamente si su Moodle 2.3 fuera de fecha anterior a Octubre 18 del 2012. Ha sido eliminada porque no funcionaba bien. (MDL-21801) Vea Importar PowerPoint para alternativas.
Añadir un cluster
- A cluster is a group of question pages which will be offered randomly to a student as they work through the lesson.It is best if you have made the question pages beforehand and can then decide where to mark the start and end of the cluster. The start is marked by a "cluster" page and the end by an "end of cluster" page. See Clusters for more information.
Añadir una página de contenido
- This is a page where a teacher can provide information to move the lesson forward but without requiring the student to answer specific questions.
- The student sees the page's title, some information and then one or more buttons at the bottom to select.
- When the student clicks on a button, they go to the next page but their choice is not scored.
Título
- The title of a content page appears to the student at the top of the page.
- A teacher will also see the title in the collapsed edit mode when they are working on the Lesson, and they will also be able to choose the title (and hence this page) from the drop down "jump" lists.
- The title in a content page is also used with the "display left menu" setting.
Contenidos de la página
- Aquí es donde el profesor puede añadir información paar el estudiante, usando el Editor de texto y sus características de multimedia.
Contenido
- Aquí es donde el profesor escribe las palabras que desea que el alumno elija para continuar a la parte siguiente de la lección.
- Estas palabras le aparecerán añ estudiante como un botón.
- El profesor puede elegir la casilla parq ue los botones aprezcan horizontalmente, o dejarla sin seleccionar para que aparezcan centradas verticalmente.
Formato
- There are 4 format types to choose from when editing text in the content description box. If you wish to have the usual rich text editing icons, choose HTML format. (Note - once you have selected an option, you cannot then go back and change your mind!) However, if you DO choose HTML format, be warned that the student will not see the changes (such as bold or different colours) in the button.

Número de opciones disponibles
- How many of these you have depends on your choice in the Maximum Number of Answers setting in Configuraciones de lección
El Salto
- Each Description in a Content page has a Jumps menu. "Jumps" take a student from one page to another.
- A "relative jump" is "next page" or "end of lesson" whereas an "absolute jump" gives the actual name of a page.
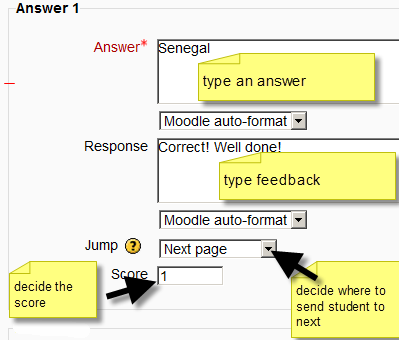
- The teacher chooses from the dropdown the correct page to send the student to if they click on the button that will be made from this particular description. Any pages created by the teacher will have their titles appear in this dropdown, allowing them to be selected.
- When a student clicks on a description button, they are sent to the page defined in the Jump associated with the button.
- See Saltos for more detailed information.
Añadir una página de pregunta
- From this link you can choose from a variety of question types which will then be added as pages to your lesson:

- (Note: These question types are not the same as for the Módulo de examen and are in no way connected with quiz questions.)
- The format of question pages is similar to content pages outlined in Section 2.4 above.
- A typical question page could include:
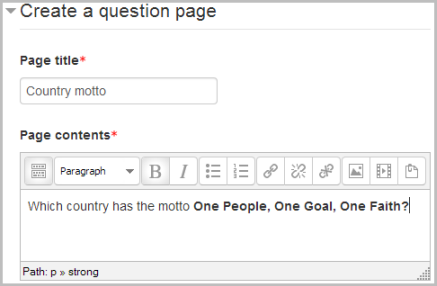
- Title - the name the student sees at the top of the question page.
- Page contents - the actual question
- Answer/Response/Format/Jump/Score as in the screenshot below


Tipos de pregunta
Opción múltiple
- The student is given a question and a list of answers. The answer list will be shuffled every time the question is view by a student. By default they choose one answer but you can check the box "multiple answer" to allow them to choose more than one answer.
Ensayo
- Students can write a longer answer as part of the lesson and this can be graded manually by the teacher. If the main purpose of your lesson is for students to write an essay, consider the Módulo de tarea instead.
Relacionar columnas (emparejamiento)
- This allows you to set up lists which must be matched against other lists, for instance, words, pictures, numbers etc. The student must match all correctly to receive the score.
Numérica
- This requires a number as an answer. A number within a range may also be accepted as correct. The range separator to be used is the colon : For example, to accept as correct any number between 10 and 12 (10, 11 and 12) you would type 10:12 in the Answer box.
Respuesta corta
- A student must provide a single word or short phrase answer. The teacher must anticipate the possible answers and enter them in the Jump dropdown boxes, using ** wild cards if appropriate.
Falso/Verdadero
- The student is given a sentence and must decide if it is true or false.
Moviendo su lección hacia adelante
- Once you have added your first content or question page, you reach the next screen which displays your page title/type/jumps (ie where the responses take the student to) and actions you can take next:

- The Actions icons allow you to move (if you have more than one), edit, preview or delete your pages.
- The drop down allows you to create another page of your choice:

- Note the different view options:
Vista colapsada
- This gives a brief outline of the lesson structure as in the two screenshots above.
Vista expandida
- This shows more detail as in the screenshot below:

Terminando su lección
- Para cerrar la lección, elija la opción de "Fin de Lección" del menú de salto en cualquier página relevante.
- El estudiante verá entonces un mensaje genérico como el de la pantalla siguiente, con una dirección de regreso al menú principal o para ver sus calificaciones:
