Diferencia entre revisiones de «28/Configuraciones de tarea»
mSin resumen de edición |
Sin resumen de edición |
||
| Línea 64: | Línea 64: | ||
===Fecha de entrega=== | ===Fecha de entrega=== | ||
El ajuste de la fecha de entrega evita que los estudiantes presenten su tarea después de la fecha indicada. | |||
Esta opción permite a un profesor establecer un día, mes, año y hora (reloj de 24 horas) antes del cual, los/as estudiantes deben presentar su tarea. Este ajuste está activado (marcado) por defecto 7 días más tarde del que has añadido la tarea. Para desactivar esta opción, elimina el marcado del cuadro Activar. | |||
For more information on using the Due Date see Assignment FAQ | |||
Note: Assignments without a Due date will appear on the My home page with “No Due date” displayed. | Note: Assignments without a Due date will appear on the My home page with “No Due date” displayed. | ||
| Línea 74: | Línea 74: | ||
===Fecha de corte=== | ===Fecha de corte=== | ||
La fecha límite es la fecha a partir del cual los/as estudiantes no podrán enviar su tarea ya que no se les muestra el botón para hacerlo. Después de esa fecha (u hora) un profesor puede, previa solicitud, conceder una prórroga haciendo clic en el enlace "Ver/Calificar todas las entregas" en el bloque Administración y pulsando en "Ampliar plazo" para ese/a estudiante, en la columna "Editar". | |||
For more details, see this Youtube screencast [http://www.youtube.com/watch?v=UaL0LzZwyYI&feature=share&list=UUCRg_EbhU9tdpLdiGGN1Mgg Assignment Extensions] | For more details, see this Youtube screencast [http://www.youtube.com/watch?v=UaL0LzZwyYI&feature=share&list=UUCRg_EbhU9tdpLdiGGN1Mgg Assignment Extensions] | ||
===Siempre mostrar descripción=== | ===Siempre mostrar descripción=== | ||
Esta configuración se utiliza en conjunción con "Permitir entregas desde". Si se establece en Sí, la descripción de la tarea se hará visible a los/as estudiantes a partir de la fecha en la que se "permiten entregas". Si se establece en No, la descripción de la tarea estará oculta para los/as estudiantes hasta la fecha que establece la opción "Permitir entregas desde" y se mostrará sólo el nombre de la tarea. | |||
|[[File:alwaysshowdescription.png|thumb|450px|Assignment description hidden until the 'Allow submissions from' date.]] | |[[File:alwaysshowdescription.png|thumb|450px|Assignment description hidden until the 'Allow submissions from' date.]] | ||
|} | |} | ||
Si "Permitir entregas desde" está desactivado, este valor no tiene sentido: la descripción de la tarea siempre será visible para los/as estudiantes. | |||
==Tipos de envíos== | ==Tipos de envíos== | ||
Revisión del 10:24 1 jul 2015
Nota: Esta es una traducción de una página de la documentación en idioma Inglés (Docs), que se considera particularmente importante, y que en su versión original se actualiza frecuentemente. Por ello, se le recomienda que revise la página original en idioma inglés: Assignment settings.
Nota: Pendiente de Traducir. ¡Anímese a traducir esta página!. ( y otras páginas pendientes)
Nota: Esta página describe las configuraciones para el nuevo módulo de Tarea de Moodle 2.3 en adelante. Para la documentación acerca de configuraciones para Tareas (2.2), vea Assignment settings en la documentación en Inglés para Moodle 2.2.
Añadir y editar una actividad de Tarea
- Para añadir una nueva actividad de Tarea a su curso, ingrese a su curso con los derechos de acceso apropiados (por ejemplo, profesor editor, creador de curso o administrador) y Active la edición. Dentro del bloque apropiado de Semana o Tópico, elija el enlace para 'Añadir una Actividad o Recurso'
- En la caja de diálogo de Añadir una Actividad o Recurso que aparece, seleccione Actividad y elija Añadir.
- Para editar una actividad de Tarea existente, ingrese a su curso con los derechos de acceso apropiados (por ejemplo, profesor editor, creador de curso o administrador) y Active la edición. Seleccione el ícono para Actualizar del ítem de Tarea relevante.
- Alternativamente, después de ingresar a su curso simplemente elija el nombre de la actividad de Tarea que desea editar y luego elija el enlace para Editar Configuraciones dentro de la Administración de Tarea dentro del bloque de Configuraciones.
Las siguientes opciones de configuración están disponibles al crear o editar/actualizar cualquier actividad de Tarea. Solamente los Tipos de envío, Disponibilidad y General están abiertos por defecto; los otros están colapsados. Para epander todo, elija el enlace de "Expander todo" arriba a la derecha. Elija cualquier imagen de pantalla para verla en pantalla completa.
General
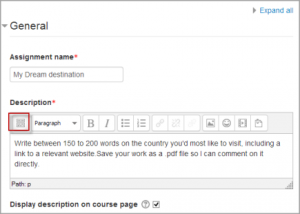
La sección general le permite a Usted darles un nombre y descripción a la tarea.
En Moodle 2.5 y anteriores tiene este aspecto:
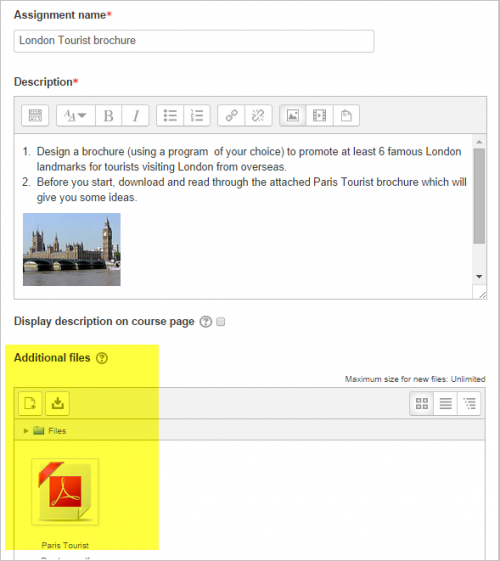
En Moodle 2.6 y posteriores tiene este aspecto:
Nombre de la Tarea
Dale a tu tarea un nombre descriptivo (por ejemplo, "Informe sobre el Tema 1"). El título introducido aquí será el nombre que los/as estudiantes ven en la página principal de la asignatura. Los/as estudiantes harán clic en el nombre para ver los detalles de la tarea y, en su caso, presentar sus trabajos.
Descripción
En el área de descripción, describe cuidadosamente qué es lo que pretendes con esa tarea. Es una buena idea explicar la tarea aquí con mucho detalle, incluso si ya lo has hecho en otro lugar.
Moodle 2.6
En Moodle 2.6 y anteriores: Elija "Mostrar herramientas para edición" para mostrar el editor de texto enriquecido y arrastre la orilla de abajo a la derecha de la caja de texto para expandirla.
Usted puede también proporcionar información o recursos relacionados con la tarea, tales como clips de video, una imagen o un enlace hacia una página web.
Moodle 2.7
Elija el ícono a la izquierda para expandir la barra de herramientas y arrastre arrastre la orilla de abajo a la derecha de la caja de texto para expandirla.
¡Nueva característica
en Moodle 2.8!
Archivos adicionales
En Moodle 2.8 y posteriores, aquí un profesor puede anexar archivos que pudieran ser de utilidad para los estudiantes cuando hagan sus tareas, como por ejemplo, envíos de ejemplo o plantillas de respuestas.
Mostrar descripción en la página del curso
La activación de este parámetro mostrará la descripción de la tarea en la página principal del curso justo debajo del enlace de la tarea.
Disponibilidad
Permitir envíos desde
La opción "Permitir envíos desde" evita que los estudiantes presenten su tarea antes de la fecha indicada. Un profesor puede establecer un día, mes, año y hora (reloj de 24 horas) en el que los estudiantes pueden comenzar a presentar sus trabajos. Ten en cuenta que este ajuste no oculta la actividad a los estudiantes. Es decir, el/la estudiante verá la actividad, será capaz de ver las instrucciones y utilizar los materiales que has incluido en la descripción, pero el/la estudiante no podrá presentar o completar la tarea hasta que la fecha indicada en la opción Permitir envíos desde.
Este ajuste está activado (marcado) por defecto con el día y hora en el que has añadido la tarea. Para desactivar esta opción, elimina el marcado del cuadro Activar.
Fecha de entrega
El ajuste de la fecha de entrega evita que los estudiantes presenten su tarea después de la fecha indicada.
Esta opción permite a un profesor establecer un día, mes, año y hora (reloj de 24 horas) antes del cual, los/as estudiantes deben presentar su tarea. Este ajuste está activado (marcado) por defecto 7 días más tarde del que has añadido la tarea. Para desactivar esta opción, elimina el marcado del cuadro Activar.
For more information on using the Due Date see Assignment FAQ
Note: Assignments without a Due date will appear on the My home page with “No Due date” displayed.
Fecha de corte
La fecha límite es la fecha a partir del cual los/as estudiantes no podrán enviar su tarea ya que no se les muestra el botón para hacerlo. Después de esa fecha (u hora) un profesor puede, previa solicitud, conceder una prórroga haciendo clic en el enlace "Ver/Calificar todas las entregas" en el bloque Administración y pulsando en "Ampliar plazo" para ese/a estudiante, en la columna "Editar".
For more details, see this Youtube screencast Assignment Extensions
Siempre mostrar descripción
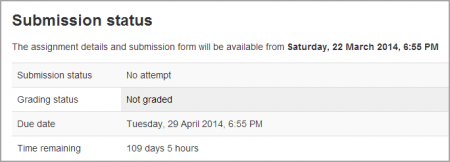
Esta configuración se utiliza en conjunción con "Permitir entregas desde". Si se establece en Sí, la descripción de la tarea se hará visible a los/as estudiantes a partir de la fecha en la que se "permiten entregas". Si se establece en No, la descripción de la tarea estará oculta para los/as estudiantes hasta la fecha que establece la opción "Permitir entregas desde" y se mostrará sólo el nombre de la tarea.
|
|}
Si "Permitir entregas desde" está desactivado, este valor no tiene sentido: la descripción de la tarea siempre será visible para los/as estudiantes.
Tipos de envíos
Aquí puede Usted decidir cómo desea que los estudiantes le envíen su trabajo.
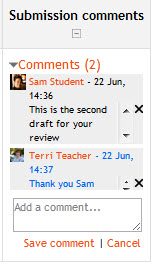
Tome nota de que si se habilitan los comentarios al envío en Administración > Plugins > Módulos de actividad > Tarea > Plugins de envío entonces los estudiantes podrán añadir una nota para su profesor al enviar su trabajo. Si se habilita la calificación ciega, los comentarios de los estudiantes se muestrancomo "Participante 01 etc" para evitar que se revelen sus identidades. Estos comentarios aparecerán en la tabla de calificación en la columna de comentarios al Envío.
Texto en línea
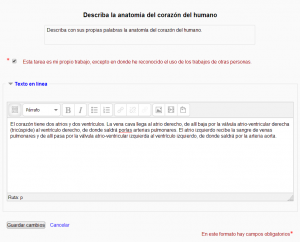
Los estudiantes pueden escribir su respuesta directamente en Moodle empleando el Editor de texto.
¡Nueva característica
en Moodle 2.8!
El texto escrito en el editor de texto Atto es guardado automáticamente a intervalos regulares. Vea Editor de texto para más información.
¡Nueva característica
en Moodle 2.7!
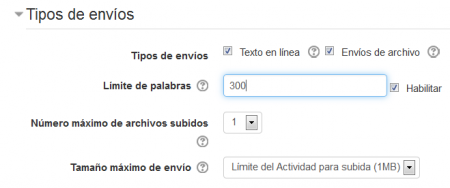
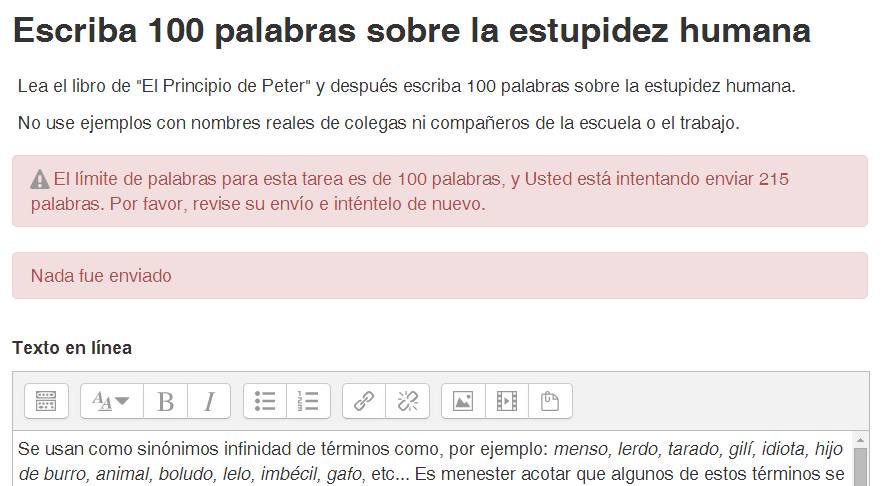
Es posible configurar un límite de palabras en una tarea de texto en línea. Los estudiantes ven una advertencia si intentan exceder el límite de palabras:
Note: Numbers (such as in addresses) are counted as words; structures such as I'm where an apostrophe replaces a part of a word are only counted as one word.
Envíos de archivo
Learners can upload and edit one or more files of any type the teacher can open.
If the student uploads a pdf file, the teacher can annotate it within the browser, and on saving, the annotated file is made available to the student. See section 5.4.1 Annotating pdfs in Usando Tarea
Note: This requires Ghostscript to be enabled on the server. This can be checked in Administration>Site administration>Plugins>Activity modules>Assignments>Feedback plugins>Annotate pdf.
Número máximo de archivos subidos
Here you can decide the maximum number of files which may be uploaded by each learner. (It might be helpful to display the number in the assignment description.)
Tamaño máximo de envío
This setting specifies the maximum size per file of each of the files that the students can upload as part of their submission. This maximum upload size may only be equal to or less than the course limit (which in turn may only be equal to or less than the site limit). The maximum size of each file is displayed to students at the point where they upload files.
Tipos de retroalimentación
(This setting is collapsed by default)

|
Comentarios de retroalimentación
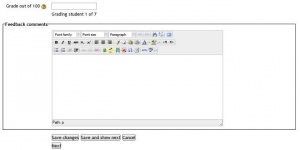
Setting this to yes means that markers can leave feedback comments for each submission. It enables the Feedback Comments column in the grading table.(To access the grading table, click on the assignment activity and then View/Grade all Submissions). Feedback comments are also accessible by clicking on the green tick in the grade column on the grading table.
Hoja de trabajo para calificar fuera-de-línea
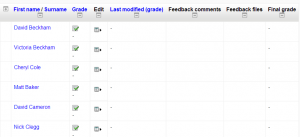
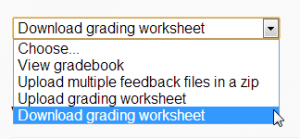
If set to yes, the teacher will have a link to download the grading list as a spreadsheet. They will then be able to enter grades and feedback comments offline:
(Not working for non English users, yet. See https://tracker.moodle.org/browse/MDL-40597)
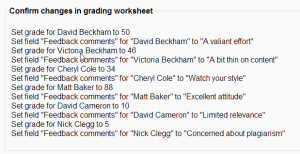
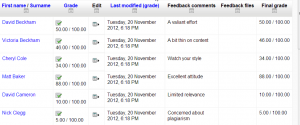
When the teacher has completed their grading offline, they can then upload the spreadsheet, confirm the changes and the grades and comments will be transferred over into Moodle's gradebook:
See also Offline grading worksheet blog post by Gavin Henrick.
Archivos de retroalimentación
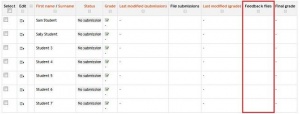
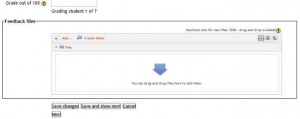
This allows markers to upload files with feedback when marking. These files may be the marked up student assignments, documents with comments, a completed marking guide, or spoken audio feedback. It enables the Feedback Files column in the grading table. (To access the grading table click on the assignment activity and then View/Grade all Submissions)To upload feedback files, click on the green tick in the grade column on the grading table and then upload either with drag and drop or using the Selector de archivos.
Feedback is displayed to students on the assignment submission page.
Subida de archivos múltiples
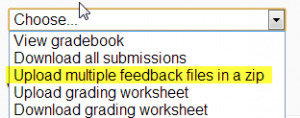
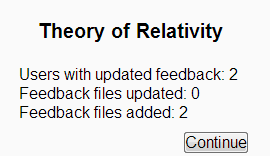
It is also possible to upload multiple feedback files as a zip, from the dropdown above the grading list:
- Download the students' assignments using the "Download all submissions" link from the same dropdown menu;
- Extract the folder offline and add your comments to the student's submissions.Keep the names the same.
- Select the students' submissions and zip them into a new folder. Important: Don't just edit them inside their original folder and re-zip this; it will not work. The folder name does not matter as long as the feedback files have the same names as before.
- Upload this newly zipped folder.
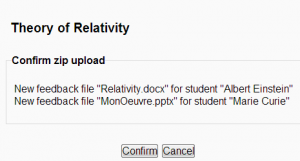
- You will be presented with a confirmation screen displaying your feedback files.
Note:If you zip files on a Mac, you may get a folder included in the zip called _MACOSX_ which needs to be removed otherwise moodle will not recognise the changes in the files.
Comentario en-línea
¡Nueva característica
en Moodle 2.7!
Si se configura a 'Si', un profesor puede comentar directamente dentro del texto que el estudiante ha enviado como una tarea del tipo de texto en línea.
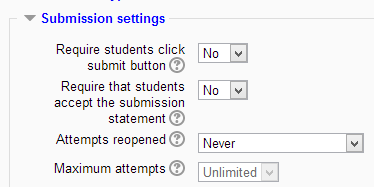
Configuraciones del envío
(This setting is collapsed by default)
|
Requerir que los estudiantes elijan el botón para envío
Students can upload draft versions of the assignment until such time as they are ready to submit.Once they click the submit button they indicate to the teacher that they have finished working on the assignment. In earlier versions of Moodle this was called "Send for marking".)
They can then longer edit their submission. If they need to change it, they must ask the teacher who can revert the assignment to draft status.
To revert to the draft stage, click on the assignment activity and then View/Grade all Submissions. Locate the student and click the action icon in the Edit column. Select Revert the submission to draft.
If this setting is No, then students do not have to to click a submit button and are able to make changes to uploaded files at any time.
If this setting is No but the teacher wishes to grade students work, then you can stop students from making further changes by using Prevent submission changes. Prevent submission changes can also be used in cases where students have neglected to click the Submit button and grading has commenced. To prevent submission changes, click on the assignment activity, then click on the View/Grade all submissions button. On the grading table, locate the student and click the action icon in the Edit column. Select Prevent submission changes.
To do either of these with a number of students, use the With selected menu at the bottom of the grading table.
To do either of these with a number of students, use the With selected menu at the bottom of the grading table.
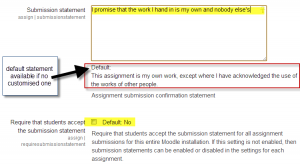
Requerir que los estudiantes acepten la declaratoria al envío
An administrator can define a "Submission statement", ie, a statement where students promise the work is their own and which they must agree to before submitting their work. This may be done via Settings>Site administration>Plugins>Activity modules>Assignment.
If preferred, the available default statement which may be used instead: This assignment is my own work, except where I have acknowledged the use of the works of other people
If the administrator has given teachers the option of using a submission statement or not, then it will be available in the assignment settings screen. The section #Submission_Statement explains how an administrator can set this up.
When this setting is enabled, students will have to check a button before they can submit their assignment:
If the administrator has forced the statement throughout the site, a teacher will not have this option in the settings but a student will see the statement when accessing their assignment.
Reabrir intentos
This setting allows the teacher to decide how submissions are reopened. The default is "Never", in that students may only submit once. However, a teacher can set this to "Manually" and reopen it themselves for the student to resubmit, or to "Automatically until pass". The student must then keep trying and resubmitting until they get a pass grade. Las Calificaciones aprobatorias se configuran en el Libro de calificaciones. Tome nota de que para que esto funcione, Usted necesita configurar la tarea de forma tal que los estudiantes tengan que elegir 'enviar para calificar'. En caso contrario, entonces, a menos que Usted bloquee manualmente una tarea deun estudiante, entonces ellos pueden continuar editando su tarea por todo el tiempo que quieran.)
Intentos máximos
If a student is allowed to resubmit, this setting will determine how many times they can resubmit before they are no longer allowed to do so. (For example, if a student has to keep trying until they get a pass grade, the teacher might decide that ten attempts is enough even though they have not yet passed!)
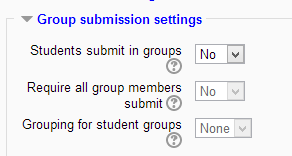
Configuraciones para envíos en grupos
(This setting is collapsed by default)
|
Los estudiantes envían en grupos
If this box is ticked, then students are able to collaborate on an assignment. This might involve for example, working in the same online text area, or one student uploading an MS Powerpoint which another student downloads, improves and re-uploads to the common assignment area.
When grading, the teacher may choose to give a common grade and feedback to all students in the group or to give individual grades and feedback to each member.
If no groups have been made, then Moodle will make a default group of every student in the course. (Note also that if a student is in more than one group then their submission will be made to the default group.)
For more details see this Youtube video Group Assignment 2.4
Requerir que todos los miembros del grupo envíen
This setting will only appear if the teacher has ticked the "Require students click submit button" earlier. The assignment will not be classed as "submitted" until all members of the group have made a contribution. When one student has submitted, the other members of the group will be able to see who still has to submit.
Agrupamiento para grupos de estudiantes
If a particular grouping is selected here, then the gradebook will display any other groups and non-grouped students in the "default group", while naming the group(s) that are in the chosen grouping. If "none" is selected, then the gradebook will display the names of all groups and put any non-grouped students in the "default group". See this forum post on grouping for student groups for examples of how this might be used.
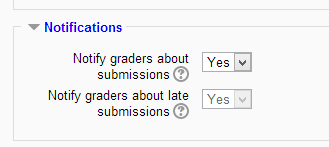
Notificaciones
(This setting is collapsed by default)
|
Notificar a quienes califican acerca de los envíos
Teachers will receive a message (of a type they choose) whenever a student submits an assignment. Por favor, tome nota de que si Usted está utilizando la tarea en Modo de Grupo (por ejemplo, en grupos visibles o grupos separados), el profesor necesitará ser un miembro del grupo para que pueda recibir la notificicación acerca del envío.
Notificar a quienes califican acerca de envíos extemporáneos
Teachers will receive a message (of a type they choose)whenever a student submits a late assignment. Por favor, tome nota de que si Usted está utilizando la tarea en Modo de Grupo (por ejemplo, en grupos visibles o grupos separados), el profesor necesitará ser un miembro del grupo para que pueda recibir la notificicación acerca del envío.
Calificación
(This setting is collapsed by default)

|
Calificación
- Selecionar Puntos o Escala del menú desplegable. Si Usted no dará una calificación para la tarea, elija Sin Calificación.
- Después seleccione sus puntos o la escala elegida.
Método para calificar
Hay 3 opciones:
- Calificación directa simple (escribir una calificación o un ítem de escala)
- Guía de puntaje
- Rúbrica
Categoría de calificación
Cualquier categoría de calificación personalizada que haya sido creada dentro de su sitio o curso estará enlistada aquí y estará disponible para seleccionarse. Seleccione la Categoría de Calificación requerida para añadir esta tarea como un Ítem de calificación dentro de esta Categoría.
Calificación ciega (calificación a ciegas)
Si se habilita esta configuración, entonces el profesor no verá los nombres de los estudiantes que hayan enviado sus tareas. En su lugar, ellos verán números de participantes generados aleatoriamente (la vista de la tarea para el estudiante no cambia). Este es también el caso si se han habilitado comentarios para el estudiante. Una vez que se hayan calificado las tareas, ya es posible que los profesores vean quén envió qué al elegir "Revelar identidad de estudiantes" en las configuraciones de la tarea.
Regresarle calificaciones a los estudiantes
Because of the nature of blind marking, the students cannot see the final grade until all of the students' names have been revealed. If you are grading an assignment using an advanced grading method such as a rubric, the rubric will also be hidden from students' view until the names are revealed. To reveal student names after you are finished grading, look under Assignment Settings > Reveal Student Names. Feedback comments will appear whether or not student names are hidden or revealed.
Note: Beacuse of this, the level of anonymity might not suit the privacy requirements of your establishment. See this tracker entry MDL-35390 - "Blind Marking is not so blind"
For more details on this feature, see this Youtube video Blind marking in 2.4.
Usar flujograma para calificar
Moodle 2.6
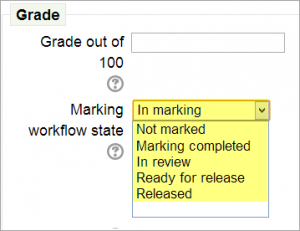
Cuando se configura a 'Si', los profesores podrán especificar la etapa en la que están con respecto a la calificación de tareas individuales (como se ve en la imagen inferior)
Una ventaja de usar el flujograma de calificación es que las calificaciones pueden ocultarse a los estudiantes hasta que sean configuradas a 'Liberadas'. La lista de los pasos es:
- Sin calificar (el sujeto que califica no ha empezado)
- En calificación (el sujeto que califica ha empezado, pero no ha terminado)
- Calificación terminada (el sujeto que califica ha terminado, pero podría regresar a revisar/corregir)
- En revisión (la calificación está con el profesor que está a cargo del control de calidad)
- Lista para liberarse (el profesor a cargo está satisfecho con la calificación, pero está esperando paara darles acceso a los alumnos)
- Liberada(los estudiantes pueden acceder a la calificación7retroalimentación)
Ejemplos de casos de uso
One marker, Marker, wants to release all grades at the same time
- Marker enables "Use marking workflow"
- Marker marks each submission and transitions the grading to "Marking completed" as each submission is graded.
- Marker then uses the batch operations to transition all grades to "Released" at the same time.
Multiple markers,
- Marker enables "Use marking workflow"
- Marker marks each submission and transitions the grading to "Marking completed" as each submission is graded.
- Marker then uses the batch operations to transition all grades to "Released" at the same time.
Usar asignación para calificar
Moodle 2.6
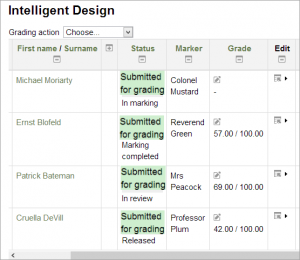
If marking workflow (see above) is set to Yes, it is possible to enable marking allocation. This means that teachers can be selected to grade or review the submitted work of specific students. Colleagues can monitor progress through the displayed marking workflow states:
Configuraciones comunes del módulo
Vea Configuraciones comunes del módulo
Configuraciones para restringir el acceso
El área de Configuraciones para restringir el acceso se vuelve visible en los recursos y actividades de Moodle si las Actividades condicionales han sido habilitadas.
Roles asignados localmente
En Configuraciones > Administración de tarea > Roles asigndos localmente ( En Moodle 2.7 en Administración > Administración de tarea > Roles asigndos localmente ) selected users can be given additional roles in the activity. See the Using Moodle Custom role for 'Course Monitor' forum discussion for an example.
Capacidades de Tarea
Role permissions for the activity can be changed in Settings > Assignment administration > Permissions.
Configuraciones de administración del sitio
The following configuration options are available for an administrator under Administration > Site administration > Plugins > Activity modules > Assignment.
Configuraciones de tareas
Plugin de retroalimentación
The comments that are pushed to the gradebook from the assignment are limited to a single text only comment. An Administrator can specify which of the feedback plugins will be push comments to the gradebook. On a standard Moodle install the choices are "Feedback comments" (default) or "Feedback file" but there may be additional options if your Moodle install contains additional feedback plugins.
Mostrar envíos recientes
This option allows everyone to see notifications of submissions in Actividad reciente reports and the Recent Activity Block, within a course context. Note that the default for this option is No which means students will not be able to see when classmates have submitted or updated any Assignments.
Enviar recibo de envío a los estudiantes
This switch will enable submission receipts for students. Students will receive a notification every time they successfully submit an assignment.
Declaratoria del Envío
Un administrador puede escribir texto dentro de esta caja y aparecerá cuando los estudiantes estén a punto de enviar su tarea.
Si se configura al valor por defecto de "No", entonces los profesores tendrán la decisión si quieren forzarlo o no en sus propias tareas.
¡Nueva característica
en Moodle 2.8!
Tome nota de que de Moodle 2.8.2 en adelante es posible mostrar las declaratorias de envío en diferentes idiomass. Vea Contenido multilingüe para saber cómo hacerlo.
Configuraciones de tarea por defecto
The administrator can specify here the default assignment settings which may be set as 'Advanced' (ie, they will appear when clicking 'Show more') or 'Locked' (ie the teacher cannot change them.)
The following configuration options are available for an administrator under Administration > Site administration > Plugins > Assignment.
Plugins de envío
Gestionar plugins de envío de tarea
Aquí puede Usted cambiar el orden, revisar las configuraciones o desinstalar un plugin de envío en particular.
Envíos de archivo
Habilitado por defecto' Si se configura, este método de envío estará habilitado por defecto para todas las tareas nuevas.
Tamaño máximo del envío Un administrador puede especificar el tamaño máximo de cualquier archivo individual subido dentro del módulo de tarea para todos los cursos del sitio. Este límite puede ser igual o menor al límite del archivo subido en el curso.
Envíos de texto en-línea
Habilitado por defecto' Si se configura, este método de envío estará habilitado por defecto para todas las tareas nuevas.
Comentarios al envío
If Submission comments are enabled in Site administration>Plugins>Activity modules>Assignment>Submission plugins AND comments enabled globally in Site Administration > Advanced features) then students will be able to send a message to their teacher when submitting their assignment. If either of those settings is disabled, then the submission comments link will not appear.
Plugins de retroalimentación
Gestionar plugins de retroalimentación de tarea
Here you can change the order, check the settings or uninstall a particular feedback plugin.
Comentarios de retroalimentación
Enabled by default If set, this submission method will be enabled by default for all new assignments.
Anotar pdf
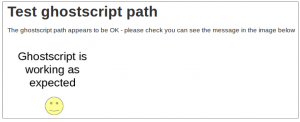
Here you can upload stamps for teachers to use when annotating student pdfs. You can also check the ghostscript path:
If the default stamps are deleted by accident, they can be found in mod/assign/feedback/editpdf/pix and re-uploaded.
Retroalimentación con archivo
Enabled by default If set, this submission method will be enabled by default for all new assignments.
Hoja de trabajo para calificar fuera-de-línea
Enabled by default If set, this will be enabled by default for all new assignments
Vea también
Synergy Learning blog post: Assignment resubmissions

