Diferencia entre revisiones de «311/Configuraciones de herramienta externa»
(tidy up) |
(tidy up) |
||
| (No se muestran 11 ediciones intermedias del mismo usuario) | |||
| Línea 1: | Línea 1: | ||
{{Versiones|Esta documentación es para Moodle 3.2 y más recientes, pero Usted puede ver la documentación para [[31/Configuraciones_de_herramienta_externa|3.1]] y [[28/Configuraciones_de_herramienta_externa|2.8 y anteriores]]}} | |||
{{Herramienta externa}}{{ | {{Herramienta externa}} | ||
{{Urgente de traducir}} | |||
[[ | This page explores in more detail the settings for the [[Herramienta externa]] once you have added it to your course and also covers the Site administration settings. | ||
==General== | |||
*'''Nombre de actividad''' - dele el nombre que Usted quiere que los estudiantes vean en la página del curso | *'''Nombre de actividad''' - dele el nombre que Usted quiere que los estudiantes vean en la página del curso | ||
*'''Herramienta preconfigurada''' - ésto es cómo se comunica Moodle con el proveedor de a herramienta. Si tiene dudas, déjelo como está por defecto. Si su administrador ha hecho disponible una herramienta para todo el sitio, Usted la podrá seleccionar aquí: | *'''Herramienta preconfigurada''' - ésto es cómo se comunica Moodle con el proveedor de a herramienta. Si tiene dudas, déjelo como está por defecto. Si su administrador ha hecho disponible una herramienta para todo el sitio, Usted la podrá seleccionar aquí: | ||
[[File:Preconfiguredtool.png|center]] | |||
*'Botón para seleccionar contenido - - allows to import the link definition from the tool rather than entering it manually. This is the preferred flow when available. | |||
*'''URL de herramienta''' - Esta es la URL para conectarse al sitio. | *'''URL de herramienta''' - Esta es la URL para conectarse al sitio. Si su sitio Moodle usa [https://es.wikipedia.org/wiki/Transport_Layer_Security SSL] (porque está en [[HTTPS]]) Usted solamente podrá usar una herramienta que también use [https://es.wikipedia.org/wiki/Transport_Layer_Security SSL]. Asegúrese de que la URL de la herramienta tiene [[HTTPS]] antes de intentar usarla, o podría obtener solamente una página en blanco. | ||
*'''Launch container'''- esto es cómo se mostrará la herramienta externa. | *'''Launch container'''- esto es cómo se mostrará la herramienta externa. | ||
**Por defecto -Si tiene dudas, déjelo como está por defecto | **Por defecto -Si tiene dudas, déjelo como está por defecto | ||
| Línea 30: | Línea 24: | ||
*'''Display activity name when launched''' - have this appear when the student clicks the link. | *'''Display activity name when launched''' - have this appear when the student clicks the link. | ||
*'''Display activity description when launched''' - have this appear when the student clicks the link. | *'''Display activity description when launched''' - have this appear when the student clicks the link. | ||
*'''Secure tool URL''' - | *'''Secure tool URL''' - This overrides the tool URL when moodle uses [https://en.wikipedia.org/wiki/Transport_Layer_Security SSL] (if your site is configured to use [[HTTPS]] in the wwwroot) | ||
*'''Consumer key''' -this tells the connecting LTI compliant site that your Moodle is allowed to connect. The "tool provider", ie the manger of the connecting LTI compliant site will issue you with this key. If you are merely linking to a tool with no secure access or gradebook sharing then you won't need a consumer key. If you are linking to a course or activity from another Moodle site, then you can add any consumer key. | *'''Consumer key''' -this tells the connecting LTI compliant site that your Moodle is allowed to connect. The "tool provider", ie the manger of the connecting LTI compliant site will issue you with this key. If you are merely linking to a tool with no secure access or gradebook sharing then you won't need a consumer key. If you are linking to a course or activity from another Moodle site, then you can add any consumer key. | ||
*'''Shared secret''' - this is the "password" to connect to the tool - the LTI compliant site. | *'''Shared secret''' - this is the "password" to connect to the tool - the LTI compliant site. | ||
*'''Custom parameters''' - most times you can leave this blank. The tool provider might use this to allow you to display a specific resource. | *'''Custom parameters''' - most times you can leave this blank. The tool provider might use this to allow you to display a specific resource. | ||
*'''Icon URL''' - you can display a different icon from the default External Tool icon by entering its URL here | *'''Icon URL''' - you can display a different icon from the default External Tool icon by entering its URL here | ||
*'''Secure Icon URL''' - enter the URL of a different icon here if your students are accessing Moodle securely via SSL. | *'''Secure Icon URL''' - enter the URL of a different icon here if your students are accessing Moodle securely via [https://en.wikipedia.org/wiki/Transport_Layer_Security SSL]. | ||
== | ==Privacidad== | ||
*'''Share launcher's name with the tool''' - this means that the student's name will be displayed on the connected site [[ Media:demoexternaltool.png| as in this example]] | *'''Share launcher's name with the tool''' - this means that the student's name will be displayed on the connected site [[ Media:demoexternaltool.png| as in this example]] | ||
| Línea 53: | Línea 43: | ||
An administrator can manually configure external tools in ''Site administration > Plugins > Activity modules > External tool> Manage tools'' so that they are available across the site. | An administrator can manually configure external tools in ''Site administration > Plugins > Activity modules > External tool> Manage tools'' so that they are available across the site. | ||
[[File: | [[File:moodle310__external_tool_registration.png|thumb|center|450px|Adding an external tool]] | ||
Una herramienta puede ser configurada por un administrador de forma tal que se muestre dentro del [[Selector de actividades]] (adicionalmente a la acticvidad de herramienta externa) para que un maestro la añada a un curso. Su descripción, si una estuviera presente, aparecerá dentro del [[Selector de actividades]]. | |||
===Registering an LTI Advantage tool=== | |||
Moodle allows a simple way to deploy an LTI Advantage tool. If the tool provider supports that flow, you should have received a registration URL. Simply enter that url to a tool in the 'Tool URL' and press 'Add LTI Advantage'. | |||
The tool registration UI will open and guide you to the steps for registration. Once completed, the registration panel will close and the list of tools will refresh. If the registration was successful, the newly added tool should be visible in a pending state. | |||
The pending state allows you to review the tool configuration, the privacy and services granted, apply possible modifications (for example how the tool appears in the activity chooser), then activate the tool to make it available. | |||
In case of errors when trying to start the registration, validate the registration URL with the tool's vendor the registration URL is for an LTI Advantage registration and not for the deprecated LTI 2 registration. | |||
{ | {| class="wikitable" border="1" | ||
|- | |||
| For Tool Developers looking to support the automated registration of LTI Advantage tool, there is an [https://moodlelti.theedtech.dev/dynreg/ implementation guide] available. The registration process is also being standardized by [https://imsglobal.org IMS Global] LTI Working Group. There is also a [https://youtu.be/6tcEwiOs5qU Youtube video] demo-ing and explaining the flow. | |||
|} | |||
===Registrando una herramienta usando un cartucho=== | ===Registrando una herramienta usando un cartucho=== | ||
Usted puede registrar un tipo de herramienta usando un cartucho. Un actucho configurará toda la información como la URL para invocar (''launch url''),nombre de la herramienta y descripción e íconos para Usted. | |||
Para hacer esto, simplemente ingrese la URL hacia un cartucho de la herramienta en 'URL de la herramienta (Tool URL)' y presione 'Añadir'. A Usted se le pedirá que ingrese una clave y un secreto. Si no los tiene, Usted puede dejarlos vacíos y presionear ' | Para hacer esto, simplemente ingrese la URL hacia un cartucho de la herramienta en 'URL de la herramienta (Tool URL)' y presione 'Añadir'. A Usted se le pedirá que ingrese una clave y un secreto. Si no los tiene, Usted puede dejarlos vacíos y presionear 'Guardar cambios'. | ||
[[File:LTIKeyAndSecret.png|thumb|center|450px|Ingresando un secreto y una clave del consumidor]] | [[File:LTIKeyAndSecret.png|thumb|center|450px|Ingresando un secreto y una clave del consumidor]] | ||
=== | ===Registering an external LTI 2.0 external tool=== | ||
<big>The LTI 2 specifications have been deprecated by [https://www.imsglobal.org/lti-security-announcement-and-deprecation-schedule IMS Global] and are no more the preferred way to integrate an external tool in Moodle.</big> | |||
To register an external tool, simply enter the url to a tool in the 'Tool URL' and press 'Add'. | To register an LTI 2 external tool, simply enter the url to a tool in the 'Tool URL' and press 'Add Legacy LTI'. | ||
This will open the tool, which may in turn ask you to decide on some settings. | This will open the tool, which may in turn ask you to decide on some settings. | ||
| Línea 108: | Línea 115: | ||
==Capacidades de herramienta externa== | ==Capacidades de herramienta externa== | ||
*[[Capabilities/mod/lti:addcoursetool|Añadir configuraciones de herramienta específicas-de-curso]] | |||
*[[Capabilities/mod/lti:addinstance|Añadir una nueva herramienta externa]] | |||
*[[Capabilities/mod/lti:addmanualinstance|Añadir una herramienta configurada manualmente] (nuevo en 3.9) | |||
*[[Capabilities/mod/lti:addpreconfiguredinstance|Añadir una herramienta preconfigurada]] (nuevo en 3.9) | |||
*[[Capabilities/mod/lti:requesttooladd|Enviar una herramienta externa a administradores para su configuración]] | |||
*[[Capabilities/mod/lti:admin|Ser un administrador cuando la herramienta es invocada]] | |||
*[[Capabilities/mod/lti:manage|Editar actividades de herramienta externa]] por ejemplo, ser un instructor cuando la herramienta es invocada | |||
*[[Capabilities/mod/lti:view|Ver actividades de herramienta externa]] por ejemplo, invocar actividades de herramienta externa | |||
[[en:External tool settings]] | [[en:External tool settings]] | ||
Revisión del 21:51 30 nov 2020
| Existe documentación diferente para varias versiones de Moodle: Esta documentación es para Moodle 3.2 y más recientes, pero Usted puede ver la documentación para 3.1 y 2.8 y anteriores |
Nota: Urgente de Traducir. ¡ Anímese a traducir esta muy importante página !. ( y otras páginas muy importantes que urge traducir)
This page explores in more detail the settings for the Herramienta externa once you have added it to your course and also covers the Site administration settings.
General
- Nombre de actividad - dele el nombre que Usted quiere que los estudiantes vean en la página del curso
- Herramienta preconfigurada - ésto es cómo se comunica Moodle con el proveedor de a herramienta. Si tiene dudas, déjelo como está por defecto. Si su administrador ha hecho disponible una herramienta para todo el sitio, Usted la podrá seleccionar aquí:
- 'Botón para seleccionar contenido - - allows to import the link definition from the tool rather than entering it manually. This is the preferred flow when available.
- URL de herramienta - Esta es la URL para conectarse al sitio. Si su sitio Moodle usa SSL (porque está en HTTPS) Usted solamente podrá usar una herramienta que también use SSL. Asegúrese de que la URL de la herramienta tiene HTTPS antes de intentar usarla, o podría obtener solamente una página en blanco.
- Launch container- esto es cómo se mostrará la herramienta externa.
- Por defecto -Si tiene dudas, déjelo como está por defecto
- Incrustar - la herramienta externa será incrustada en la página del curso Moodle con bloques y Barra de navegación
- Incrustar sin bloques - la herramienta externa será incrustada en la página de curso de Moodle pero sin los bloques
- Nueva Ventana - la herramienta externa se abrirá en una ventana nueva. (Se abrirá una ventana nueva o una pestaña nueva con la Herramienta externa y la antigua ventana del navegador que contiene la página del curso no cambiará.)
The following settings are available by clicking ""Show more":
- Activity description - give a short description here
- Display description on course page - choose to show the description along with the activity name
- Display activity name when launched - have this appear when the student clicks the link.
- Display activity description when launched - have this appear when the student clicks the link.
- Secure tool URL - This overrides the tool URL when moodle uses SSL (if your site is configured to use HTTPS in the wwwroot)
- Consumer key -this tells the connecting LTI compliant site that your Moodle is allowed to connect. The "tool provider", ie the manger of the connecting LTI compliant site will issue you with this key. If you are merely linking to a tool with no secure access or gradebook sharing then you won't need a consumer key. If you are linking to a course or activity from another Moodle site, then you can add any consumer key.
- Shared secret - this is the "password" to connect to the tool - the LTI compliant site.
- Custom parameters - most times you can leave this blank. The tool provider might use this to allow you to display a specific resource.
- Icon URL - you can display a different icon from the default External Tool icon by entering its URL here
- Secure Icon URL - enter the URL of a different icon here if your students are accessing Moodle securely via SSL.
Privacidad
- Share launcher's name with the tool - this means that the student's name will be displayed on the connected site as in this example
- Share launcher's email with the tool - this means that the student's email will be displayed on the connected site as in this example
- Accept grades from the tool - if this is checked, the connecting site will send back grades to Moodle's gradebook. See Usando herramienta externa for more information on this.
Configuraciones de la administración del sitio
Añadiendo una herramienta para todo el sitio
An administrator can manually configure external tools in Site administration > Plugins > Activity modules > External tool> Manage tools so that they are available across the site.
Una herramienta puede ser configurada por un administrador de forma tal que se muestre dentro del Selector de actividades (adicionalmente a la acticvidad de herramienta externa) para que un maestro la añada a un curso. Su descripción, si una estuviera presente, aparecerá dentro del Selector de actividades.
Registering an LTI Advantage tool
Moodle allows a simple way to deploy an LTI Advantage tool. If the tool provider supports that flow, you should have received a registration URL. Simply enter that url to a tool in the 'Tool URL' and press 'Add LTI Advantage'.
The tool registration UI will open and guide you to the steps for registration. Once completed, the registration panel will close and the list of tools will refresh. If the registration was successful, the newly added tool should be visible in a pending state.
The pending state allows you to review the tool configuration, the privacy and services granted, apply possible modifications (for example how the tool appears in the activity chooser), then activate the tool to make it available.
In case of errors when trying to start the registration, validate the registration URL with the tool's vendor the registration URL is for an LTI Advantage registration and not for the deprecated LTI 2 registration.
| For Tool Developers looking to support the automated registration of LTI Advantage tool, there is an implementation guide available. The registration process is also being standardized by IMS Global LTI Working Group. There is also a Youtube video demo-ing and explaining the flow. |
Registrando una herramienta usando un cartucho
Usted puede registrar un tipo de herramienta usando un cartucho. Un actucho configurará toda la información como la URL para invocar (launch url),nombre de la herramienta y descripción e íconos para Usted.
Para hacer esto, simplemente ingrese la URL hacia un cartucho de la herramienta en 'URL de la herramienta (Tool URL)' y presione 'Añadir'. A Usted se le pedirá que ingrese una clave y un secreto. Si no los tiene, Usted puede dejarlos vacíos y presionear 'Guardar cambios'.
Registering an external LTI 2.0 external tool
The LTI 2 specifications have been deprecated by IMS Global and are no more the preferred way to integrate an external tool in Moodle.
To register an LTI 2 external tool, simply enter the url to a tool in the 'Tool URL' and press 'Add Legacy LTI'.
This will open the tool, which may in turn ask you to decide on some settings.
Then you will be shown the capabilities the tool wants to use and you can decide if you want to allow the tool or not.
Viendo más detalles
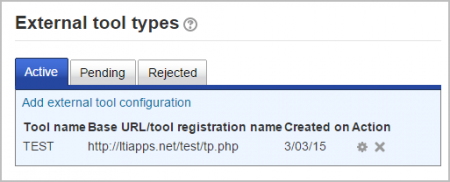
On the 'Manage tools' page you can also visit 'Manage preconfigured tools' to view the preconfigured tools in a tabular format.
There are tabs to add an external tool, to view those which are pending and to view those which have been rejected:
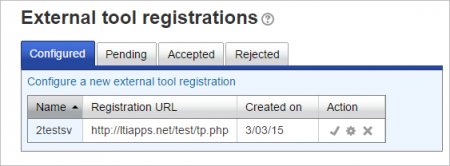
You can also visit 'Manage external tool registrations' to view the tool registrations in a tabular format, or to add an external registration with limited capabilities.
To add a tool with limited capabilities. 1. Click 'Configure a new external tool registration'
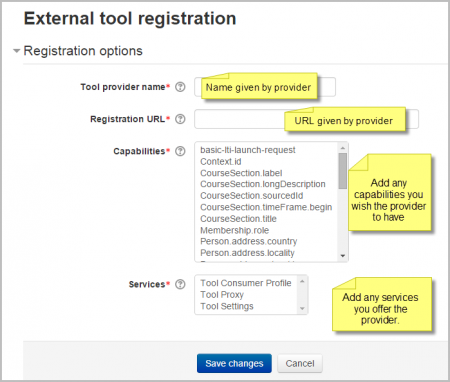
2. Configure the details on the settings page:
'Memberships', allow the external tool to request a list of users with a certain role in a specified context e.g. users enrolled in a course.
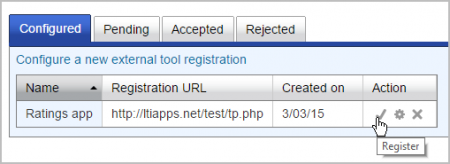
3. Click the tick/checkmark to register:
4. After obtaining a success message, click to complete the process:
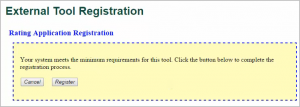
5. If all requirements are met then you will be able to register automatically.
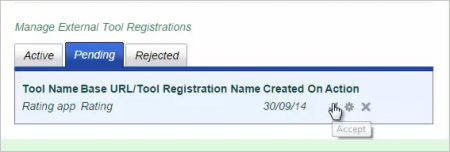
6. Now go to Site administration > Plugins > Activity modules > External tool > Manage external tool types and click the 'Pending tab'
7. Click the tick/checkmark to activate it:
See the screencast External tool registration for a demonstration of the above steps.
Capacidades de herramienta externa
- Añadir configuraciones de herramienta específicas-de-curso
- Añadir una nueva herramienta externa
- [[Capabilities/mod/lti:addmanualinstance|Añadir una herramienta configurada manualmente] (nuevo en 3.9)
- Añadir una herramienta preconfigurada (nuevo en 3.9)
- Enviar una herramienta externa a administradores para su configuración
- Ser un administrador cuando la herramienta es invocada
- Editar actividades de herramienta externa por ejemplo, ser un instructor cuando la herramienta es invocada
- Ver actividades de herramienta externa por ejemplo, invocar actividades de herramienta externa


