Diferencia entre revisiones de «Añadir nuevos usuarios»
De MoodleDocs
(update from English 3.8) |
(tidy up) |
||
| Línea 2: | Línea 2: | ||
{{Bases de admin}} | {{Bases de admin}} | ||
==Añadir usuarios al sitio== | ==Añadir usuarios al sitio== | ||
Para que la gente entre a sus cursos, primeramente necesitan tener una cuenta en su sitio. Las dos formas más comunes de hacerlo son: | |||
*[[#Habilitar apuntarse al curso|Habilitar apuntarse al curso]] | *[[#Habilitar apuntarse al curso|Habilitar apuntarse al curso]] para que puedan crear sus propias cuentas en el sitio | ||
*[[#Crear un usuario|Crear una cuenta de usuario]] | *[[#Crear un usuario|Crear una cuenta de usuario]] para ellos, Usted, manualmente. | ||
==Habilitar apuntarse== | ==Habilitar apuntarse== | ||
# | #Ingrese con su cuenta de administrador | ||
# | #Desde el panel izquierdo (el Cajón de Navegación) haga clic en '''Administración del sitio''' | ||
# | #Haga clic en la pestaña de '''Plugins'" baje hasta '''Autenticación''' | ||
#Click '''Manage authentication''' | #Click '''Manage authentication''' | ||
#Click to open the 'eye' icon of '''Email-based self registration''': | #Click to open the 'eye' icon of '''Email-based self registration''': | ||
Revisión del 16:27 2 abr 2020
Nota: Urgente de Traducir. ¡ Anímese a traducir esta muy importante página !. ( y otras páginas muy importantes que urge traducir)
Añadir usuarios al sitio
Para que la gente entre a sus cursos, primeramente necesitan tener una cuenta en su sitio. Las dos formas más comunes de hacerlo son:
- Habilitar apuntarse al curso para que puedan crear sus propias cuentas en el sitio
- Crear una cuenta de usuario para ellos, Usted, manualmente.
Habilitar apuntarse
- Ingrese con su cuenta de administrador
- Desde el panel izquierdo (el Cajón de Navegación) haga clic en Administración del sitio
- Haga clic en la pestaña de Plugins'" baje hasta Autenticación
- Click Manage authentication
- Click to open the 'eye' icon of Email-based self registration:
6. Scroll down and from the 'Self registration' dropdown section, select Email-based self-registration:
7. Scroll down and click the button Save changes
Crear un usuario
- Log in with your administrator account
- From the left panel (the Navigation drawer) click Site administration
- Click the Users tab
- Click Add a new user
- Add your user details, using the icon
 for extra help
 - If you want their new account details emailed to them, click 'Generate password and notify user'
- Click Create user
Añadir usuarios al curso
Once users have accounts, you then need to give them access to the course. The two most common ways are:
- Habilitar apuntarse al curso so they can enrol themselves
- Añadir profesores y estudiantes to the course yourself manually.
Habilitar apuntarse al curso
- Log in as an administrator or teacher and go to the course you want to allow users to access
- Go to the course you want to allow users to access
- From the left panel (Navigation drawer) click Participants
- Click the cog icon on the right
 (above Enrol users) and select Enrolment methods
 - Click to open the eye of Self enrolment (Student)
Añadir profesores y estudiantes
- Log in with your administrator account and go to the course where you want to add teachers and students.
- From the left panel (Navigation drawer) click Participants
- Click Enrol users
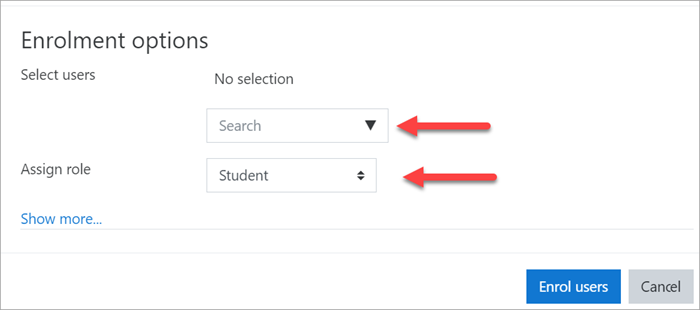
- From the dropdowns, select the users you want and the role you want to give them:
5. Click Enrol users.


