Diferencia entre revisiones de «29/Usando Tarea»
(tidy up 2) |
(old page) |
||
| (No se muestran 9 ediciones intermedias de 2 usuarios) | |||
| Línea 1: | Línea 1: | ||
{{Versiones|Esta documentación es para Moodle 2.9 y anteriores. Para la documentación de Moodle 3.1 y más recientes vea [[Usando Tarea]].}} | |||
{{Tarea}} | {{Tarea}} | ||
<p class="note">'''Nota''': Esta página es acerca del nuevo módulo de Tarea de Moodle 2.3 en adelante. Para la documentación acerca de Tareas (2.2), vea [https://docs.moodle.org/22/en/Using_Assignment Using Assignment] en la documentación en inglés para Moodle 2.2 .</p> | <p class="note">'''Nota''': Esta página es acerca del nuevo módulo de Tarea de Moodle 2.3 en adelante. Para la documentación acerca de Tareas (2.2), vea [https://docs.moodle.org/22/en/Using_Assignment Using Assignment] en la documentación en inglés para Moodle 2.2 .</p> | ||
==Diferentes opciones de envío== | ==Diferentes opciones de envío== | ||
Las opciones de entrega disponibles son: | |||
'' | * Entrega de archivos (Los/as estudiantes pueden subir y editar uno o varios archivos de cualquier tipo, que el profesor pueda abrir) | ||
* Texto en línea (Los/as estudiantes pueden escribir sus respuestas directamente en Moodle usando el editor de texto). | |||
* Comentarios del estudiante sobre la entrega (Los/as estudiantes pueden dejar comentarios en un área de texto asociada a la tarea) | |||
''Nota: También se puede usar el módulo tarea para calificar una tarea "fuera de línea", por ejemplo, una donde el trabajo se haga fuera de Moodle como una exposición en clase o un trabajo entregado en mano. Para hacer esto sólo debes dejar sin seleccionar todas las opciones anteriores.'' | |||
==¿Cual tipo de envío le queda mejor?== | ==¿Cual tipo de envío le queda mejor?== | ||
| Línea 49: | Línea 51: | ||
**Disadvantage: if students upload other file types, you have to download them, comment and then re-upload them. | **Disadvantage: if students upload other file types, you have to download them, comment and then re-upload them. | ||
=== | ===Si Usted quiere que los estudiantes le envíen un comentario o nota junto con su trabajo subido=== | ||
*In the settings, set ''Submission comments'' to Yes. | *In the settings, set ''Submission comments'' to Yes. | ||
=== | ===Si Usted quiere que los estudiantes puedan corregir un borrador del trabajo y puedan decidir cuando enviar su trabajo=== | ||
* | *En las opciones configure ''Requerir que los estudiantes hagan click en el botón paara enviar su trabajo'' a Si. Entonces los estudiantes podrán controlar cuando es que su borrador de la tarea está listo para ser enviado al profesor. | ||
=== | ===Si Usted quiere mantener un diaro contínuo o hacer una tarea iterativa=== | ||
*In the settings set ''Require students click submit button'' to No. Students can continue to make changes to their assignment and at no point do they 'submit'. If the work will be graded at some point it is recommended that either ''Prevent late submissions'' is set to Yes to ensure that no changes can be made after the due date, or [[Usando_Tarea#Estatus_de_envío| todos los envíos están bloqueados]] when grading commences to ensure that the work is not altered during grading. | *In the settings set ''Require students click submit button'' to No. Students can continue to make changes to their assignment and at no point do they 'submit'. If the work will be graded at some point it is recommended that either ''Prevent late submissions'' is set to Yes to ensure that no changes can be made after the due date, or [[Usando_Tarea#Estatus_de_envío| todos los envíos están bloqueados]] when grading commences to ensure that the work is not altered during grading. | ||
| Línea 63: | Línea 65: | ||
**Disadvantage: there is no record/history of previous attempts (such as with the [[Wiki]]). The online text assignment does not replicate the display of a journal or blog where each new entry is additional to the previous ones. | **Disadvantage: there is no record/history of previous attempts (such as with the [[Wiki]]). The online text assignment does not replicate the display of a journal or blog where each new entry is additional to the previous ones. | ||
=== | ===Si Usted quiere que los estudiantes envíen su trabajo en equipos=== | ||
*In the settings, set "Students submit in groups" to Yes. If you just do this, then once one student has submitted, the assignment will be flagged as submitted even if the others haven't contributed. If you want to ensure everyone has an input, set "Require students click submit button" to Yes and then change "Require all group members to submit" to Yes. The assignment will only be classed as submitted when each member has contributed, and once one student has submitted, the remaining members's names will be displayed for the group to see who still needs to add their input. | *In the settings, set "Students submit in groups" to Yes. If you just do this, then once one student has submitted, the assignment will be flagged as submitted even if the others haven't contributed. If you want to ensure everyone has an input, set "Require students click submit button" to Yes and then change "Require all group members to submit" to Yes. The assignment will only be classed as submitted when each member has contributed, and once one student has submitted, the remaining members's names will be displayed for the group to see who still needs to add their input. | ||
=== | ===Si Usted quiere calificar anónimamente el trabajo de los estudiantes=== | ||
*In the settings, choose "Blind marking". When students submit assignments, their names will be replaced by radomly generated participant numbers so you will not know who is who. Note that this is not '''totally'''''Italic text'' | *In the settings, choose "Blind marking". When students submit assignments, their names will be replaced by radomly generated participant numbers so you will not know who is who. Note that this is not '''totally'''''Italic text'' | ||
blind marking because you can reveal their identities in the assignment settings and you can work out identities from the logs - so this might not be suitable if your establishment has very precise privacy requirements. | blind marking because you can reveal their identities in the assignment settings and you can work out identities from the logs - so this might not be suitable if your establishment has very precise privacy requirements. | ||
=== | ===Si Usted quiere leer y calificar fuera-de-línea las tareas de los estudiantes=== | ||
*In the settings, choose "Offline grading worksheet". When students have submitted, click "View/grade all submissions" and you can download their assignments from the link "Download all submission" and download the grading sheet from the link "Download grading worksheet". You can then edit grades and re-upload the grading worksheet. You can also upload multiple feedback files in a zip from this drop down menu. See [[Configuraciones de Tarea]] for an explanation of how to use the "upload multiple feedback files as zip" feature. | *In the settings, choose "Offline grading worksheet". When students have submitted, click "View/grade all submissions" and you can download their assignments from the link "Download all submission" and download the grading sheet from the link "Download grading worksheet". You can then edit grades and re-upload the grading worksheet. You can also upload multiple feedback files in a zip from this drop down menu. See [[Configuraciones de Tarea]] for an explanation of how to use the "upload multiple feedback files as zip" feature. | ||
=== | ===Si Usted quiere ocultar las calificaciones de los estudiantes hasta una fecha que USted elija.=== | ||
Use 'marking workflow' as explained in [[Configuraciones de Tarea]] | Use 'marking workflow' as explained in [[Configuraciones de Tarea]] | ||
=== | ===Si Usted quiere moderar (supervisar) la forma de calificar de otros profesores o asignarle a ciertos estudiantes a ciertos profesores=== | ||
Use 'marking allocation' as explained in [[Configuraciones de Tarea]] | Use 'marking allocation' as explained in [[Configuraciones de Tarea]] | ||
== | ==¿Cómo es que los estudiantes envían sus tareas?== | ||
La primera página que verán los estudiantes cuando hagan click en el enlace a una actividad de [[Tarea]] en una página del curso mostrará el nombre de la tarea, su descripción y el estatus del envío. La primera vez que un estudiante mire la tarea se verá de esta manera: | |||
{| | {| | ||
|[[Image:statuses.jpg|thumb| | |[[Image:statuses.jpg|thumb|Vista del estudiante para la tarea]] | ||
|} | |} | ||
La sección acerca del estatus del envío incluye: | |||
*''' | *'''Estatus del envío''' | ||
*''' | *'''Estatus de calificación''' | ||
* | *Fecha esperada | ||
* | *Tiempo restante | ||
* | *Última modificación | ||
* | *Detalles del envío | ||
Conforme el estudiante progrese con el envío, se actualizarán el estatus del Envío y el estatus de Calificación y aparecerá la fecha de la última modificación. | |||
{| | {| | ||
|[[Image:submission statuses graded.jpg|thumb| | |[[Image:submission statuses graded.jpg|thumb|Ejemplo de tarea enviada y calificada]] | ||
|} | |} | ||
Si el estudiante sube un archivo PDF que el profesor ha corregido con anotaciones, éste estará disponible en la sección de Retroalimentación. El estudiante puede buscar dentro del documento y filtrar comentarios específicos. | |||
{| | {| | ||
|[[File:26pdfstudentgraded.png|thumb| | |[[File:26pdfstudentgraded.png|thumb|Vista del estudiante de un archivo PDF calificado]] | ||
|[[File:26searchcomments.png|thumb| | |[[File:26searchcomments.png|thumb|Buscar y filtrar comentarios en PDF con anotaciones del profesor]] | ||
|} | |} | ||
Los estatus del envío incluyen: | |||
*Nada enviado para esta tarea | |||
*Borrador (no enviado) | |||
*Enviado para calificarse | |||
Los estatus de calificación incluyen: | |||
*No calificado | |||
*Calificado | |||
=== | ===Envío de archivo=== | ||
Para enviar un archivo, los estudiantes completan los pasos siguientes: | |||
* | *Hacer click en el botón para ‘Añadir envío’ para que salga la página para subir archivo. | ||
* | *Subir el archivo relevante dentro del envío. El estudiante puede ‘arrastrar y soltar’ el archivo dentro de la caja para envío. | ||
* | *Hacer click en ‘Guardar cambios’. | ||
* | *Entonces deberá de aparecer una fecha de la última modificación y el/los archivo(s) subido(s) también se mostrarán. | ||
* | *Dependiendo de como esté configurada la tarea, el estatus mostrará, ya sea ‘Enviado para calificar’ - en cuyo caso ya no se requiere hacer nada más , o mostrará ‘Borrador (no enviado)’. | ||
* | *Si se necesitara hacer cambios, el estudiante hará click en ‘Editar mi envío’. | ||
* | *Una vez que la tarea editada ya esté lista para enviarse, el estudiante hace click en ‘Enviar tarea’. Tome nota de que una vez que la tarea haya sido 'enviada’ ya no se permitirá hacerle cambios. | ||
{| | {| | ||
|[[File:file upload.jpg|thumb| | |[[File:file upload.jpg|thumb|Vista del estudiante al añadir un envío]] | ||
|[[File:file uploaded.jpg|thumb| | |[[File:file uploaded.jpg|thumb|Vista del estudiante una vez que se subido un archivo]] | ||
|[[File:submit button.jpg|thumb| | |[[File:submit button.jpg|thumb|Vista del estudiante al enviar una tarea]] | ||
|} | |} | ||
Nota: Dependiendo de como esté configurada la tarea, los estudiantes podrán ver (ambos), tanto una página para envío de archivo, como un editor de texto en-línea. | |||
'''Nota del traductor': El botón para Enviar tarea está al fondo de la página'''. | |||
[[Archivo:ES boton para enviar tarea.png]] | |||
=== | ===Texto en-línea=== | ||
Para enviar texto-en-línea,los estudiantes completan los pasos siguientes: | |||
* | *Hacer click ene l botón para ‘Añadir envío’ para que aparezca la página del editor de texto | ||
* | *Escribir el texto relevante dentro del [[Editor de texto]], o pegarlo desde un archivo escritopreviamente. | ||
* | *Hacer click en ‘Guardar cambios’. | ||
* | *Aquí deberpa de aparecer la fecha de última modificación y los primeros 100 caracteres escritos también se mostrarán. | ||
* | *Dependiendo de como esté configurada la tarea, el estatus se verá como ‘Enviado para calificar’ - en cuyo caso no es necesario hacer nada más, o ‘Borrador (no enviado)’ | ||
* | *Si es necesario hacerle cambios, haga click en ‘Editar mi envío’. | ||
* | *Una vez que esté listo para enviarse, hacer click en ‘Enviar tarea’. Tome nota de que una vez que una tarea haya sido 'enviada’ ya no se permitirá hacerle más cambios. | ||
{| | {| | ||
|[[File:online text entered.jpg|thumb| | |[[File:online text entered.jpg|thumb|Texto-en-línea enviado]] | ||
|[[File:submit button online text.jpg|thumb| | |[[File:submit button online text.jpg|thumb|Envío de tarea]] | ||
|} | |} | ||
=== | ===Comentarios al envío=== | ||
Dependiendo de como haya sido configurada la tarea, puede haber una sección en donde los estudiantes podrán dejar sus comentarios al envío. | |||
{| | {| | ||
|[[Image:student comments.jpg|thumb| | |[[Image:student comments.jpg|thumb|Comentarios del estudiante]] | ||
|} | |} | ||
== | ==Notificaciones de Envíos== | ||
Moodle allows the sending of a notification to the student when a student submits an assignment. This feature provides reassurance to the students that they have correctly submitted their assignments, especially when using features like draft submissions and file uploads. Moodle also allows notifications to teachers either when students submit assignments, or when students submit assignments late, or both. This feature notifies markers of the presence of assignments, or provides a reminder to access assignments submitted after the due date. | Moodle allows the sending of a notification to the student when a student submits an assignment. This feature provides reassurance to the students that they have correctly submitted their assignments, especially when using features like draft submissions and file uploads. Moodle also allows notifications to teachers either when students submit assignments, or when students submit assignments late, or both. This feature notifies markers of the presence of assignments, or provides a reminder to access assignments submitted after the due date. | ||
'' | ''¿Porqué es útil esto?''' | ||
*Provides a receipt for student that the assignment has been successfully submitted | *Provides a receipt for student that the assignment has been successfully submitted | ||
*Provides notification to marker that assignment are submitted | *Provides notification to marker that assignment are submitted | ||
| Línea 166: | Línea 171: | ||
*'''Note''': When '''blind marking''' is used, students ''will'' receive a notification, but will ''not'' see feedback until all submissions are marked and '''reveal student identities''' is clicked. That releases rubric marks and inline comment feedback to all students. | *'''Note''': When '''blind marking''' is used, students ''will'' receive a notification, but will ''not'' see feedback until all submissions are marked and '''reveal student identities''' is clicked. That releases rubric marks and inline comment feedback to all students. | ||
''' | '''¿Cuándo es enviado?''' | ||
If ‘Require students to hit submit button’ is enabled within the assignment (formerly ‘enable send for marking button’ in 2.2), which requires students to click a final submit button and prevents further changes, only one notification will be sent upon hitting the submit button. | If ‘Require students to hit submit button’ is enabled within the assignment (formerly ‘enable send for marking button’ in 2.2), which requires students to click a final submit button and prevents further changes, only one notification will be sent upon hitting the submit button. | ||
| Línea 173: | Línea 178: | ||
''' | '''¿Donde están estas configuraciones?''' | ||
Submission Notification for Grader - ''Assignment > Edit Settings'' | Submission Notification for Grader - ''Assignment > Edit Settings'' | ||
| Línea 194: | Línea 199: | ||
Assignment notification - On submission of an assignment, the student will receive a notification that their assignment has been successfully received. | Assignment notification - On submission of an assignment, the student will receive a notification that their assignment has been successfully received. | ||
== | ==Ver y calificar tareas enviadas== | ||
When students have submitted their assignments, they can be accessed by clicking on the assignment activity. This will bring up the Grading Summary page. | When students have submitted their assignments, they can be accessed by clicking on the assignment activity. This will bring up the Grading Summary page. | ||
| Línea 209: | Línea 214: | ||
[[File:assignmentfilter.png]] | [[File:assignmentfilter.png]] | ||
=== | ===Estatus del envío=== | ||
If you will be assigning grades to student work, you may want to take note of the submission status before you begin the marking process. If you have required students click the Submit button, you may find that some submissions are still marked as Draft (not submitted), meaning the student has either uploaded a file(s) or entered some text, but has not clicked ‘Submit assignment’. | If you will be assigning grades to student work, you may want to take note of the submission status before you begin the marking process. If you have required students click the Submit button, you may find that some submissions are still marked as Draft (not submitted), meaning the student has either uploaded a file(s) or entered some text, but has not clicked ‘Submit assignment’. | ||
| Línea 227: | Línea 232: | ||
|} | |} | ||
=== | ===Calificación rápida=== | ||
Under Options (scroll to bottom of the page) you can determine your preferences for the number of assignments you wish to display per page. You can also filter assignments either to show all (no filter), submitted, or requires grading. This is also where you can turn on '''quick grading'''. | Under Options (scroll to bottom of the page) you can determine your preferences for the number of assignments you wish to display per page. You can also filter assignments either to show all (no filter), submitted, or requires grading. This is also where you can turn on '''quick grading'''. | ||
| Línea 239: | Línea 244: | ||
#A confirmation screen will appear. | #A confirmation screen will appear. | ||
=== | ===Página de calificación del estudiante=== | ||
If you have enabled File Feedback in the [[Configuraciones de Tarea]] and wish to upload either the marked student assignment, a completed text based feedback document or audio feedback, click on the green tick in the Grade column (or use the icon in the Edit column and select Grade). | If you have enabled File Feedback in the [[Configuraciones de Tarea]] and wish to upload either the marked student assignment, a completed text based feedback document or audio feedback, click on the green tick in the Grade column (or use the icon in the Edit column and select Grade). | ||
| Línea 266: | Línea 271: | ||
Note: The annotate PDF feature requires Ghostscript to be installed on the server. This can be checked in ''Administration > Site administration > Plugins > Activity modules > Assignments > Feedback plugins > Annotate PDF''. | Note: The annotate PDF feature requires Ghostscript to be installed on the server. This can be checked in ''Administration > Site administration > Plugins > Activity modules > Assignments > Feedback plugins > Annotate PDF''. | ||
=== | ===Controlar cuando se les notifica a los estudiantes acerca del trabajo calificado=== | ||
| Línea 274: | Línea 279: | ||
A checkbox is available when grading individual students. Choose Yes to notify them immediately or No to grade without notifying the student. | A checkbox is available when grading individual students. Choose Yes to notify them immediately or No to grade without notifying the student. | ||
=== | ===Descargar envíos de estudiantes=== | ||
You can download a zip file containing all of the assignment submissions by selecting the ‘Download all submissions’ options from the ''Choose'' menu at the top of the grading table, or in the settings menu. | You can download a zip file containing all of the assignment submissions by selecting the ‘Download all submissions’ options from the ''Choose'' menu at the top of the grading table, or in the settings menu. | ||
| Línea 281: | Línea 286: | ||
''Note - the files will have a Moodle unique identifier appended to the name, not your institutional student ID number.'' | ''Note - the files will have a Moodle unique identifier appended to the name, not your institutional student ID number.'' | ||
== | ==Mantenimiento de registros (archivar, exportar, respaldar)== | ||
When students unenrol from a Moodle area, their records become invisible through the Gradebook interface. In order to have the information to hand, departments or course teaching teams may need systems in place to keep their own records for the data retention period required in their particular context. There are two separate procedures for exporting student submissions and marks. | When students unenrol from a Moodle area, their records become invisible through the Gradebook interface. In order to have the information to hand, departments or course teaching teams may need systems in place to keep their own records for the data retention period required in their particular context. There are two separate procedures for exporting student submissions and marks. | ||
Revisión actual - 03:20 12 oct 2017
| Existe documentación diferente para varias versiones de Moodle: Esta documentación es para Moodle 2.9 y anteriores. Para la documentación de Moodle 3.1 y más recientes vea Usando Tarea. |
Nota: Esta página es acerca del nuevo módulo de Tarea de Moodle 2.3 en adelante. Para la documentación acerca de Tareas (2.2), vea Using Assignment en la documentación en inglés para Moodle 2.2 .
Diferentes opciones de envío
Las opciones de entrega disponibles son:
- Entrega de archivos (Los/as estudiantes pueden subir y editar uno o varios archivos de cualquier tipo, que el profesor pueda abrir)
- Texto en línea (Los/as estudiantes pueden escribir sus respuestas directamente en Moodle usando el editor de texto).
- Comentarios del estudiante sobre la entrega (Los/as estudiantes pueden dejar comentarios en un área de texto asociada a la tarea)
Nota: También se puede usar el módulo tarea para calificar una tarea "fuera de línea", por ejemplo, una donde el trabajo se haga fuera de Moodle como una exposición en clase o un trabajo entregado en mano. Para hacer esto sólo debes dejar sin seleccionar todas las opciones anteriores.
¿Cual tipo de envío le queda mejor?
Si Usted quiere que los estudiantes escriban directamente en línea respuestas más cortas o largas
- Set Online text to Yes. This works well for younger children who will only manage a sentence or two and works just as well for higher education students who write more.
- Advantage - quick for the student to get started; no need to use a word-processing program and upload the file. New in 2.8 The text is saved on a regular basis so it will be preserved if the student loses the page for some reason.
- Disadvantate: if the word count is expected to be large, setting Online text to No and File submission to Yes might be a better option.
Si Usted quiere que los estudiantes envén trabajos que Usted pueda descargar en un programa específico
- Set File submission to Yes, set the number of files you will allow using the Maximum number of uploaded files setting and the file sizes by using the Maximum submission size setting.
- Advantage - better than students emailing work as the whole class's work is collated in one space on your course. Markers can provide comments directly on the student work.
- Advantage - with "Attempts reopened" enabled, teachers can see the progression through various drafts of a student's work.
- Disadvantage - assignments must downloaded to be viewed (but they can be descargados masivamente) and the teacher needs the appropriate program to open them.
Si Usted quiere que los estudiantes envíen archivos en diferentes tiempo para un proyecto
- Set File submission to Yes, and use Maximum number of uploaded files to set the maximum number of separate files they can upload
- Advantage - all project files are in one assignment area for grading so they get a single grade.
- Disadvantage - all project files are in one assignment area for grading - so they can only have a single grade!
Si Usted quiere que los estudiantes escriban una respuesta a un video/sonido/archivo/imagen
- Set up an assignment allowing online text submission and get students to use the Moodle media icon to add video/sound/image files.
Si Usted quiere que los estudiantes respondan una serie de preguntas sobre un video/sonido/archivo/imagen
- Investigate the Examen module. Assignments are really just for a single question.
Si Usted quiere calificar el trabajo que los estudiantes han realizado fuera-de-línea
- Uncheck the submission types when setting up the assignment. Students won't be required to do anything but you can use the assignment to grade them for work done outside of Moodle.
Si Usted quiere ver, comentarles y regresarles sus tareas a los estudiantes
- Set up an assignment allowing file submissions.
- Advantage: useful for teachers who like using the "comment" options in word-processing programs for example. If you have Ghostscript enabled on your server and the students upload PDF files, you can annotate them inline. See the section Haciendo anotaciones en archivos PDF below.
- Disadvantage: if students upload other file types, you have to download them, comment and then re-upload them.
Si Usted quiere que los estudiantes le envíen un comentario o nota junto con su trabajo subido
- In the settings, set Submission comments to Yes.
Si Usted quiere que los estudiantes puedan corregir un borrador del trabajo y puedan decidir cuando enviar su trabajo
- En las opciones configure Requerir que los estudiantes hagan click en el botón paara enviar su trabajo a Si. Entonces los estudiantes podrán controlar cuando es que su borrador de la tarea está listo para ser enviado al profesor.
Si Usted quiere mantener un diaro contínuo o hacer una tarea iterativa
- In the settings set Require students click submit button to No. Students can continue to make changes to their assignment and at no point do they 'submit'. If the work will be graded at some point it is recommended that either Prevent late submissions is set to Yes to ensure that no changes can be made after the due date, or todos los envíos están bloqueados when grading commences to ensure that the work is not altered during grading.
- Advantage: the work remains in one place and is constantly improved, graded (if needed) and improved again.
- Disadvantage: there is no record/history of previous attempts (such as with the Wiki). The online text assignment does not replicate the display of a journal or blog where each new entry is additional to the previous ones.
Si Usted quiere que los estudiantes envíen su trabajo en equipos
- In the settings, set "Students submit in groups" to Yes. If you just do this, then once one student has submitted, the assignment will be flagged as submitted even if the others haven't contributed. If you want to ensure everyone has an input, set "Require students click submit button" to Yes and then change "Require all group members to submit" to Yes. The assignment will only be classed as submitted when each member has contributed, and once one student has submitted, the remaining members's names will be displayed for the group to see who still needs to add their input.
Si Usted quiere calificar anónimamente el trabajo de los estudiantes
- In the settings, choose "Blind marking". When students submit assignments, their names will be replaced by radomly generated participant numbers so you will not know who is who. Note that this is not totallyItalic text
blind marking because you can reveal their identities in the assignment settings and you can work out identities from the logs - so this might not be suitable if your establishment has very precise privacy requirements.
Si Usted quiere leer y calificar fuera-de-línea las tareas de los estudiantes
- In the settings, choose "Offline grading worksheet". When students have submitted, click "View/grade all submissions" and you can download their assignments from the link "Download all submission" and download the grading sheet from the link "Download grading worksheet". You can then edit grades and re-upload the grading worksheet. You can also upload multiple feedback files in a zip from this drop down menu. See Configuraciones de Tarea for an explanation of how to use the "upload multiple feedback files as zip" feature.
Si Usted quiere ocultar las calificaciones de los estudiantes hasta una fecha que USted elija.
Use 'marking workflow' as explained in Configuraciones de Tarea
Si Usted quiere moderar (supervisar) la forma de calificar de otros profesores o asignarle a ciertos estudiantes a ciertos profesores
Use 'marking allocation' as explained in Configuraciones de Tarea
¿Cómo es que los estudiantes envían sus tareas?
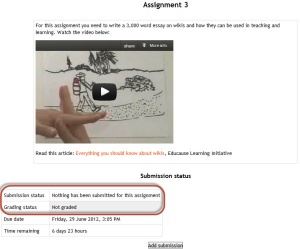
La primera página que verán los estudiantes cuando hagan click en el enlace a una actividad de Tarea en una página del curso mostrará el nombre de la tarea, su descripción y el estatus del envío. La primera vez que un estudiante mire la tarea se verá de esta manera:
La sección acerca del estatus del envío incluye:
- Estatus del envío
- Estatus de calificación
- Fecha esperada
- Tiempo restante
- Última modificación
- Detalles del envío
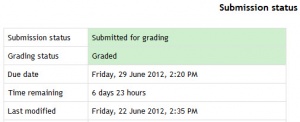
Conforme el estudiante progrese con el envío, se actualizarán el estatus del Envío y el estatus de Calificación y aparecerá la fecha de la última modificación.
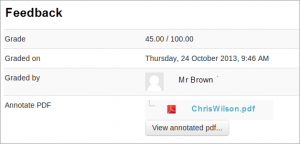
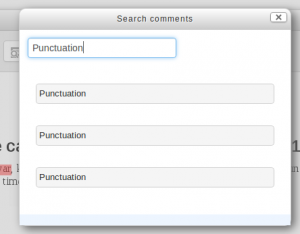
Si el estudiante sube un archivo PDF que el profesor ha corregido con anotaciones, éste estará disponible en la sección de Retroalimentación. El estudiante puede buscar dentro del documento y filtrar comentarios específicos.
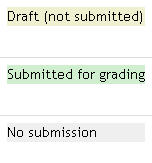
Los estatus del envío incluyen:
- Nada enviado para esta tarea
- Borrador (no enviado)
- Enviado para calificarse
Los estatus de calificación incluyen:
- No calificado
- Calificado
Envío de archivo
Para enviar un archivo, los estudiantes completan los pasos siguientes:
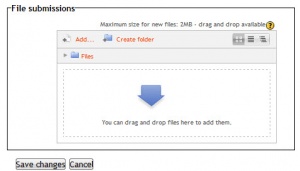
- Hacer click en el botón para ‘Añadir envío’ para que salga la página para subir archivo.
- Subir el archivo relevante dentro del envío. El estudiante puede ‘arrastrar y soltar’ el archivo dentro de la caja para envío.
- Hacer click en ‘Guardar cambios’.
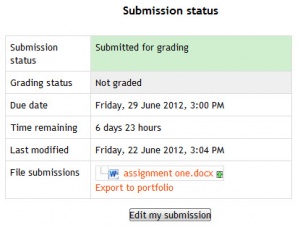
- Entonces deberá de aparecer una fecha de la última modificación y el/los archivo(s) subido(s) también se mostrarán.
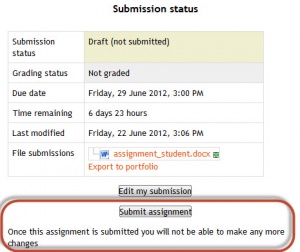
- Dependiendo de como esté configurada la tarea, el estatus mostrará, ya sea ‘Enviado para calificar’ - en cuyo caso ya no se requiere hacer nada más , o mostrará ‘Borrador (no enviado)’.
- Si se necesitara hacer cambios, el estudiante hará click en ‘Editar mi envío’.
- Una vez que la tarea editada ya esté lista para enviarse, el estudiante hace click en ‘Enviar tarea’. Tome nota de que una vez que la tarea haya sido 'enviada’ ya no se permitirá hacerle cambios.
Nota: Dependiendo de como esté configurada la tarea, los estudiantes podrán ver (ambos), tanto una página para envío de archivo, como un editor de texto en-línea.
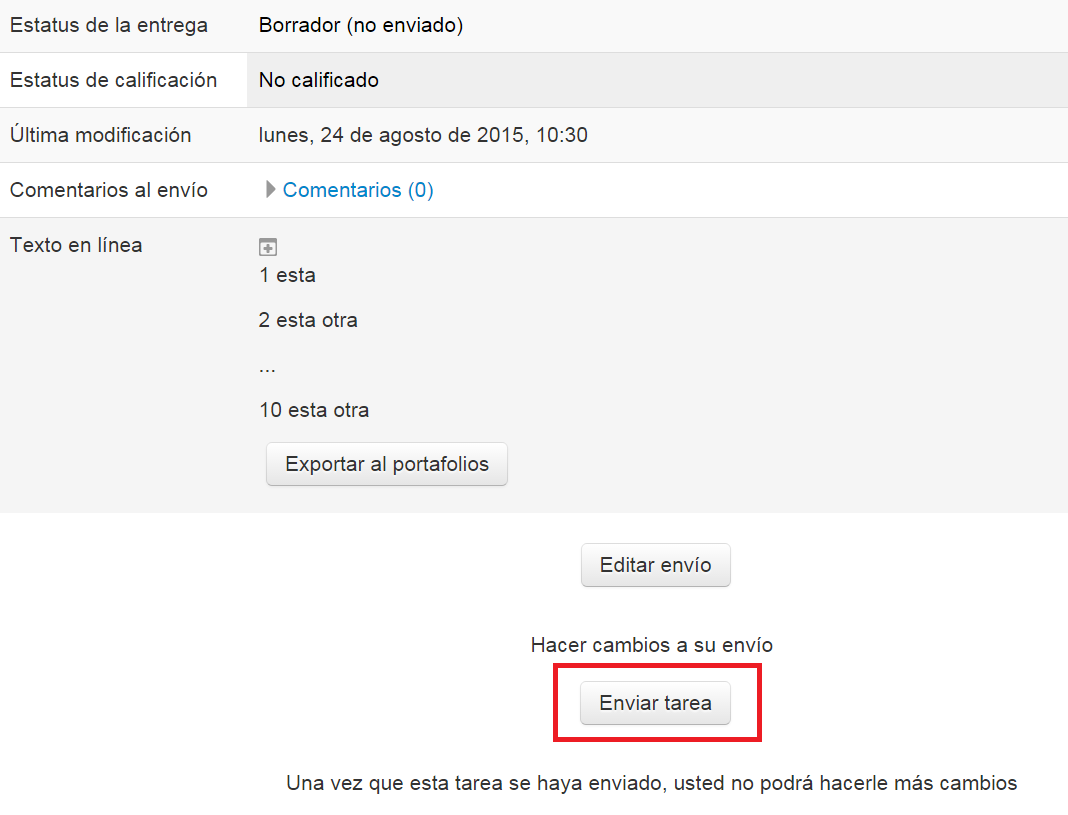
Nota del traductor': El botón para Enviar tarea está al fondo de la página.
Texto en-línea
Para enviar texto-en-línea,los estudiantes completan los pasos siguientes:
- Hacer click ene l botón para ‘Añadir envío’ para que aparezca la página del editor de texto
- Escribir el texto relevante dentro del Editor de texto, o pegarlo desde un archivo escritopreviamente.
- Hacer click en ‘Guardar cambios’.
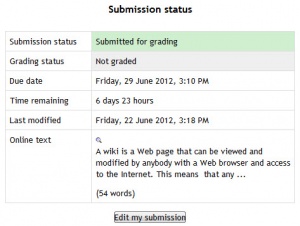
- Aquí deberpa de aparecer la fecha de última modificación y los primeros 100 caracteres escritos también se mostrarán.
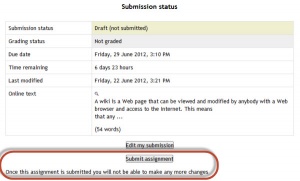
- Dependiendo de como esté configurada la tarea, el estatus se verá como ‘Enviado para calificar’ - en cuyo caso no es necesario hacer nada más, o ‘Borrador (no enviado)’
- Si es necesario hacerle cambios, haga click en ‘Editar mi envío’.
- Una vez que esté listo para enviarse, hacer click en ‘Enviar tarea’. Tome nota de que una vez que una tarea haya sido 'enviada’ ya no se permitirá hacerle más cambios.
Comentarios al envío
Dependiendo de como haya sido configurada la tarea, puede haber una sección en donde los estudiantes podrán dejar sus comentarios al envío.
Notificaciones de Envíos
Moodle allows the sending of a notification to the student when a student submits an assignment. This feature provides reassurance to the students that they have correctly submitted their assignments, especially when using features like draft submissions and file uploads. Moodle also allows notifications to teachers either when students submit assignments, or when students submit assignments late, or both. This feature notifies markers of the presence of assignments, or provides a reminder to access assignments submitted after the due date.
¿Porqué es útil esto?'
- Provides a receipt for student that the assignment has been successfully submitted
- Provides notification to marker that assignment are submitted
- Notifies of any changes to submission - for student’s record and to notify marker
- Provides notification to student that assignment feedback is available
- Note: When blind marking is used, students will receive a notification, but will not see feedback until all submissions are marked and reveal student identities is clicked. That releases rubric marks and inline comment feedback to all students.
¿Cuándo es enviado?
If ‘Require students to hit submit button’ is enabled within the assignment (formerly ‘enable send for marking button’ in 2.2), which requires students to click a final submit button and prevents further changes, only one notification will be sent upon hitting the submit button.
If ‘Require students to hit submit button’ is not enabled, and students are allowed to make alterations or add/remove files from their submission, this receipt will be sent every time the file is altered - ie once on adding the file, once on adding a second file, once on removal of file, once on uploading a new file.
¿Donde están estas configuraciones?
Submission Notification for Grader - Assignment > Edit Settings The grader is given two options:
- Notify Graders about Submissions - YES/NO
- Notify Graders about Late Submissions - YES/NO
The first option will notify the grader on any/all submissions made. The second will only send a notification for assignments submitted after the ‘Due Date’.
The Late Submissions option will be greyed out unless ‘Notify Graders about Submissions’ is selected as NO because ‘Notify Graders about Submissions’ will also send receipts for assignments submitted after the due date. To fully disable the grader receiving notifications, change both options to NO.
Submission Notification for Students - My Profile Settings > Messaging Tickboxes on the messaging page can be set by the student depending on their preference. A student can opt to receive notification via email, popup message, jabber or -if enabled by admin -mobile phone.
Assignment notification - On submission of an assignment, the student will receive a notification that their assignment has been successfully received.
Ver y calificar tareas enviadas
When students have submitted their assignments, they can be accessed by clicking on the assignment activity. This will bring up the Grading Summary page.
The Grading Summary page displays a summary of the assignment, including; number of participants, number of drafts, number of submitted assignments, due date and time remaining.
Clicking on the the ‘View/grade all submissions’ link will bring up the Grading Table.
The Grading Table contains columns of information about the student, the status of their submission, a link to grade their submission, a link to each submission and feedback comments and files (if enabled).
Filtering submissions
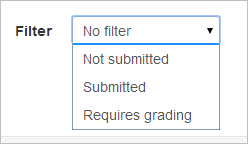
A dropdown menu accessed from the 'Options' section allows you to filter submissions so you can for example quickly see which students have not submitted yet.
Estatus del envío
If you will be assigning grades to student work, you may want to take note of the submission status before you begin the marking process. If you have required students click the Submit button, you may find that some submissions are still marked as Draft (not submitted), meaning the student has either uploaded a file(s) or entered some text, but has not clicked ‘Submit assignment’.
If it's after the due date and you are about to commencing marking that you use ‘Prevent submission changes’ to stop students from making changes to their assignment. You can do this one by one by using the icon in the Edit column.
Or you can select two or more students by putting a tick in the select column and going to 'Lock submissions’ from the With selected menu under the grading table.
Likewise you can also revert a student's submission to draft if they have uploaded the incorrect file. Instead of selecting ‘Prevent submission changes’ select ‘Revert the submission to draft’, or place ticks against selected students and choose 'Revert the submission to draft status' from the With selected menu under the grading table.
Calificación rápida
Under Options (scroll to bottom of the page) you can determine your preferences for the number of assignments you wish to display per page. You can also filter assignments either to show all (no filter), submitted, or requires grading. This is also where you can turn on quick grading.
Quick grading allows you to enter grades and a feedback comment (if enabled in Configuraciones de Tarea) directly into the grading table. Quick grading is not compatible with advanced grading and is not recommended when there are multiple markers.
- You can enter grades and feedback comments using quick grading. It is now possible to enter grades in decimal format. You will not be able to return a feedback file to your students (if enabled in the Configuraciones de Tarea).
- Enter the grades
- Scroll to the bottom of the grading table and click 'Save all quick grading changes'
- A confirmation screen will appear.
Página de calificación del estudiante
If you have enabled File Feedback in the Configuraciones de Tarea and wish to upload either the marked student assignment, a completed text based feedback document or audio feedback, click on the green tick in the Grade column (or use the icon in the Edit column and select Grade).
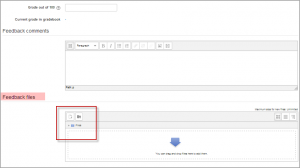
Here you can enter grades, feedback comments and feedback files (if enabled in the Configuraciones de Tarea). You can use drag and drop to upload feedback files.
Haciendo anotaciones a archivos PDF
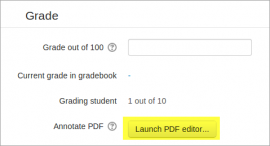
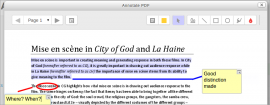
If the student has uploaded a PDF file you will see a link to Launch the PDF editor on the students' individual grading screen. This will display the PDF inline, allowing you to annotate it, using a variety of tools, stamps (if uploaded by the admin) and comments which may be saved to a comments bank. When the annotations are complete, clicking to save the changes will result in it being displayed to the student as part of their feedback. (Note that simply clicking on the file itself will not display it inline for annotating.)
Comments may be added and then saved in a quick list for future use. When adding a new comment, click the icon top right to access previously saved comments:
Note: The annotate PDF feature requires Ghostscript to be installed on the server. This can be checked in Administration > Site administration > Plugins > Activity modules > Assignments > Feedback plugins > Annotate PDF.
Controlar cuando se les notifica a los estudiantes acerca del trabajo calificado
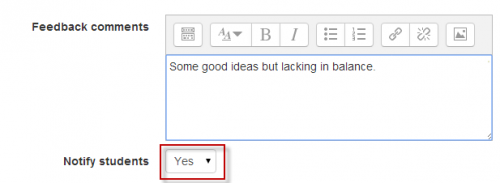
A checkbox is available when grading individual students. Choose Yes to notify them immediately or No to grade without notifying the student.
Descargar envíos de estudiantes
You can download a zip file containing all of the assignment submissions by selecting the ‘Download all submissions’ options from the Choose menu at the top of the grading table, or in the settings menu.
File submissions will be downloaded in the format uploaded by the student. Online text submissions will be downloaded as html files. Each file in the zip will include the student first and lastname at the beginning of the filename for identification purposes.
Note - the files will have a Moodle unique identifier appended to the name, not your institutional student ID number.
Mantenimiento de registros (archivar, exportar, respaldar)
When students unenrol from a Moodle area, their records become invisible through the Gradebook interface. In order to have the information to hand, departments or course teaching teams may need systems in place to keep their own records for the data retention period required in their particular context. There are two separate procedures for exporting student submissions and marks.
To export marks (with or without feedback):
- Go to your course area
- From its front page Settings block, select Grades; the Grader Report loads.
- From the Grader Report Settings block, select Export; a menu displays.
- From the menu, if you need easy viewing and running calculations you probably want to select one of the spreadsheet formats; a page of export settings loads
- Use the Visible Groups pulldown menu to limit the export to specific groups, as required
- In Options, you indicate whether feedback comments are included
- In Grade Items To Be Included lists you can, if required, omit particular Activities from the report
- When you've finished with the settings, click on Submit; a preview of your export displays
- Click on Download to export to the format you chose, and save the file.
To download the original student submissions:
- In your course area, click the link to the Assignment whose submissions you want to download.
- Click on the link to View/Grade all submissions; the Grading Table will load.
- Click the link to 'Download all submissions' (either from the Choose menu or from the Settings block), and save the file.
Sugerencias y Trucos
- Want to use an Assignment activity again in another Moodle site? Use the respaldar y restaurar options.
- Want to use an Assignment activity in another course you teach? Use the Función de importación in the course administration block.
- Moodle will sometimes appear not to be uploading a resubmitted assignment - you seem to be downloading the original assignment. This is a cache issue, in short, go to "Tools > Clear Recent History" in Firefox or "Tools > Delete Browsing History > Delete Temporary Files" in Windows Explorer. The newer file will then appear.
Vea también
Screencasts
Ejemplos de School demo site
- Teacher view of a PDF assignment which can be annotated inline.Log in with username 'teacher' and password 'moodle'
- Teacher view of allocated markers and marking workflow status. Log in with username 'teacher' and password 'moodle'
- Student view of an assignment. Log in with username 'student' and password 'moodle'. Scroll down to see the rubric and feedback.
- Student view of a student submission statement Log in with username 'student' and password 'moodle'
- Student view of group assignment grading screen Log in with username 'student' and password 'moodle'
- Teacher view of a group assignment grading screen Log in with username 'teacher' and password 'moodle'.
- Teacher view of blind marking grading screen Log in with username 'teacher' and password 'moodle'
Otros
- One approach to group project grading Blog post by Gavin Henrick.
- Using Moodle of using Assignment upload over emailing a document forum discussion
