OAuth 2 Microsoft service
Setup App In Microsoft
To set up an OAuth 2.0 client with Microsoft, you must first register a new application by using App registrations in the Azure Portal.
1. From Azure Portal home, under 'Azure services', select 'Azure Active Directory'
2. From the left hand menu, select 'App registrations'
3. Select 'New registration'
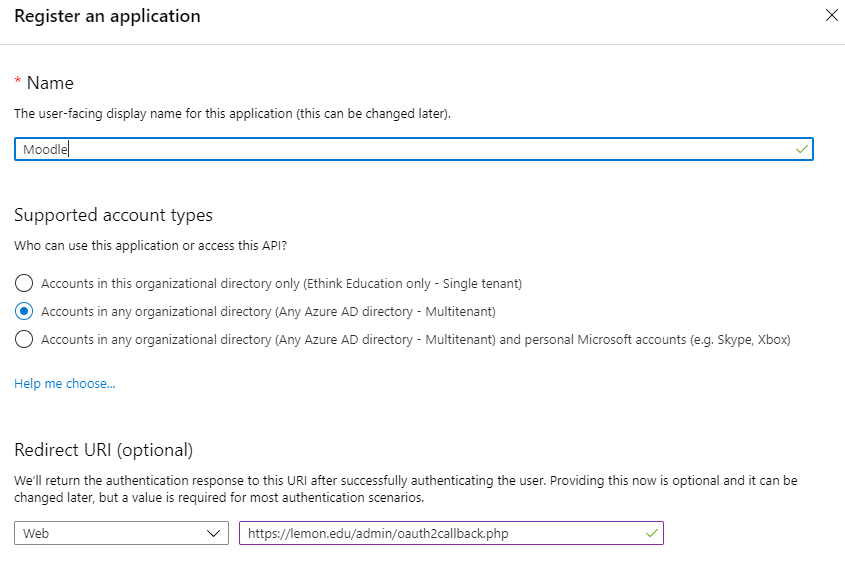
4. Choose a good name as this is what is shown to users when they are asked to approve the permissions.
5. Under supported account types select either:
5A. 'Accounts in this organizational directory only (your organization's name - Single tenant)'.
**Single-tenant apps are only available in the tenant they were registered in, also known as their home tenant. For single tenancy to work properly complete the additional steps outlined below under 'Additional Single Tenancy Configuration'.
5B. 'Accounts in any organizational directory (Any Azure AD directory - Multitenant)'.
**Multi-tenant apps are available to users in both their home tenant and other tenants (meaning anyone with an Office 365 account will have access, unless domains are added to the 'Login domains' field (Step 19) which will restrict logins to specific domains.)
6. Choose 'Web' for redirect URI and add the callback URL. The callback URL should point to "your Moodle site URL + /admin/oauth2callback.php". If your Moodle site was available at https://lemon.edu/ the callback URL would be https://lemon.edu/admin/oauth2callback.php. It is important that your Moodle site uses https and not http. Microsoft will not allow the callback url if it is not using https.
7. Click 'Register'.
8. Copy the 'Application (client) ID' to a safe place for later use.
9. Select 'Authentication' from side-bar menu.
10. Ensure implicit grant flow is disabled.
11. Select 'API permissions' from side-bar menu.
12. Make sure the "Microsoft Graph (1)" permissions section contains the "User.Read" permission.
13. Select 'Certificates & secrets' from side-bar menu.
14. Click 'New client secret' to create password/client secret.
15. Add a description and select when the password/secret will expire.
16. Copy the secret string value to a safe place for later use.
17. In Moodle go to OAuth2 services (Site administration > Server > OAuth2 services) and create a new Microsoft service.
18. Update the name if desired and enter the password/secret as the "Client secret" and the Application ID as the "Client ID".
19. Make any additional configuration changes such as limiting login domains, whether a login button will show on the login page, and if email verification is required.
Additional Single Tenancy Configuration
1. Once the above steps have been completed, click "Overview" if not already selected and choose "Endpoints".
2. From the list of endpoints copy the OpenID Connect metadata document endpoint URL. It is only necessary to copy the portion up to and including "v2.0". In the example below, the copied URL would be, "https://login.microsoftonline.com/96e0421d-d572-4839-9c32-b8bc00cf250b/v2.0/". Note that it is important to include the trailing slash.
3. Now return to Moodle and in the newly created OAuth2 Microsoft service, paste the endpoint in the 'Service base URL' field.
4. Save your changes.
See also
- OneDrive repository
- OAuth 2 authentication for enabling users to log in to Moodle with their Microsoft account


