Using certainty-based marking
From MoodleDocs
Note: This documentation is based on the more comprehensive Certainty-Based Marking from Tony Gardner-Medwin.
Certainty-Based marking (CBM)
- After each answer, you say how sure you are that your answer is correct.
- This is on a 3-point scale: C=1 (low), C=2 (mid) or C=3 (high)
- We don't rely on words like 'sure' or 'very sure' because these mean different things to different people
- The mark scheme and the risk of a penalty determine when you should use each C level:
How CBM works

- Certainty levels 1, 2, 3 always give you marks 1, 2, or 3 when you are correct
- If you are wrong, then unless you opted for C=1 you will lose marks: -2 at C=2 and -6 at C=3
Why use CBM?
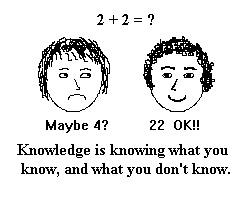
- To make students think about how reliable their answer is
- To encourage students to try to understand the issues,not just react immediately to a question
- To challenge: if a student won't risk losing marks if wrong then they don't really know the answer
- If a student is a careful thinker but not very confident. they will gain in confidence
- It is more fair - a thoughtful and confident correct answer deserves more marks than a lucky hunch
- Students need to pay attention if they make confident wrong answers: think,reflect, learn!
- Efficient study requires constantly questioning how our ideas arise and how reliable they are.

How to decide on the best certainty level
- If you're sure, obviously you do best with C=3. But you will lose twice over (-6) if you are actually wrong!
- If unsure, you should avoid any risk of penalty by choosing C=1
- In between, you are best to use C=2: you gain 2 or lose 2 depending on whether you are right.
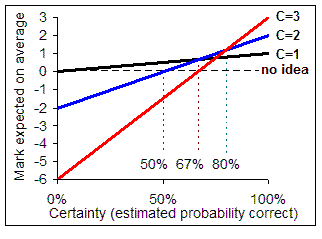
- The graph below shows how the average mark at each C level depends on the probability that your answer will be right.
- Suppose you think you only have a 50% chance of being right: The highest graph for 50% on the bottom scale is black, for C=1. So you will expect to boost your marks on average most by acknowledging your low certainty (C=1).
- If you think you can justify your answer well, with less than an 80% chance of being correct, then the red graph is highest, for C=3. Opt for this.

- Note that you can't ever expect to gain by misrepresenting your certainty. If you click C=3 (the red line) when you aren't sure, you will expect to do badly - with very likely a negative mark on average. If you understand the topic well, and think your answer is very probably right, then you will lose if you opt for C=1 or C=2 rather than C=3. You do best if you can distinguish which answers are reliable and which uncertain.
Scores
For more information on scores (relating to the UCL version of CBM but also relevant to Moodle) please see test scores with and without CBM by Tony Gardner-Medwin.