Als LTI-Tool bereitstellen: Unterschied zwischen den Versionen
- Einschreibungs-Plugins
- Manuelle Einschreibung
- Selbsteinschreibung
- Globale Gruppen
- Meta-Einschreibung
- Gastzugang
- Kursbereich
- Externe Datenbank
- CSV-Einschreibung
- IMS Enterprise Datei
- LDAP-Einschreibung
- Moodle-Netzwerk
- Paypal-Einschreibung
- Einschreibung bei Zahlung
- Als LTI-Tool bereitstellen
- Einschreibung FAQ
| Zeile 43: | Zeile 43: | ||
Wenn die entfernte Plattform auch ein Moodle-System ist (Moodle-to-Moodle LTI): | Wenn die entfernte Plattform auch ein Moodle-System ist (Moodle-to-Moodle LTI): | ||
# | # Gehen Sie auf die Seite ''Website-Administration > Plugins > Aktivitäten > Externes Tool > Tools verwalten. | ||
# Tragen Sie die kopierte Registrierungs-URL in das Feld ''Tool-URL''. | # Tragen Sie die kopierte Registrierungs-URL in das Feld ''Tool-URL''. | ||
# Klicken Sie auf den Button ''LTI Advantage hinzufügen''. | # Klicken Sie auf den Button ''LTI Advantage hinzufügen''. | ||
Version vom 3. Juni 2022, 13:18 Uhr
![]() Diese Seite muss überarbeitet werden. Greif zu!
Diese Seite muss überarbeitet werden. Greif zu!
Wenn du dich um diesen Artikel kümmern willst, dann kennzeichne das, indem du die Vorlage {{Überarbeiten}} durch die Vorlage {{ÜberarbeitenVergeben}} ersetzt.
Wenn du mit deiner Arbeit fertig bist, dann entferne die Vorlage aus dem Artikel.
Danke für deine Mitarbeit!
Moodle als LTI-Anbieter
Die Einschreibemethode Als LTI-Tool bereitstellen funktioniert zusammen mit der Authentifizierung LTI. Damit ist es möglich, dass Nutzer/innen anderer Moodle-Systeme (LTI-Konsumenten genannt) auf ausgewählte Kurse oder Inhalte Ihres Moodle-Systems zugreifen. Ihr Moodle-System wird so zum LTI-Anbieter. Alle Bewertungen werden an das Konsumenten-System zurückgesendet.
LTI 1.3 und LTI Advantage
Neue Funktionalität
in Moodle 4.3!
LTI 1.3 beschreibt die Kernspezifikation, die gebraucht wird, um eine LTI-Aktivität sicher innerhlab einer Plattform aufzurufen. Wenn die LTI 1.3 Kernfunktionalität mit den drei wesentlichen Diensten (Assignment and Grade Services v2.0, Names and Role Provisioning Services v2.0, Deep Linking v2.0) zusammengepackt wird, heißt das LTI Advantage. Mehr Informationen über LTI Advantage und seine Dienste finden Sie auf der IMS Global Website. Siehe https://www.imsglobal.org/activity/learning-tools-interoperability.
Unter LTI Advantage wird der Begriff Tool verwendet, um auf die Funktionalität eines externen Dienstes zu verweisen, während mit dem Begriff Platform die Anwendung bezeichnet wird, die die Funktionalität des Tools nutzt. Die Begriffe Tool und Plattform ersetzen die früheren Begriffe Konsument (consumer) und Anbieter (provider).
Einschreibemethode systemweit aktivieren
Die Moodle-Administration kann die Einschreibemethode Als LTI-Tool bereitstellen systemweit aktivieren:
- Gehen Sie auf die Seite Website-Administration (oder im Block Einstellungen > Website-Administration) > Plugins > Authentifizierung > Übersicht und aktivieren Sie LTI.
- Gehen Sie auf die Seite Website-Administration (oder im Block Einstellungen > Website-Administration) > Plugins > Einschreibung > Übersicht und aktivieren Sie Als LTI-Tool bereitstellen.
Es empfiehlt sich, auf der Seite Website-Administration (oder im Block Einstellungen > Website-Administration) > Sicherheit > HTTP-Sicherheit die Checkbox Frame-Einbettung erlauben zu markieren. Dann werden die LTI-Inhalte in einem Frame und nicht in einem neuen Fenster angezeigt.
Moodle bei der Plattform registrieren
Das Sicherheitsmodell für LTI 1.3 und LTI Advantage Dienste basiert auf OAuth 2.0 und OpenID Connect. Das ist anders als bei früheren Versionen des LTI Standards, der OAuth 1.0 verwendet hat. Praktisch bedeutet das, dass das Tool und die Plattform sich vorab wechselseitig registrieren müssen, bevor auf Aktivitäten und Kurse zugegriffen werden kann. Das bedeutet auch, dass die Verwendung von Consumer Key und Consumer Secret nicht mehr nötig sind, um den Zugriff auf Aktivitäten und Kurse abzusichern. Die Registrierung muss nur einmal erfolgen, indem man einen Link zwischen Tool und Plattform einrichtet. Dieser Link ist im Wesentlichen einen Sicherheitsvertrag zwischen den beiden Systemen.
Die Registrierung kann auf verschiedene Weisen erfolgen:
- Manuelle Registrierung: manueller Austausch von URLs und IDs zwischen der Plattform und dem Tool, ausgeführt durch eine/n Administrator/in.
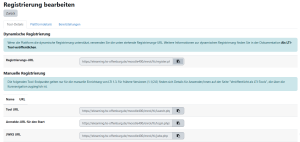
- Dynamische Registrierung - automatisierter Austausch der relevanten URLs und IDs. Die Plattform verwendet die Registrierungs-URL des Tools, um den Prozess zu starten.
Die dynamische Registrierung vereinfacht den Konfigurationsprozess für die Administrationerheblich und sollte bevorzugt verwendet werden, vorausgesetzt die Plattform unterstützt das. Manuelle Registrierung funktioniert auf allen Plattformen, die LTI Advantage kompatibel sind. Das ist die Methode der Wahl, wenn die Plattform keine dynamische Registrierung unterstützt.
Unabhängig von der Wahl der Methode ist der erste Schritt immer, über Website-Administration eine Plattform-Registrierung anzulegen.
Dynamische Registrierung
In Moodle:
- Gehen Sie auf die Seite Website-Administration > Plugins > Einschreibung > Als LTI-Tool bereitstellen > Tool registration.
- Klicken Sie auf den Button Eine Plattform registrieren.
- Geben Sie den Namen der entfernten Plattform ein und klicken Sie auf Weiter.
- Im Reiter Tool-Details kopieren Sie die Registrierungs-URL im Abschnitt Dynamische Registrierung.
In der entfernten Plattform: Wie genau die Registrierungs-URL verwendet wird, hängt von der entfernten Plattform ab.
Wenn die entfernte Plattform auch ein Moodle-System ist (Moodle-to-Moodle LTI):
- Gehen Sie auf die Seite Website-Administration > Plugins > Aktivitäten > Externes Tool > Tools verwalten.
- Tragen Sie die kopierte Registrierungs-URL in das Feld Tool-URL.
- Klicken Sie auf den Button LTI Advantage hinzufügen.
- Wenn Sie auf die entsprechende Seite weitergeleitet werden, wählen Sie Als neues externes Tool registrieren (die Weiterleitung funktioniert nur, wenn ein anderes Moodle-Tool aus derselben Domain bereits konfiguriert ist).
- Wenn die Seite neu geladen ist und das Tool angezeigt wird, klicken Sie auf ativieren.

Sobald die Registrierung abgeschlossen ist, werden die Plattformdetails und eine zugehörige Deployment ID automatisch zur Registrierung in Moodle hinzugefügt. Um sich davon zu überzeugen, gehen Sie auf die Seite Website-Administration > Plugins > Einschreibung > Als LTI-Tool bereitstellen > Tool registration. Dort werden Sie die Registrierung mit dem Status Aktiv sehen. Kicken Sie auf das Aktionen-Symbol Plattformdetails anzeigen, um die relevanten Plattforminformationen anzusehen, und auf das Symbol Bereitstellungen verwalten, um Bereitstellungen hinzuzufügen oder zu löschen. Diese Aktionen sind jedoch nicht erforderlich.
Manuelle Registrierung
There are two parts to the manual registration process. Firstly, it requires information be copied from the Moodle tool into the platform, as part of configuring the tool there. Finally it requires information about the tool configuration in the platform be copied into the Moodle tool site to complete the process.
Starting in the Moodle tool:
- As an admin user, go to "Site administration > Plugins > Enrolments > Publish as LTI tool > Tool registration"
- Click the "Register a platform" button to create a new platform registration
- Enter the name of the platform and click "Continue"
- You'll see a "Tool details" tab. Leave this browser window open.
Now, in the platform (the exact setup is platform dependent but this guide assumes another Moodle site is being used as the platform):
- As an admin user, go to "Site administration > Plugins > Activity modules > External tool > Manage tools"
- Click "Configure a tool manually"
- Change the field "LTI version" to "LTI 1.3"
- Change "Public key type" to "Keyset URL"
- Enable "Supports Deep Linking (Content-Item Message)"
- Copy the following URLs from the tool site into the respective form fields on the platform site:
- Copy "Tool URL" into both the "Tool URL" field and the "Redirection URI(s)" field
- Copy "Initiate login URL" into the "Initiate login URL" field
- Copy "JWKS URL" into the "Public keyset" field
- Copy "Deep linking URL" into both the "Content selection URL" field and the "Redirection URI(s)" field (on a new line)
- Set a tool name and save the configuration.
- On the resulting tool card, click "View configuration details" and leave this browser window open
Now, back in the Moodle tool again:
- As the admin user, go to "Site administration > Plugins > Enrolments > Publish as LTI tool > Tool registration"
- If you have the registration open still, simply click the "Platform details" tab. If not, from the registration table, click the "View platform details" action. You'll see a table listing the various platform endpoints and identifiers.
- Click "Edit platform details"
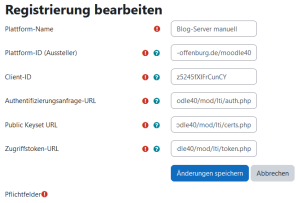
- Copy the following values from the platform site's tool configuration into the respective form fields:
- Copy "Platform ID" into the "Platform ID (issuer)" field
- Copy "Client ID" into the "Client ID" field
- Copy "Public keyset URL" into the "Public keyset URL" field
- Copy "Access token URL" into the "Access token URL" field
- Copy "Authentication request URL" into the "Authentication request URL" field
- Save
- Next, select the "Deployments" tab
- Click "Add a deployment"
- Copy the "Deployment ID" from the platform site's tool configuration into the "Deployment ID" field
- Enter a deployment name and save.
The registration process is now complete. Click the "Back" button or navigate to "Site administration > Plugins > Enrolments > Publish as LTI tool > Tool registration", where you will now see the registration listed as "Active".
TODO: Zugriff auf Kurse oder Kursinhalte teilen
- Gehen Sie in den Kurs auf Ihrem Moodle-System und fügen Sie über die Kursnavigation Teilnehmer/innen und im Pulldown-Menu Einschreibemethoden (oder im Block Einstellungen > Kurs-Administration > Nutzer/innen > Einschreibemethoden) die Methode Als LTI-Tool bereitstellen hinzu.
- Im Auswahlmenü Tool to be provided wählen Sie den Kurs oder den Kursinhalt aus, den Sie für externe LTI-Konsumenten bereitstellen möchten.
- Klicken Sie auf den Button Methode hinzufügen.
- Klicken Sie in der Kursnavigation Mehr
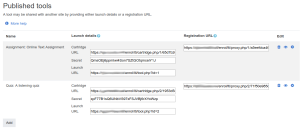
 > Als LTI-Tool bereitgestellt (oder im Block Einstellungen > Kurs-Administration > Als LTI-Tool bereitgestellt) und notieren Sie sich die URL und das Secret. Beide Daten müssen Sie den LTI-Konsumenten bekanntgeben. Das können andere Moodle-Systeme oder LTI-konforme Lernplattformen, wie z.B. Sakai sein. Wenn das Konsumentensystem eine andere Moodle-Site ist, dann müssen Sie dort in einem Kurs ein Externes Tool anlegen und auf der Konfigurationsseite die URL und das Secret eintragen.
The published activity or course is now ready for use in platforms via the content selection flow.
Note: The fields "Launch URL" and "Custom properties" are only relevant when sharing the content with instructors who don't have an account in the Moodle tool. If you're using Content selection, you can ignore these values.
Grade and user synchronisation (if configured) is handled asynchronously via the 'Publish as LTI tool grade sync' and 'Publish as LTI tool users sync' scheduled tasks, which run by default every 30 minutes.
If user synchronisation is set to yes, enrolled users in the remote system are synchronised with enrolments in the course, with an account created for each remote user as necessary, and the user enrolled or unenrolled as required. If set to no, at the moment when a remote user accesses the tool, an account will be created for them and they will be automatically enrolled.
User account provisioning
When users access a shared activity or course for the first time, Moodle will need to either find an existing account or create an account for them. Historically, all first launches resulted in the creation of new user accounts in Moodle, meaning users with existing accounts had no way to reuse those accounts. Account provisioning modes solve this problem by providing control over how accounts are created or linked on first launch. Additionally, in the case of teachers, they permit a richer experience via Content Selection, a process allowing the teacher to launch into Moodle using their existing Moodle account and select from any shared course or activity they have access to. More on this in the next section.
TODO: On the LTI platform site
Different platforms have different means of configuring and using LTI tools. The preferred means of configuring a course or activity link is by using Deep Linking (Content Selection), however, this requires that instructors have an existing account on the Moodle tool site. In instances where this isn't the case, course or activity links can be manually configured in the platform. Both methods are described below.
Link creation via content selection
The following describes the recommended process for teachers when using another Moodle site as the platform and assumes the tool-platform registration process has already been completed. More information on the Moodle external tool setup can be found at External tool.
- Make sure you're signed in to the Moodle tool site in another browser tab (if not, you will be prompted to do so later)
- In the platform site, visit a course
- Add an External Tool activity, or select a pre-configured tool from the activity chooser.
- Click the "Select content" button
- When prompted, link your account
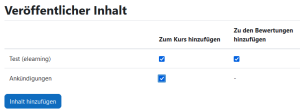
- Select from a list of activities and courses to which you have access (optionally adding line items to the platform gradebook, where applicable - see note below), clicking "Add content" when done
- Save and launch the activity
Note: For platforms supporting coupled line items, Moodle can send information about the activity's grade to the platform during content selection. This allows the platform to create the respective line item in its grade book at the time of link creation. Whether this information is returned to the platform or not depends on two things: whether the published course or activity supports grades, and whether the 'Add to gradebook' checkbox is ticked during content selection.
Manual link creation
For users who don't have an account on the Moodle tool site, content selection isn't possible. These users can manually configure the activity link in the platform via the following process. Again, this assumes the tool-platform registration process has already been completed.
- In the platform site, visit a course
- Add an External Tool activity, or select a pre-configured tool from the activity chooser.
- Click "Show more"
- Enter the published course or activity's "Launch URL" into the "Tool URL" field
- Enter the published course or activity's "Custom properties" into the "Custom parameters" field
- Save and launch the activity
Custom launch parameters
Note: If you would prefer to not show blocks for teachers, you can pass the custom parameter "force_embed = 1". This may limit the functionality available to teachers and admins. To get blocks back, simply remove the parameter.
TODO: LTI Advantage, LTI 1.1 or LTI 2.0?
Moodle supports publication of content over several IMS LTI standards; LTI Advantage, LTI 1.1 and LTI 2.0. LTI Advantage is the current standard; LTI 1.1 and 2.0 have been deprecated. Courses and activities should be published using LTI Advantage. The legacy publication methods will continue to function in their current state to allow organisations to progressively move to LTI Advantage and will be removed in the future. More information about legacy methods can be found in the "Legacy resources" section below.
Alte Legacy Materialien
Die folgenden Materialien gehören jetzt zu den veralteten Versionen von LTI (1.1 und 2.0).
Zugriff auf einen Kurs oder eine Aktivität teilen (LTI 1.1 und 2.0)
- Gehen Sie im Kurs, dessen Inhalte Sie teilen wollen, auf die Seite Kurs-Administration > Nutzer/innen > Einschreibemethoden. Im Menü Methode hinzufügen wählen Sie die Option Als LTI-Tool bereitstellen aus.
- Auf der Konfigurationsseite der Einschreibemethode wählen Sie im Menü zu veröffentlichendes Tool den Kurs oder die Aktivität aus, die Sie teilen wollen.
- Klicken Sie auf den Button Methode hinzufügen unten auf der Konfigurationsseite.
- Gehen Sie im Kurs auf die Seite Kurs-Administration > Als LTI-Tools bereitgestellt und notieren Sie sich die Start URL für die LTI Consumer Site (mehr Informationen dazu weiter unten). Die URL hat die Gestalt: .../enrol/lti/...
- Sie müssen für die LTI Consumer Site auch einen Consumer Key bereitstellen. Das kann eine beliebige Zeichenkette sein.
Der LTI Consumer kann eine andere Moodle-Site oder jede andere LTI-Consumer-kompatible Lernplattform sein. Abhängig von den Anforderungen des LTI Consumers können Sie eine Cartridge URL (auch Configuration URL genannt) plus ein Secret ODER eine Start URL (ab Moodle 3.5.2) ODER ein Registration URL bereitstellen.
Die Synchronisation von Bewertungen und Nutzer/innen erfolgt nach denselben Regeln wie bei LTI 1.3 und LTI Advantage.
Vergleich von LTI 1.1 und 2.0 Begriffen in verschiedenen Plattformen
| IMS Spec | Moodle | Canvas | Edu App Center (Canvas) | Desire2Learn | Blackboard | Sakai | Chamilo |
|---|---|---|---|---|---|---|---|
| Tool Consumer | External Tool | External App | App | Link | LTI Tool Provider* | Sakai Basic LTI Portlet | IMS/LTI Plugin |
| Launch URL | Tool URL | Launch URL | k.A. | URL | Provider Domain | Remote Tool URL | Launch URL |
| Secret | Secret | Secret | Secret | Secret | Tool Provider Secret | Remote Tool Secret | Secret |
| Cartridge URL | Tool URL | Paste XML | Configuration URL | k.A. | k.A. | Tool Registration File? | k.A. |
| Proxy URL | Registration URL/Tool URL | LTI 2 Registration URL | k.A. | k.A. | k.A. | - | k.A. |
Bekannte Probleme
Das Einrichten von LTI kann kompliziert sein. Im Folgenden zählen wir die häufigsten Probleme auf, von denen Moodle-Nutzer/innen berichten. Wie immer hilft es, den Debug-Modus von Moodle einzuschalten, um der Fehlerquelle auf die Spur zu kommen.
Bekannte Proleme unter LTI 1.1 und 2.0
Fehler: Einschränkungen wegen unterschiedlicher Protokolle
Wenn Moodle das HTTP-Protokoll (und nicht HTTPS) verwendet, können Sie das Tool nur auf Seiten verwenden, die auch unter HTTP (und nicht HTTPS) laufen. Wir empfehlen, Moodle unter HTTPS laufen zu lassen. Siehe Moodle auf HTTPS umstellen.
Fehler: A required parameter (oauth_consumer_key) was missing
Dieser Fehler tritt auf, wenn der Consumer Key Parameter fehlt. Wie oben erwähnt, kann der Consumer Key eine beliebige Zeichenkette sein, er darf nur nicht leer sein. Halten Sie den Key kurz und verwenden Sie möglichst keine Sonderzeichen.
Fehler: Nutzer/in hat Zugriff auf die Plattform, aber nicht auf den Kurs
Das passiert, wenn der Kursinhalt nicht eingebettet ist. Aktivieren Sie auf der Seite Website-Administration > Sicherheit > HTTP-Sichheit die Checkbox Frame-Einbettung erlauben. Auf der Konsumenten-Seite setzen Sie in der LTI-Tool-Konfiguration die Einstellung custom parameters auf force_embed=1.
Fehler: This XML file does not appear to have any style information associated with it.
Einige Tool-Konsumenten, z.B. Sakai und Chamilo, unterstützen keine Cartridge URLs. Dann ist es besser, die Launch URL zu verwenden.
Fehler: Invalide request
Dieser Fehler kann aus verschiedenen Gründen auftreten, deshalb kann es schwierig sein, die Wurzel des Problems zu finden. Eine Ursache kann sein, dass beim Tool Consumer deep linking aktiviert ist. In Plattformen, die diese Funktionalität haben (z.B. Chamilo und Canvas) kann es helfen, deep linking zu deaktivieren.
Siehe auch
- LTI und Moodle
- LTI authentication not working Diskussionsbeitrag auf moodle.org
- saLTIre - Test-System für LTI
Weitere Fragen?
Schreiben Sie einen Beitrag imLTI und Moodle Forum auf moodle.org.


