OAuth 2 LinkedIn service: Difference between revisions
From MoodleDocs
Helen Foster (talk | contribs) (page requires updating template) |
Mary Cooch (talk | contribs) (updating with ref to MDL-79181) |
||
| Line 1: | Line 1: | ||
{{OAuth2}} | {{OAuth2}} | ||
== LinkedIn setup == | == LinkedIn setup == | ||
To setup an OAuth 2 client with LinkedIn, first we need to login to the [https://www.linkedin.com/developers/ LinkedIn Developers page] and create a new app. | To setup an OAuth 2 client with LinkedIn, first we need to login to the [https://www.linkedin.com/developers/ LinkedIn Developers page] and create a new app. | ||
*Request access and add the product "Sign in with LinkedIn using OpenID Connect". | |||
*Make sure you've set the "Authorized redirect URLs for your app" to: YOURSITE/admin/oauth2callback.php | |||
*Go to your Moodle site and log in as admin. | |||
* | *Go to "Site admin > Plugins > Authentication" and enable the "OAuth2" authentication plugin | ||
*Go to "Site admin > Server > OAuth 2 Services" | |||
*Click the "LinkedIn" button | |||
*Enter your Client ID and Client secret (You'll find these on the 'Auth' tab of your LinkedIn dev portal app.) | |||
*Decide whether or not to uncheck "Require email verification" -and if you do uncheck it, tick the "I understand that disabling email verification can be a security issue" box to confirm. | |||
*Save changes. | |||
Go to | |||
[[File: | [[File:ouath2linkedin.png]] | ||
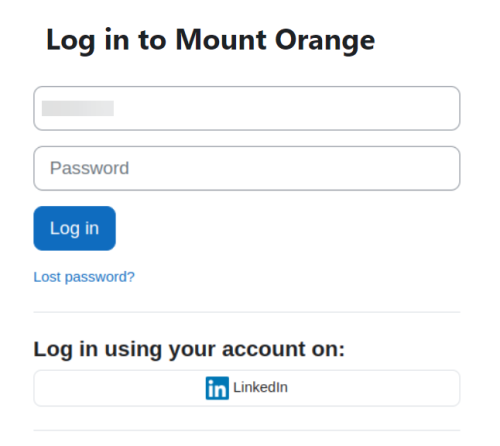
Users will now see a LinkedIn option when logging in to your site. | |||
[[File:LinkedInlogin.png|left|500px]] | |||
Revision as of 15:26, 3 December 2023
LinkedIn setup
To setup an OAuth 2 client with LinkedIn, first we need to login to the LinkedIn Developers page and create a new app.
- Request access and add the product "Sign in with LinkedIn using OpenID Connect".
- Make sure you've set the "Authorized redirect URLs for your app" to: YOURSITE/admin/oauth2callback.php
- Go to your Moodle site and log in as admin.
- Go to "Site admin > Plugins > Authentication" and enable the "OAuth2" authentication plugin
- Go to "Site admin > Server > OAuth 2 Services"
- Click the "LinkedIn" button
- Enter your Client ID and Client secret (You'll find these on the 'Auth' tab of your LinkedIn dev portal app.)
- Decide whether or not to uncheck "Require email verification" -and if you do uncheck it, tick the "I understand that disabling email verification can be a security issue" box to confirm.
- Save changes.
Users will now see a LinkedIn option when logging in to your site.

