VideoTime premium version advanced doc
1. Deep Vimeo integration
In one Sentence:
Directly connects your Moodle/Totara site to Vimeo using their API.
Objective / Added value:
By using Vimeo as repository you get all advantages of Vimeo CDN (meaning ‘Contents Delivery Network’) platform into your own Moodle courses; high performance streaming platform, no local storage overload, all advanced Vimeo player capabilities and controls and last but not least confidentiality of your video material (No download and no embedding if watcher is not authorized to do so).
But to get those advantages you have to manually create a link between your Moodle activity and your Vimeo account. Each time you want to insert a Video Time activity, you have to visit your Vimeo account and copying your Vimeo video URL, and paste it at the right location onto your Moodle course activity settings. This could be really time consuming. In order to save time, you may be able to create a permanent and secure connection between your Moodle account and your Vimeo account.
Such connection is based upon Vimeo built-in API and App management. The only thing you have to do is create an App from you Vimeo account, including a ‘Client identifier’ and a ‘Client secret Key’ and use both to create a secure and permanent link between your Moodle and Vimeo accounts.
How To:
This is a 2 steps procedure;
- Step 1: Create Vimeo app, ID and Key.
- Caution; This is a Vimeo global account setting and so requires Vimeo owner rights. If you don’t, ask your Vimeo account admin.
- Referral Vimeo Documentation;
- To create a Vimeo app, read the Vimeo developer documentation here; https://vimeo.zendesk.com/hc/en-us/articles/360042445632-How-do-I-create-an-API-app-
- Here is the page to start from your Vimeo account; https://developer.vimeo.com/apps/new
- Step 2: Copy/Paste your Vimeo video URL
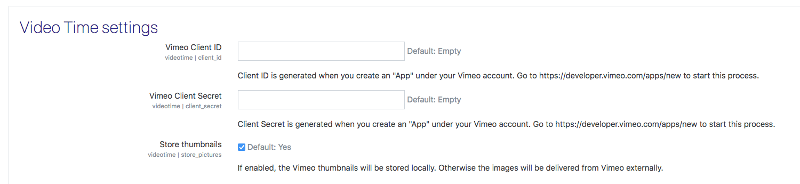
- Once done, copy your Vimeo Client ID and Secret Key, go to the Main setting page of your Video Time plugin on your Moodle admin site, and paste both values into appropriate fields; ‘Vimeo Client ID’ and ‘Vimeo Client Secret (Key)’.
- Caution; This is a plugin level configuration and so requires admin rights. If you don’t, ask your site admin. => Site administration > Plugins > Plugins overview > Video Time Settings
- Note: Remember to authorise your Vimeo videos embedding to your Moodle site by adding your Moodle domain name on your Vimeo account, as a global setting or as a per video settings (Vimeo account Settings Menu > Videos > Upload defaults).
2. Media library
In one Sentence:
See all videos from your connected Vimeo account in Moodle; supports searching, filtering and previewing videos.
Objective / Added value:
Once your Vimeo and Moodle Accounts permanently and securely connected, you would be able to load a special preview window listing all your videos published on your Vimeo account. This feature will become a game changer and great time saver, since you may directly embed any video from this listing directly into your Moodle course, without the need to copy/paste the Video link/URL from your Vimeo account repository.
How To:
Once again, this is a 2 steps procedure;
- Step 1: Add activity an open preview window.
- Select the right place into your Moodle course to add a Video Time activity, do so and then push down the ‘Choose Video’ button.

- This will automatically load and open the preview window, listing all videos being on your Vimeo account.
- Step 2: Select and embed video.
- Then make your choice and select the video you want to embed in this place and push down the ‘Use’ button.

- Because your listing will be exhaustive, it should be very populated.
- To help yourself to shorten such list you may filtering by using Filters and Tags already used into your Vimeo repository or using search capabilities.
- To finish, confirm selection an action by pushing down the ‘Yes’ button. That’s all!
Note: You may also automatically pull meta data from your Vimeo account (related to current video) to populate video information’s into your Moodle courses by ticking the ‘Insert metadata’ check box. This will automatically copy and embed title and description video information’s into your Moodle course. This can also be done on existing video by pushing ‘Pull Metadata from Vimeo’ button on video activity ‘General’ settings param window.
Note for admin: Current discussed process requires the appropriate cron process has run in order to pull videos listing from your Vimeo account. This process is named ‘Discover Vimeo videos. Such cron task need to be scheduled at least once per day. If requested, or in case of emergency, schedule may be adapted using the unix cron format and rules.
Caution: This is a Moodle site level configuration and so requires admin rights. If you don’t, ask your site admin. => Site administration > Server > Tasks > Scheduled tasks > Discover Vimeo videos (Video Time Repository)
3. Preview mode
In one Sentence:
Displays the Video Time activity with a preview image in a card on the course page.
Objective / Added value:
By default, when using free or pro version, video will be displayed as a text link or as label layout on course page.
Thanks to this Media library Repository concept, you will get a new mode display option, coming with Business version, named ‘Preview image mode’.
When chosen, video will be displayed into a video thumbnail on course page. This poster preview image will be directly linked to the right video. So clicking on the thumbnail image will start video lecture and watching in the player.
How To:
Once business version installed, this new display feature becomes automatically available and appears as usable (and no more as greyed and not usable) in the General settings parameters window. Simply check the ‘Preview image mode ‘radio button when inserting a new Video Time activity.
Such ‘Preview image mode’ includes a few layout parameters and display options, like;
- Some global parameters often already existing on your Vimeo videos parameters which can be imported from Vimeo into your Video Time activity parameters, like; Video Title, Video Description, Video Tags, Video Duration, Viewed Duration (dynamic parameter based upon user’s activity)
- The number of items on a line (number of columns), with 4 options, from 1 column to 4 columns;
- On column design mode means one video will take the full available width (100 %), so you get 1 video per line.
- Two columns design mode means each video will take an half of full available width (50 %), so you get 2 videos per line.
- Three columns design mode means each video will take a third of full available width (33 %), so you get 3 videos per line.
- Four columns design mode means each video will take a quarter of full available width (25 %), so you get 4 videos per line.
- The global display of the video poster or preview image, with 2 different options in terms of size (1920*1200 pixels or 640*400 pixels) with or without ‘Play’ Button embedded.
Modify Display options;
- To manage global ‘Display options’ layout, simply tick desired options.
- To modify the ‘Columns’ layout, select right option in ‘Columns’ drop-down list.
- To modify the ‘Preview image’ size and adding the ‘Play Button’ on preview image select right option in ‘Preview image’ drop-down list.
Global Settings
As explained earlier in the ‘Global Settings’ section, you may be interested to define some options once and apply those options the same way on any video or videos collection in any of your course. Remember ‘Global Configuration’ option allows you to preselect some parameters and also to re-apply those on all pre-existing settings (means settings you set previously on some videos activities).
This may apply on;
- Mode (Preview image mode)
- Video title
- Video description
- Video tags
- Video duration
- Video viewed duration
- Columns
- Preview image
Caution; This is a plugin level configuration and so requires admin rights. If you don’t, ask your site admin. => Site administration > Plugins > Plugins overview > Video Time Settings
Video channels
Using here below described parameters included within Premium version (previously Business version), like ‘Preview image mode’ and several display options, you are now able to build a Moodle course, which really looks like a regular video hub with as much appealing than YouTube Playlists and/or Vimeo public Showcases.
Congratz !
