File resource settings
Adding a file
To add a file to your course
Quick method: (Note - does not work with Internet Explorer 9 or lower)
- Click the 'Turn editing on' button at the top right of the course page
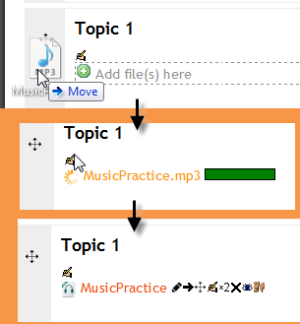
- Drag and drop the file onto the course section where you'd like it to appear
- If necessary, edit the title of the file by clicking the pencil icon, or edit other options (see below) by clicking the editing icon
Longer method:
- Click the 'Turn editing on' button at the top right of the course page
- Click 'Add an activity or resource' link, then in the activity chooser, select file then click the Add button (or select file from the "Add a resource" dropdown menu)
- Enter a link name and a description (which may be required or optional according to the admin settings)
- Either drag and drop a file into the box with an arrow or click the Add button to open the File picker menu in order to choose a file from your computer or a repository
- Select display and other options as required (see below)
- Click the button 'Save and display' at the bottom of the page
Course administration settings
Display options
- Automatic - Make the best guess at what should happen (probably what is wanted 99% of the time).
- Embed - Show the Moodle page with heading, blocks and footer. Show the title/description of the item and display the file directly in the page as well (good for images, flash animations, videos?, PDFs).
- Force download - user clicks on the file, then the web browser pops up with the 'where do you want to save this file' box.
- Open - No Moodle heading, blocks, footer or description - just show the file in the web browser (e.g. shows image, PDF, flash animation, taking up the whole browser window)
- In pop-up - Same as 'Open', but opens a new browser window to show this file (without the Moodle heading, blocks, etc) - this browser window also does not have all the menus and address bar in it.
- The following additional options are only there if you enable them via Site administration > Plugins > Activity modules > File:
- In frame - show the Moodle heading and the file description, with the file displayed in a resizable area below (images, PDF, flash, etc. supported).
- New window - very much like 'in pop-up', but the new window is a full browser window, with menus and address bar, etc.
All of the above is true of items that can be displayed inside the browser directly (e.g. images, text files, PDFs (with plugin)). If the file cannot be displayed within the browser (e.g. word documents, without a suitable plugin, or other files that need to be loaded by an external program), then the pop-ups or frames, etc. will be created, but then the browser will take over and ask if you want to save the file.
To summarise:
- Do you want Moodle to sort it all out for you? - Automatic
- Do you want to force the user to save the file (or open it in a program on their desktop)? - Force download
- Do you want to show the file as part of the Moodle page (images, PDFs, videos)? - Embed
- Do you want to show the file in the browser, but without the Moodle page decorations (images, PDFs, videos)? - Open
- Do you want that, but in a new window? - In Pop-up (or possibly 'New window')
- Do you want to use a horrible bit of non-strict HTML that should never be allowed in polite company? - In frame
Additional options
To show the file size and/or type on the course page and also on the resource page, simply tick the appropriate checkboxes.
There is also an option to display the file description on the course page below the link to the file.
There are the usual Common module settings and - if admin has enabled them - the Restrict access settings Conditional activities.
Displaying a website index page
The file module may be used if you have a folder with linked files such as a website with an index.html file or a flash activity with xml/swf and index file.
- Click the 'Turn editing on' button at the top right of the course page
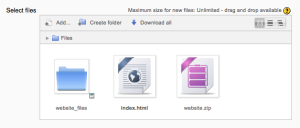
- Drag and drop the zipped folder onto the course section where you'd like it to appear, answer 'Create file resource' to the popup dialogue, then click the upload button
- Clicking the editing icon (hand with a pen) then click on the zip file and unzip it
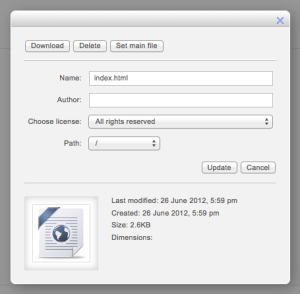
- Click on the index.html file or the file you want to start displaying your linked files from then in the popup dialogue click the button 'Set main file'. This ensures this file is the one that appears on the course page for students to click on. The main file is then indicated with a title in bold.
- Click the button 'Save and display' at the bottom of the page
File module capabilities
Site administration settings
The file module has additional settings which may be changed by an administrator in Settings > Site administration > Plugins > Activity modules > File.
Frame height
Here you can specify the height of the top frame (containing the navigation) if you choose the "in frame" display option. Note: If your theme has a large header then the resource_framesize variable should be increased to prevent horizontal and vertical scrollbars.
Require activity description
This setting allows you to turn off the requirement for users to type something into the description box.
Available display options
This setting allows you to add different ways the resource may be displayed on the course page. By default Moodle doesn't enable "New window" or "In frame", so you need to set them available here if required, and you can also disable other options if not applicable.
Default values for activity settings
Here you can set the defaults for this resource. You can also choose which setting(s) to class as "Advanced". These settings will only then appear if the user clicks "Show advanced" in the settings.


