Wiki activity: Difference between revisions

From MoodleDocs
(internal links to Viewing a Wiki)
(updated video)
 
(56 intermediate revisions by 20 users not shown)
Line 1: Line 1:
{{Wiki}}
{{Activities}}
__NOTOC__
==What is the Wiki activity?==
*The WIki activity allows students to create a collaborative document by building pages together,  similar to Wikipedia. Unlike other collaborative editing programs (such as Google docs) the Wiki is a standard Moodle activity and so no extra permissions or logins are needed.
*Although Wikis are usually collaborative, it is possible to allow each student to create their own Wiki for individual use.


A wiki is a collection of collaboratively authored web documents. Basically, a wiki page is a web page everyone in your class can create together, right in the browser, without needing to know HTML. A wiki starts with one front page. Each author can add other pages to the wiki by simply creating a link to a page that doesn't exist yet.
{{MediaPlayer | url = https://youtu.be/UXmyzix9osY| desc = Overview of the Wiki activity}}


Wikis get their name from the Hawaiian term "wiki wiki," which means "very fast." A wiki is indeed a fast method for creating content as a group. It's a hugely popular format on the Web for creating documents as a group. There is usually no central editor of a wiki, no single person who has final editorial control. Instead, the community edits and develops it's own content. Consensus views emerge from the work of many people on a document.
==How is it set up?==
#In a course, with the editing turned on, choose 'Wiki' from the activity chooser.
#Give it a name and, if required, a description.
#For Wiki mode, choose Collaborative if you want students to work together in the same wiki, or Individual if you want them to each have their own wiki.
#Choose the First page name carefully, as it cannot be changed.
#For Format, leave it as the default if you are not sure what the others mean.
# Expand the other sections to select the settings you want and click Save and display.
#Click the Create page button and helpfully add text and/or create new pages by adding double square brackets around their titles
[[File:WikiStart.png|center]]
8.Click Save and display and, if you want to start the pages yourself, click a link, add some text and click Create page.


Moodle's wiki is built on top of an older wiki system called Erfurt wiki http://erfurtwiki.sourceforge.net.
==How does it work?==
===Student view===
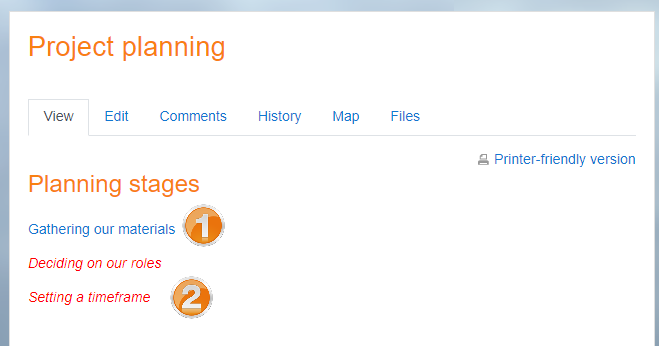
*Students click on the Wiki icon in the course to access it and can either go to an existing page (1), activate a draft page by clicking the link (2) or create a new page by adding double square brackets around its title.
[[File:StudentWikiView.png|center]]
*The Edit tab allows them to edit the page, which they can preview before saving.
*The History tab shows who has done what in the Wiki, and the Map tab shows a menu of the pages.
*Depending on the teacher's settings, other tabs might include Comments and the ability to upload files.


In Moodle, wikis can be a powerful tool for collaborative work. The entire class can edit a document together, creating a class product, or each student can have their own wiki and work on it with you and their classmates.
===Teacher view===
Teachers additionally see an Administration tab, where they can remove pages or delete page versions.

== Setting up and editing a Wiki ==
==More information==


For documentation here on: setting up a Wiki and for adding and editing pages, see:
* [[Wiki settings]]
* [[Using Wiki]]
* [[Wiki_module_FAQ|Wiki FAQ]]


Setting up: https://docs.moodle.org/en/Adding/editing_a_wiki


Adding pages:  https://docs.moodle.org/en/Viewing_a_wiki#Adding_a_wiki_page
[[Category:Wiki]]
 
Editing pages: https://docs.moodle.org/en/Viewing_a_wiki#Editing_a_wiki_page
 
 
==Tips and tricks==
 
*We have course filled with resources and a wiki devoted to equipment located in several remote classrooms, as an aid to instructors. I created my own page that has links to equipment and process pages that I use all the time in giving directions.  The front page is organized differently than my page.
*A useful way of to start a wiki, is to think of the front page as a structured table of contents. Essentially a wiki is organized by its links.
 
==Creative Wiki practices==
 
The free-form, collaborative nature of wikis makes them easy to apply in creative ways. Any sort of group process can be facilitated using a wiki.
 
===Group lecture notes===
Usually, lecture notes are a solitary activity. But one person can easily miss an important point during a lecture through either daydreaming or trying to understand a prior point. Students also have difficulty deciding what information is important and what is elaboration or example. Creating a wiki for group lecture notes after a lecture gives students a chance to combine all their notes. Those that missed information can get it from their peers. The group can also decide what information is critical and give it proper emphasis. Group lecture notes could be done with the entire class, if it is small enough, or with
small working groups. Groups can also compare notes for further discussion and refinement.
 
===Group Project management===
The most straightforward use of a wiki is as a tool for group collaboration for creating group projects. If you assign a group project, give your students a place to work by creating a wiki with the group mode enabled. This will give each group their own space to record their research, create outlines and even create the final product. You may even want to create a submission date where you turn off editing capabilities for students and then grade the final projects. Afterwards, consider enabling visible groups so everyone can see each others’ work.
 
===Brainstorming===
Brainstorming is a creative process in which ideas are elicited from a group of people. In a face-to-face meeting, a brainstorming facilitator will usually stand in front of a big piece of paper and elicit ideas from the participants in the room. You can use a wiki to create an online version of this process. Set up a wiki for the entire class, or for student
groups, and ask people to submit ideas around a brainstorming topic. People can add ideas as they occur and link to other pages for elaboration.
 
===Contribute to other wikis===
Consider assigning your class the task of contributing to Wikipedia, or to another wiki on the Web, on a topic in your class. Assign your students to groups (or make it a class project if the class is small enough and the topic broad enough) and challenge them to collaboratively create an article they would feel confident posting to a public-information space. Your students will use the course wiki to create drafts of the article they will publish to the community at the end of the semester.
 
This type of assignment has a number of benefits:
* It gives students additional motivation to do their best since they know their work will be viewed and critiqued by the public instead of just their instructor.
* It can act as a summarizing activity for an entire semester’s worth of material.
* Students will know their work will be used by other people, not just graded and filed away.
 
== See also ==
 
*Using Moodle [http://moodle.org/mod/forum/view.php?f=366 Wiki module forum]
*[http://download.moodle.org/docs/using_moodle/ch11_wikis.pdf Using Moodle Chapter 11: Wikis]
 
[[Category:Modules]]


[[de:Wiki]]
[[es:Wikis]]
[[es:Wikis]]
[[eu:Wikiak]]
[[eu:Wikiak]]
[[fr:Wiki]]
[[fr:Wiki]]
[[ja:Wikiモジュール]]

Latest revision as of 20:33, 13 May 2022


What is the Wiki activity?

  • The WIki activity allows students to create a collaborative document by building pages together, similar to Wikipedia. Unlike other collaborative editing programs (such as Google docs) the Wiki is a standard Moodle activity and so no extra permissions or logins are needed.
  • Although Wikis are usually collaborative, it is possible to allow each student to create their own Wiki for individual use.
Overview of the Wiki activity

How is it set up?

  1. In a course, with the editing turned on, choose 'Wiki' from the activity chooser.
  2. Give it a name and, if required, a description.
  3. For Wiki mode, choose Collaborative if you want students to work together in the same wiki, or Individual if you want them to each have their own wiki.
  4. Choose the First page name carefully, as it cannot be changed.
  5. For Format, leave it as the default if you are not sure what the others mean.
  6. Expand the other sections to select the settings you want and click Save and display.
  7. Click the Create page button and helpfully add text and/or create new pages by adding double square brackets around their titles
WikiStart.png

8.Click Save and display and, if you want to start the pages yourself, click a link, add some text and click Create page.

How does it work?

Student view

  • Students click on the Wiki icon in the course to access it and can either go to an existing page (1), activate a draft page by clicking the link (2) or create a new page by adding double square brackets around its title.
StudentWikiView.png
  • The Edit tab allows them to edit the page, which they can preview before saving.
  • The History tab shows who has done what in the Wiki, and the Map tab shows a menu of the pages.
  • Depending on the teacher's settings, other tabs might include Comments and the ability to upload files.

Teacher view

Teachers additionally see an Administration tab, where they can remove pages or delete page versions.

More information