Data privacy: Difference between revisions
Helen Foster (talk | contribs) (→Data registry: retention period - thanks to Andrew for info https://moodle.org/mod/forum/discuss.php?d=371715#p1498662) |
|||
| Line 78: | Line 78: | ||
[[es:Plugin de privacidad de datos]] | [[es:Plugin de privacidad de datos]] | ||
[[de: | [[de:Datenschutz-Plugin]] | ||
Revision as of 07:49, 17 July 2018
New feature
in Moodle 4.1!
The Data privacy plugin provides the workflow for users to submit subject access requests and for the site administrator or Data Protection Officer (DPO) to process these requests.
The Data Privacy plugin forms part of Moodle’s privacy feature set to assist sites to become GDPR compliant. It is included as standard in Moodle 3.5 onwards and available as a separately downloadable plugin for Moodle 3.3.6 and 3.4.3.
Privacy Officer role
After installing the data privacy plugin, the first thing to do is to create a Privacy Officer role and assign it.
(If there is nobody on the site with the role of Privacy Officer i.e. nobody with the capability to manage data requests, then a site admin can respond to data requests and manage the data registry.)
Data requests
Any user can send a message to the Privacy Officer via the 'Contact Privacy Officer' link on their profile page.
In addition, they can request a copy of all of their personal data or request that their personal data should be deleted as follows:
- Go to your profile page (via the user menu).
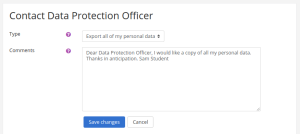
- Click the link 'Data requests' then click the 'New request' button.
- Select 'Export all of my personal data' or 'Delete all of my personal data' as appropriate.
- Save changes.
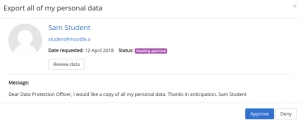
The Privacy Officer will then receive a data request notification.
If the user has requested a copy of all of their personal data, once the request is approved, they will receive a notification to inform them that their personal data may be downloaded from their Data requests page.
If the user has requested that their personal data should be deleted, once the request is approved, they will receive an email to inform them and they will no longer be able to log in to the site.
Responding to data requests
The Privacy Officer can respond to data requests as follows:
- Go to 'Data requests' in the Site administration (or follow the link in the data request notification).
- In the Actions dropdown, select View, Approve, or Deny as appropriate.
Data registry
The Privacy Officer can set purposes (why the organisation is processing data) with retention periods and categories for data stored in Moodle in the data registry.
A default purpose and retention period may be set for course categories, courses, activity modules and blocks. The retention period is measured from the course end date for the course that an activity is in. For a user it is from the last login time for any user who is no longer enrolled (or has already been deleted).
Example categories
- Administrative: Civil status, identity, identification data, images …
- Personal life (lifestyle, family situation, etc.)
- Economic and financial information (income, financial situation, tax situation, etc.)
- Connection data (IP address, logs, etc.)
- Educational Data (Assessed Coursework, exam scripts etc)
- Records of Education Attainment (Results of exams, assessments, qualifications awarded etc)
- Location data (travel, GPS data, GSM, etc.)
Data registry set-up
To add purposes and categories:
- Go to 'Data registry' in the Site administration.
- In the Edit menu select Categories.
- On the 'Edit categories' page, click the + button to add a new category.
- Enter a category name and description then click the Save button.
- Go to 'Data registry' again and in the Edit menu select Purposes.
- On the 'Edit purposes' page, click the + button to add a new purpose.
- Enter a purpose name, description and retention period then click the Save button.
To set default categories and purposes:
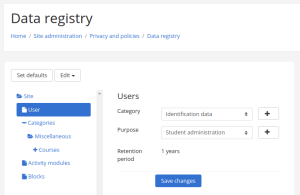
- In 'Data registry' in the Site administration click the 'Set defaults' button.
- Select a default category and purpose for the site, and for users, course categories, courses, activity modules and blocks as required.
- Save changes.


