Book settings: Difference between revisions
Helen Foster (talk | contribs) m (Reverted edits by Bchandler2 (talk) to last version by Linda Rogers) |
|||
| (48 intermediate revisions by 7 users not shown) | |||
| Line 1: | Line 1: | ||
{{Book}} | {{Book}} | ||
This page explores in more detail the settings for the Book resource once you have added it to your course and also covers the Site administration settings. | |||
==General== | |||
Give the Book a name and a description if required, checking the box if you want the description to display on the course page. | |||
==Appearance== | |||
;Chapter formatting | |||
:The options are: | |||
== Give | * None - chapter and subchapter titles are not formatted at all, use if you want to define special numbering styles. For example, letters: in chapter title type "A First Chapter", "A.1 Some Subchapter",... | ||
== | |||
* None - chapter and subchapter titles are not formatted at all, use if you want to define special numbering styles. For example letters: in chapter title type "A First Chapter", "A.1 Some Subchapter",... | |||
* Numbers - chapters and subchapters are numbered (1, 1.1, 1.2, 2, ...) | * Numbers - chapters and subchapters are numbered (1, 1.1, 1.2, 2, ...) | ||
| Line 24: | Line 14: | ||
* Indented - subchapters are indented. | * Indented - subchapters are indented. | ||
;Custom titles | |||
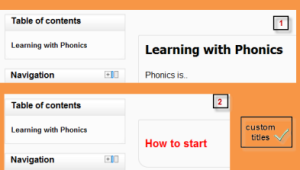
:If you disallow custom titles, the chapter title (the one that appears on the table of contents) will appear as a header at the top of your content (''1 below'') If you enable custom titles, you will be able to create a title different from the one that appears in the ToC or display no title at all (''2 below'') If you enable custom titles, you will need to enter the chapter title as part of the page content. | |||
{| | |||
|[[File:customtitles.png|thumb|Example of a custom title.]] | |||
|} | |||
==Other settings== | |||
Depending on what is enabled for your site and course, you may also need to explore [[Common module settings]], [[Restrict access]], [[Activity completion]], [[Tags]] and [[Competencies]]. | |||
==Site administration settings== | |||
The administrator can set the default values for chapter formatting and navigational links in ''Administration > Site administration > Plugins > Activity modules > Book.'' | |||
==Adding chapters and subchapters== | |||
Titles of chapters appear as links in the table of contents to the left of your content. It is recommended to keep your titles short. | |||
To add a chapter: | |||
# Turn editing on via the link in the Book administration or, in Moodle 3.1.3 onwards, by clicking the 'Turn editing on' button at the top right of the page. | |||
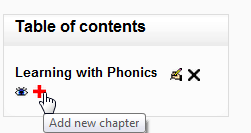
# Click on the '''+''' icon in the Table of Contents or first chapter. The new chapter will be inserted directly after the chapter whose title is on the same line as the red cross you click (Screenshot 1). | |||
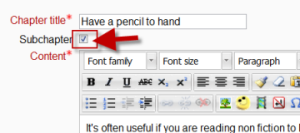
Note that the sub chapter box is checked. A chapter may have many sub chapters, but sub chapters cannot have further sub chapters. In order to keep this resource simple, you are limited to two levels (Screenshot 2). | |||
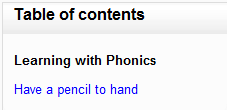
You now see a chapter and a sub chapter. Because we did not elect to number chapters, the fact that the second chapter is a sub chapter cannot be seen in the table of contents. Note that you do, however, see this in the title above the content. | |||
By the way, the items in the table of contents are neither numbered nor are they indented only because that is the option we chose when setting up the book. We can always go back and change that (Screenshot 3). | |||
{| | |||
|[[File:addnewchapter.png|thumb|(1) Adding a new chapter]] | |||
|[[File:subchapter.png|thumb|(2) Adding a subchapter]] | |||
|[[File:viewofsubchapter.png|thumb|(3) View of subchapter]] | |||
|} | |||
When you have finished adding chapters and subchapters, you can turn editing off. | |||
===Tags=== | |||
A teacher (or any other user with editing rights) can tag book chapters. | |||
[[ | Tags can be managed by a site administrator in [[Managing tags|Manage tags]] in the Site administration. Book chapter tags may be added to a specified tag collection and standard tags may be suggested or forced. If desired, book chapter tagging may be disabled completely. | ||
==Importing chapters== | |||
To import chapters | |||
*Create a zip file of HTML files and optional multimedia files and folders. If you wish to upload subchapters, add "_sub" to the end of HTML file or folder names. | |||
*Go to Administration > Book administration > Import chapter | |||
*Choose whether each HTML file or folder represents one chapter | |||
*Browse for and select the zip file, either using the Add button or the drag and drop method: | |||
{| | |||
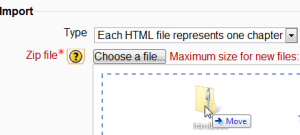
|[[File:importbook.png|thumb|Import book]] | |||
|} | |||
*Click the import button | |||
Note: Relative file links are converted to absolute chapter links. Images, Flash and Java are re-linked too. Remember to upload images and multimedia files as well as HTML files. | |||
===Importing chapters from existing content=== | |||
There are a number of contributed plugins which support importing content into books from other formats. | |||
*[https://moodle.org/plugins/booktool_importepub Lucimoo epub import] supports importing content from ePub files. | |||
*[https://moodle.org/plugins/booktool_wordimport Word import] supports importing content from Word (''.docx'') files. See [[How to prepare a Word file for import into a Book]] resource. | |||
==Book capabilities== | |||
*[[Capabilities/mod/book:edit|Edit book chapters]] | |||
*[[Capabilities/mod/book:read|Read book]] | |||
*[[Capabilities/mod/book:viewhiddenchapters|View hidden book chapters]] | |||
*[[Capabilities/booktool/exportimscp:export|Export book as IMS content package]] | |||
*[[Capabilities/booktool/importhtml:import|Import chapters]] | |||
*[[Capabilities/booktool/print:print|Print book]] | |||
*[[Capabilities/mod/book:addinstance|Add a new book]] | |||
[[de:Buch konfigurieren]] | |||
[[es:Configuraciones de libro]] | |||
Latest revision as of 15:55, 2 August 2022
This page explores in more detail the settings for the Book resource once you have added it to your course and also covers the Site administration settings.
General
Give the Book a name and a description if required, checking the box if you want the description to display on the course page.
Appearance
- Chapter formatting
- The options are:
- None - chapter and subchapter titles are not formatted at all, use if you want to define special numbering styles. For example, letters: in chapter title type "A First Chapter", "A.1 Some Subchapter",...
- Numbers - chapters and subchapters are numbered (1, 1.1, 1.2, 2, ...)
- Bullets - subchapters are indented and displayed with bullets.
- Indented - subchapters are indented.
- Custom titles
- If you disallow custom titles, the chapter title (the one that appears on the table of contents) will appear as a header at the top of your content (1 below) If you enable custom titles, you will be able to create a title different from the one that appears in the ToC or display no title at all (2 below) If you enable custom titles, you will need to enter the chapter title as part of the page content.
Other settings
Depending on what is enabled for your site and course, you may also need to explore Common module settings, Restrict access, Activity completion, Tags and Competencies.
Site administration settings
The administrator can set the default values for chapter formatting and navigational links in Administration > Site administration > Plugins > Activity modules > Book.
Adding chapters and subchapters
Titles of chapters appear as links in the table of contents to the left of your content. It is recommended to keep your titles short.
To add a chapter:
- Turn editing on via the link in the Book administration or, in Moodle 3.1.3 onwards, by clicking the 'Turn editing on' button at the top right of the page.
- Click on the + icon in the Table of Contents or first chapter. The new chapter will be inserted directly after the chapter whose title is on the same line as the red cross you click (Screenshot 1).
Note that the sub chapter box is checked. A chapter may have many sub chapters, but sub chapters cannot have further sub chapters. In order to keep this resource simple, you are limited to two levels (Screenshot 2).
You now see a chapter and a sub chapter. Because we did not elect to number chapters, the fact that the second chapter is a sub chapter cannot be seen in the table of contents. Note that you do, however, see this in the title above the content.
By the way, the items in the table of contents are neither numbered nor are they indented only because that is the option we chose when setting up the book. We can always go back and change that (Screenshot 3).
When you have finished adding chapters and subchapters, you can turn editing off.
Tags
A teacher (or any other user with editing rights) can tag book chapters.
Tags can be managed by a site administrator in Manage tags in the Site administration. Book chapter tags may be added to a specified tag collection and standard tags may be suggested or forced. If desired, book chapter tagging may be disabled completely.
Importing chapters
To import chapters
- Create a zip file of HTML files and optional multimedia files and folders. If you wish to upload subchapters, add "_sub" to the end of HTML file or folder names.
- Go to Administration > Book administration > Import chapter
- Choose whether each HTML file or folder represents one chapter
- Browse for and select the zip file, either using the Add button or the drag and drop method:
- Click the import button
Note: Relative file links are converted to absolute chapter links. Images, Flash and Java are re-linked too. Remember to upload images and multimedia files as well as HTML files.
Importing chapters from existing content
There are a number of contributed plugins which support importing content into books from other formats.
- Lucimoo epub import supports importing content from ePub files.
- Word import supports importing content from Word (.docx) files. See How to prepare a Word file for import into a Book resource.
