Course homepage: Difference between revisions
Mary Cooch (talk | contribs) (updating) |
Mary Cooch (talk | contribs) (→Blocks: updating info) |
||
| (35 intermediate revisions by 2 users not shown) | |||
| Line 2: | Line 2: | ||
===Parts of a course homepage=== | ===Parts of a course homepage=== | ||
A Moodle course can look very different according to the theme and course format (layout). Here are blank course page using the [[Boost theme]] and the | A Moodle course can look very different according to the theme and course format (layout). Here are a blank course page using the [[Boost theme]] and the Classic theme, both with standard weekly format: | ||
[[File:BlankBoost4v.png|thumb|center||600px|Empty course with Boost theme]] | |||
[[File:BlankClassic4v.png|thumb|600px|center|Empty course with Classic theme]] | |||
====Boost theme==== | |||
{{New features}} | |||
{{MediaPlayer | url = https://youtu.be/ScT3hBTT3ps | desc = Overview of course editing}} | |||
1. Course navigation. These provide a quick way for the teacher to access important aspects of the course. The More link takes you to, for example, the Content and Question banks and (new in 4.0)Course reuse which incorporates Backup, Restore, Import, Reset and Copy. | |||
2. Course index. This is a scrollable, collapsible drawer that displays course sections and elements. As you move up and down the central course area, your location is highlighted in the Course index. Clicking on an item in the Course index will open it up directly in the course central area. | |||
3. Edit mode toggle. An easy way to toggle edit mode on and off. | |||
4. Block drawer. This is not visible until you have enabled edit mode and added a block. The block drawer can be collapsed and expanded as a user preference. | |||
5. [[Course formats|Course sections]] | |||
Here is where the learning materials are displayed. This element may be arranged in one or multiple weeks, topics, forums or other (non-standard) layouts. | |||
6. Collapse all. Sections can be collapsed and expanded individually or you can use the Collapse all link to collapse them all at once. | |||
====Classic theme==== | |||
1.[[Navigation block]] | 1.[[Navigation block]] | ||
Normally visible on all pages, this block | Normally visible on all pages, this block helps you find your way around the course and site. | ||
2.[[Administration block]] | 2.[[Administration block]] | ||
| Line 21: | Line 32: | ||
Again, normally visible on all pages, this block gives different levels of access to teachers and students. | Again, normally visible on all pages, this block gives different levels of access to teachers and students. | ||
3.[[Course formats|Course sections]] | 3. Turn editing on | ||
A clearly visible button allows you to turn editing on and off. | |||
4. [[Course formats|Course sections]] | |||
Here is where the learning materials are displayed. This element may be arranged in one or multiple weeks, topics, forums or other (non-standard) layouts. | Here is where the learning materials are displayed. This element may be arranged in one or multiple weeks, topics, forums or other (non-standard) layouts. | ||
5. {{New features}}Collapse all. Sections can be collapsed and expanded individually or you can use the Collapse all link to collapse them all at once. | |||
6.[[Blocks|Side blocks]] | |||
Side blocks can be added when the editing is turned on. | |||
Which blocks you see depend on what the administrator has selected and what you as teacher choose to add. | |||
===To edit a course section=== | ===To edit a course section=== | ||
# Enable Edit mode/turn editing on | |||
#Quickly rename sections from the pencil icon. | |||
If [[Restrict access]] is enabled for the site, access to the section (including all activities and resources within it) may be restricted. | If [[Restrict access]] is enabled for the site, access to the section (including all activities and resources within it) may be restricted. | ||
===To move a course section=== | ===To move a course section=== | ||
(Note:The ability to move course sections is controlled by the capability [[Capabilities/moodle/course:movesections|moodle/course:movesections]], which is allowed for the default role of teacher.) | |||
#Enable edit mode/turn editing on | |||
#Drag and drop the section either from the course central area or the Course index to your chosen location. | |||
If your course is long you can also drag from the central area to a location in the Course index, and/or you can click the three dots next to a section, select Move and choose the location to move it to. | |||
Note: The ability to move course sections is controlled by the capability [[Capabilities/moodle/course:movesections|moodle/course:movesections]], which is allowed for the default role of teacher. | [[File:Move34.png|thumb|center|400px]] | ||
===To add course sections=== | |||
#Enable edit mode/turn editing on. | |||
#If you are using Topics then find the location you want to add a new section and click Add topic. | |||
#If you are using Weeks then go to the bottom of the course page and click Add week. | |||
[[File:Addtopic4.png|thumb|400px|center|Adding sections]] | |||
===To delete a course section=== | ===To delete a course section=== | ||
With the editing turned on, click the 'Edit' link to the right of the course section you wish to delete and then, from the menu that displays, click 'X Delete'. You will be prompted to confirm your wish to delete the section and its contents. Note that all activities inside the section and their user data will also be deleted. Use the [[Recycle bin]] to reverse this if you do it by mistake. | |||
With the editing turned on, click the 'Edit' link to the right of the course section you wish to delete and then, from the menu that displays, | |||
===To link course sections=== | ===To link course sections=== | ||
An admin setting ''Always link course sections'' can be enabled from ''Site administration > Appearance > Navigation'' and will link course sections so that when a course section name is clicked in the navigation block or the central content area, it will go directly to that section. | An admin setting ''Always link course sections'' can be enabled from ''Site administration > Appearance > Navigation'' and will link course sections so that when a course section name is clicked in the navigation block or the central content area, it will go directly to that section. | ||
==Blocks== | ==Blocks== | ||
The Boost and Classic themes only only displays blocks on the right, although contributed themes might display them on the left. | |||
To add a block to the course page | To add a block to the course page | ||
#Enable Edit mode top right. | |||
# | #Expand the block drawer and click Add block. Select your block. | ||
# | |||
To move a block | To move a block | ||
# | #With Edit mode on, click the crosshair icon on a block. | ||
#While keeping the block selected, drag it to where you want to position it and let go. | #While keeping the block selected, drag it to where you want to position it and let go. | ||
==Activities and resources== | ==Activities and resources== | ||
To add an activity or resource to the course | To add an activity or resource to the course | ||
*Enable Edit mode. | |||
*Click 'Add an activity or resource' to open the activity chooser. Double-click to add an activity or resource; click the i for more information and click the star icon to add it to a separate, starred tab. | |||
Alternatively, certain resources and activities may be added using drag and drop: | Alternatively, certain resources and activities may be added using drag and drop: | ||
*To add a [[File|file]], simply drag and drop it onto the course section where you'd like it to appear | *To add a [[File|file]], simply drag and drop it onto the course section where you'd like it to appear | ||
*To add a [[Folder|folder of files]], simply zip the folder then drag and drop it onto the course section where you'd like it to appear, answer 'Unzip files and create folder' to the popup dialogue, then click the upload button | *To add a [[Folder|folder of files]], simply zip the folder then drag and drop it onto the course section where you'd like it to appear, answer 'Unzip files and create folder' to the popup dialogue, then click the upload button | ||
*To add a [[SCORM module|SCORM package]], simply drag and drop it onto the course section where you'd like it to appear, answer 'Add a SCORM package' to the popup dialogue, then click the upload button | *To add a [[SCORM module|SCORM package]], simply drag and drop it onto the course section where you'd like it to appear, answer 'Add a SCORM package' to the popup dialogue, then click the upload button | ||
: | |||
==Course homepage capabilities== | ==Course homepage capabilities== | ||
*[[Capabilities/moodle/course:sectionvisibility|Control section visibility]] | *[[Capabilities/moodle/course:sectionvisibility|Control section visibility]] | ||
*[[Capabilities/moodle/course:setcurrentsection|Set current section]] | *[[Capabilities/moodle/course:setcurrentsection|Set current section]] | ||
Latest revision as of 15:56, 22 April 2022
Parts of a course homepage
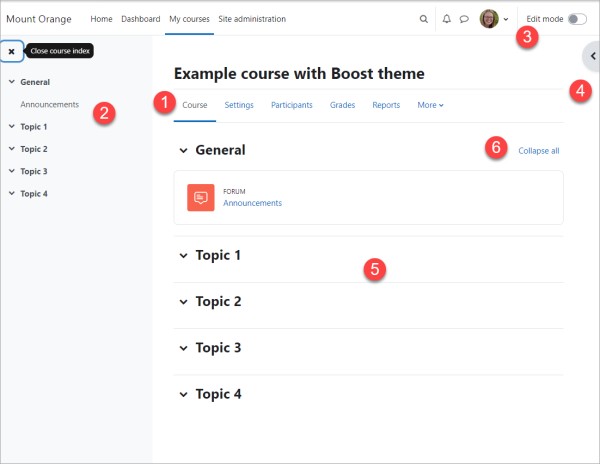
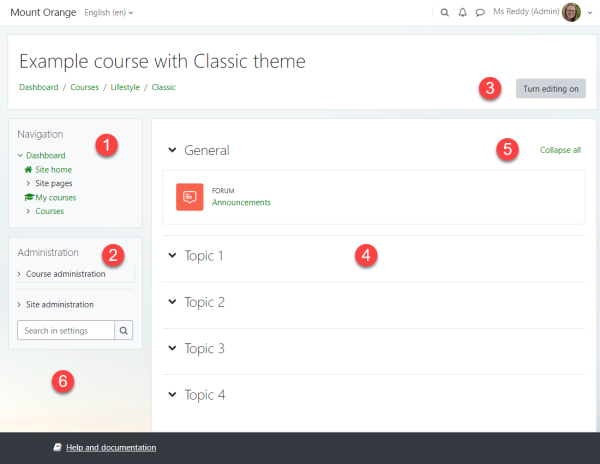
A Moodle course can look very different according to the theme and course format (layout). Here are a blank course page using the Boost theme and the Classic theme, both with standard weekly format:
Boost theme
1. Course navigation. These provide a quick way for the teacher to access important aspects of the course. The More link takes you to, for example, the Content and Question banks and (new in 4.0)Course reuse which incorporates Backup, Restore, Import, Reset and Copy.
2. Course index. This is a scrollable, collapsible drawer that displays course sections and elements. As you move up and down the central course area, your location is highlighted in the Course index. Clicking on an item in the Course index will open it up directly in the course central area.
3. Edit mode toggle. An easy way to toggle edit mode on and off.
4. Block drawer. This is not visible until you have enabled edit mode and added a block. The block drawer can be collapsed and expanded as a user preference.
Here is where the learning materials are displayed. This element may be arranged in one or multiple weeks, topics, forums or other (non-standard) layouts.
6. Collapse all. Sections can be collapsed and expanded individually or you can use the Collapse all link to collapse them all at once.
Classic theme
Normally visible on all pages, this block helps you find your way around the course and site.
Again, normally visible on all pages, this block gives different levels of access to teachers and students.
3. Turn editing on A clearly visible button allows you to turn editing on and off.
Here is where the learning materials are displayed. This element may be arranged in one or multiple weeks, topics, forums or other (non-standard) layouts.
5. New feature
in Moodle 4.0!
Collapse all. Sections can be collapsed and expanded individually or you can use the Collapse all link to collapse them all at once.
Side blocks can be added when the editing is turned on.
Which blocks you see depend on what the administrator has selected and what you as teacher choose to add.
To edit a course section
- Enable Edit mode/turn editing on
- Quickly rename sections from the pencil icon.
If Restrict access is enabled for the site, access to the section (including all activities and resources within it) may be restricted.
To move a course section
(Note:The ability to move course sections is controlled by the capability moodle/course:movesections, which is allowed for the default role of teacher.)
- Enable edit mode/turn editing on
- Drag and drop the section either from the course central area or the Course index to your chosen location.
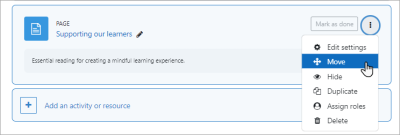
If your course is long you can also drag from the central area to a location in the Course index, and/or you can click the three dots next to a section, select Move and choose the location to move it to.
To add course sections
- Enable edit mode/turn editing on.
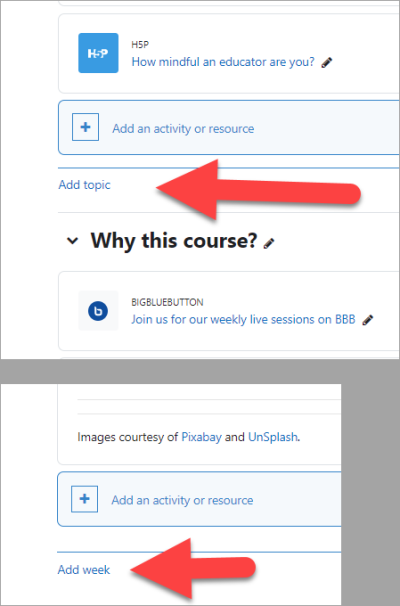
- If you are using Topics then find the location you want to add a new section and click Add topic.
- If you are using Weeks then go to the bottom of the course page and click Add week.
To delete a course section
With the editing turned on, click the 'Edit' link to the right of the course section you wish to delete and then, from the menu that displays, click 'X Delete'. You will be prompted to confirm your wish to delete the section and its contents. Note that all activities inside the section and their user data will also be deleted. Use the Recycle bin to reverse this if you do it by mistake.
To link course sections
An admin setting Always link course sections can be enabled from Site administration > Appearance > Navigation and will link course sections so that when a course section name is clicked in the navigation block or the central content area, it will go directly to that section.
Blocks
The Boost and Classic themes only only displays blocks on the right, although contributed themes might display them on the left.
To add a block to the course page
- Enable Edit mode top right.
- Expand the block drawer and click Add block. Select your block.
To move a block
- With Edit mode on, click the crosshair icon on a block.
- While keeping the block selected, drag it to where you want to position it and let go.
Activities and resources
To add an activity or resource to the course
- Enable Edit mode.
- Click 'Add an activity or resource' to open the activity chooser. Double-click to add an activity or resource; click the i for more information and click the star icon to add it to a separate, starred tab.
Alternatively, certain resources and activities may be added using drag and drop:
- To add a file, simply drag and drop it onto the course section where you'd like it to appear
- To add a folder of files, simply zip the folder then drag and drop it onto the course section where you'd like it to appear, answer 'Unzip files and create folder' to the popup dialogue, then click the upload button
- To add a SCORM package, simply drag and drop it onto the course section where you'd like it to appear, answer 'Add a SCORM package' to the popup dialogue, then click the upload button


