OAuth2 Microsoft Service: Unterschied zwischen den Versionen
Aus MoodleDocs
Keine Bearbeitungszusammenfassung |
Keine Bearbeitungszusammenfassung |
||
| Zeile 7: | Zeile 7: | ||
Um einen OAuth2 Client für Microsoft aufzusetzen, müssen Sie sich als erstes eine neue App anlegen. | Um einen OAuth2 Client für Microsoft aufzusetzen, müssen Sie sich als erstes eine neue App anlegen. | ||
*Melden Sie sich auf der Seite [https://apps.dev.microsoft.com/#/appList Microsoft Application Console] an und klicken Sie auf den Button ''Add an app''. | *Melden Sie sich auf der Seite [https://apps.dev.microsoft.com/#/appList Microsoft Application Console] an und klicken Sie auf den Button ''Add an app''. | ||
:[[Image:microsoft-1-create-new.png| | :[[Image:microsoft-1-create-new.png|400px]] | ||
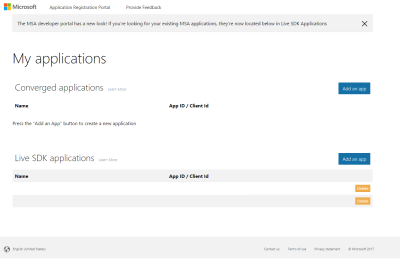
:'''Hinweis''': If you have previously registered Applications with an older API your Application Console may look different. In this case you should create a new "Converged Application". | :'''Hinweis''': If you have previously registered Applications with an older API your Application Console may look different. In this case you should create a new "Converged Application". | ||
:[[File:microsoft-1-1-alternate-app-page.png| | :[[File:microsoft-1-1-alternate-app-page.png|400px]] | ||
*Choose a good name as this is what is shown to users when they are asked to approve the permissions. | *Choose a good name as this is what is shown to users when they are asked to approve the permissions. | ||
:[[File:microsoft-2-name-it.png| | :[[File:microsoft-2-name-it.png|400px]] | ||
*Next you have to add a platform to your application. | *Next you have to add a platform to your application. | ||
:[[File:microsoft-3-add-platform.png| | :[[File:microsoft-3-add-platform.png|200px]] | ||
*Choose "Web platform" | *Choose "Web platform" | ||
:[[File:microsoft-3.1-web-platform.png| | :[[File:microsoft-3.1-web-platform.png|400px]] | ||
*Uncheck the "Allow Implicit Flow" checkbox and set the callback URL. The callback URL should point to "your Moodle site URL + /admin/oauth2callback.php". If your Moodle site was available at <nowiki>https://lemon.edu/</nowiki> the callback URL would be <nowiki>https://lemon.edu/admin/oauth2callback.php</nowiki>. It is important that your Moodle site uses https and not http. Microsoft will not allow the callback url if it is not using https. | *Uncheck the "Allow Implicit Flow" checkbox and set the callback URL. The callback URL should point to "your Moodle site URL + /admin/oauth2callback.php". If your Moodle site was available at <nowiki>https://lemon.edu/</nowiki> the callback URL would be <nowiki>https://lemon.edu/admin/oauth2callback.php</nowiki>. It is important that your Moodle site uses https and not http. Microsoft will not allow the callback url if it is not using https. | ||
:[[File:microsoft-4-platform-settings.png| | :[[File:microsoft-4-platform-settings.png|400px]] | ||
*Make sure the "Microsoft Graph Permissions" section contains the "User.Read" permission. | *Make sure the "Microsoft Graph Permissions" section contains the "User.Read" permission. | ||
:[[File:microsoft-5-permissions.png| | :[[File:microsoft-5-permissions.png|400px]] | ||
*Set the options for the consent screen. | *Set the options for the consent screen. | ||
:[[File:microsoft-6-consent.png| | :[[File:microsoft-6-consent.png|400px]] | ||
*Save all the details and then generate a new password. | *Save all the details and then generate a new password. | ||
:[[File:microsoft-7-new-password.png| | :[[File:microsoft-7-new-password.png|400px]] | ||
*Enter the password in Moodle as the "Client secret" and the Application ID as the "Client id". | *Enter the password in Moodle as the "Client secret" and the Application ID as the "Client id". | ||
:[[File:microsoft-8-got-it.png| | :[[File:microsoft-8-got-it.png|400px]] | ||
==Siehe auch== | ==Siehe auch== | ||
Version vom 19. Juni 2017, 08:37 Uhr
Neue Funktionalität
in Moodle 4.0!
Einen OAuth2 Client für Microsoft aufsetzen
Um einen OAuth2 Client für Microsoft aufzusetzen, müssen Sie sich als erstes eine neue App anlegen.
- Melden Sie sich auf der Seite Microsoft Application Console an und klicken Sie auf den Button Add an app.

- Hinweis: If you have previously registered Applications with an older API your Application Console may look different. In this case you should create a new "Converged Application".


- Choose a good name as this is what is shown to users when they are asked to approve the permissions.

- Next you have to add a platform to your application.

- Choose "Web platform"

- Uncheck the "Allow Implicit Flow" checkbox and set the callback URL. The callback URL should point to "your Moodle site URL + /admin/oauth2callback.php". If your Moodle site was available at https://lemon.edu/ the callback URL would be https://lemon.edu/admin/oauth2callback.php. It is important that your Moodle site uses https and not http. Microsoft will not allow the callback url if it is not using https.

- Make sure the "Microsoft Graph Permissions" section contains the "User.Read" permission.

- Set the options for the consent screen.

- Save all the details and then generate a new password.

- Enter the password in Moodle as the "Client secret" and the Application ID as the "Client id".

Siehe auch
- OneDrive Repository
- OAuth2 Authentifizierung - ermöglicht es Nutzer/innen, sich mit ihrem Microsoft-Nutzerkonto in Moodle anzumelden