Ero sivun ”Tiedostojen käyttäminen” versioiden välillä
pEi muokkausyhteenvetoa |
pEi muokkausyhteenvetoa |
||
| Rivi 1: | Rivi 1: | ||
{{Moodle 3.0}} | {{Moodle 3.0}} | ||
__NOTOC__ | <!-- __NOTOC__ --> | ||
{{Managing content}} | {{Managing content}} | ||
| Rivi 34: | Rivi 34: | ||
|} | |} | ||
== | ===Lisättävien tiedostojen tarkastelu=== | ||
* | * Kun olet ladannut tiedostot, ne näkyvät pikkukuvina, joista ne on helppo tunnistaa. | ||
* | * Voit vaihtaa näkymäksi yksityiskohtaisen listauksen tai hierarkkisen listauksen. | ||
{| | {| | ||
| [[File: | | [[File:tiedostonvalitsin-ikonit.png|thumb|Pikkukuvat]] | ||
| [[File: | | [[File:tiedostonvalitsin-lista.png|thumb|Listanäkymä]] | ||
| [[File: | | [[File:tiedostonvalitsin-hierarkkinen.png|thumb|Hierarkia]] | ||
|} | |} | ||
== | ==Tiedostojen muokkaaminen ja päivittäminen== | ||
* | * Napsauta tiedoston nimeä avataksesi ponnahdusvalikon, jossa voit muutta tiedoston tietoja. | ||
* Voit avata jo käytössä olevan tiedoston muokattavaksi, kun valitset kurssialueella tiedoston vieressä '''Muokkaa > Muokkaa asetuksia''' | |||
{| | {| | ||
| [[File: | | [[File:muokkaa-tiedostoa.png|thumb|Tiedoston tiedot]] | ||
|} | |} | ||
== | ==Aliaksen/oikotien lisääminen== | ||
Voit käyttää kurssissa tiedostoja, jotka sijaitsevat fyysisesti muualla. Sen sijaan, että lataisit kurssiin uudet erilliset kopiot tiedostoista, voit luoda oikoteitä ainakin tiedostoihin jotka ovat: | |||
* Moodleen lataamissasi tiedostoissa | |||
* Moodlen Omissa tiedostoissasi | |||
* Dropboxissa | |||
* EQUELLA -arkistoissa ([https://docs.moodle.org/30/en/EQUELLA_repository EQUELLA_repository]) | |||
* Wikimediassa | |||
Oikotien luominen ei välttämättä onnistu kaikista verkkosivustoista. | |||
Kun käytät oikotietä, tiedoston muuttaminen sen alkuperäisessä sijainnissa muuttaa myös kaikkia "aliaksia". | |||
*If an alias is created, then when the original file is updated, it will change in all instances of the alias. So a teacher might add course notes to their private files for example, and then add them into a number of courses. When the teacher makes an alteration in the file in their private files, this alteration will be reflected in all instances of the course notes. | *If an alias is created, then when the original file is updated, it will change in all instances of the alias. So a teacher might add course notes to their private files for example, and then add them into a number of courses. When the teacher makes an alteration in the file in their private files, this alteration will be reflected in all instances of the course notes. | ||
*An alias can be recognised by its thumbnail. See the difference in the screenshot below between the original file (left) and the alias (right): | *An alias can be recognised by its thumbnail. See the difference in the screenshot below between the original file (left) and the alias (right): | ||
Versio 26. marraskuuta 2015 kello 12.43
Moodle 3.0
Keskeneräinen käännös
Moodle tarjoaa opettajalle helpon tavan jakaa oppimateriaaleja osallistujille. Usein käytettyjä ovat esimerkiksi Word-, PDF- ja PowerPoint -tiedostot. Voit näyttää materiaalit joko yksittäin tai kansioihin paketoituina. Suuret määrät samaan asiaan liittyviä tiedostoja kannattaa tuoda Moodleen kansioina, koska se pitää sivut helpommin hahmotettavina. Moodle hyväksyy useimmat tiedostotyypit, mutta osallistujat tarvitsevat sopivat ohjelmistot tiedostojen avaamiseen.
Tiedostojen lisääminen kurssiin
Valitse Muokkaustila päälle ennen kuin alat lisätä tiedostoja kurssiin.
Vedä ja pudota
Voit yksinkertaisesti vetää tiedoston oman tietokoneesi resurssienhallinnasta kurssisivulle, kun käytät nykyaikaista verkkoselainta. Kun olet vetämässä tiedostoa kurssialuelle, kurssiosion alaosaan tulee viesti, joka ilmaisee mihin osioon tiedosto tulee.
Jos haluat lisätä kurssiin kansion, se on ensin pakattava ZIP-tiedostoksi.
Lisää aktiviteetti tai aineisto
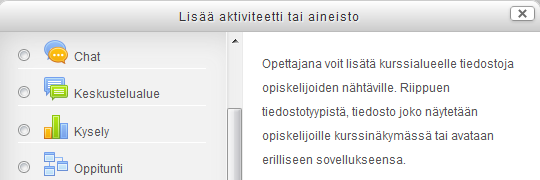
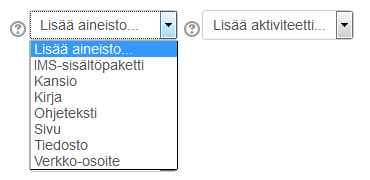
Voit myös käyttää Lisää aktiviteetti tai aineisto -linkkiä, joka avaa aineistotyyppejä listaavan ponnahdusvalikon. Sen avulla voit lisätä kurssiin monia erilaisia aineistoja ja aktiviteetteja. Ponnahdusvalikon sijaan käytössäsi saattavat olla kurssiosion alareunassa avattavat Lisää aineisto ja Lisää aktiviteetti -valikot.
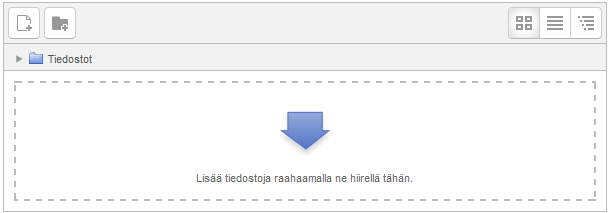
Valitse aineistotyyppi Lisää aktiviteetti tai aineisto -valikossa ja napsauta alhaalla olevaa Lisää-painiketta. Näin pääset sivulle, jolla voit valita tiedoston ja määrittää sitä koskevia asetuksia. Sivulla on alue, jolle voit vetää tiedoston. Vaihtoehtoisesti voit käyttää alueen yläkulmassa olevia Lisää tiedosto ja Luo kansio painikkeita.
On mahdollista, että tämä ei toimi kaikilla Internet Explorerin versioilla.

|
Lisättävien tiedostojen tarkastelu
- Kun olet ladannut tiedostot, ne näkyvät pikkukuvina, joista ne on helppo tunnistaa.
- Voit vaihtaa näkymäksi yksityiskohtaisen listauksen tai hierarkkisen listauksen.
Tiedostojen muokkaaminen ja päivittäminen
- Napsauta tiedoston nimeä avataksesi ponnahdusvalikon, jossa voit muutta tiedoston tietoja.
- Voit avata jo käytössä olevan tiedoston muokattavaksi, kun valitset kurssialueella tiedoston vieressä Muokkaa > Muokkaa asetuksia
Aliaksen/oikotien lisääminen
Voit käyttää kurssissa tiedostoja, jotka sijaitsevat fyysisesti muualla. Sen sijaan, että lataisit kurssiin uudet erilliset kopiot tiedostoista, voit luoda oikoteitä ainakin tiedostoihin jotka ovat:
- Moodleen lataamissasi tiedostoissa
- Moodlen Omissa tiedostoissasi
- Dropboxissa
- EQUELLA -arkistoissa (EQUELLA_repository)
- Wikimediassa
Oikotien luominen ei välttämättä onnistu kaikista verkkosivustoista.
Kun käytät oikotietä, tiedoston muuttaminen sen alkuperäisessä sijainnissa muuttaa myös kaikkia "aliaksia".
- If an alias is created, then when the original file is updated, it will change in all instances of the alias. So a teacher might add course notes to their private files for example, and then add them into a number of courses. When the teacher makes an alteration in the file in their private files, this alteration will be reflected in all instances of the course notes.
- An alias can be recognised by its thumbnail. See the difference in the screenshot below between the original file (left) and the alias (right):
- To update a file, go to its original location (for example Private files) and upload your new version with the same name . You will be prompted to override or rename the file. Choose "override" and this file will replace your original file and the alisas/shortcuts will remain and all be updated to your latest version.
Tiedosto:alias.png Creating an alias |
Areas in which aliases cannot be made
An alias cannot be made in the following areas of Moodle:
- an assignment submission
- a forum post attachment
- a workshop submission
- a quiz essay
- a database activity file field
This is to prevent cases such as a student uploading an item for assessment and then subsequently changing the original in their private files. When a student uses a file from their private files in one of these instances, they do not see the options to "copy" or "create an alias". Below is an example of a file added to an assignment:
Tiedosto:aliasassignment.png Assignment submission with no option to create an alias |
Site administration settings
An administrator can add new file types and view, edit and delete existing file types from Site administration > Server > File types. This means that, for example, if teachers and students on your site use a lot of files specific to a particular program, such files can now be recognised by Moodle, and, when downloaded, they will open in the correct program, rather than presenting themselves as a generic zip file.
Adding a new file type
1. Scroll down to the bottom of the page and click the "Add" button
2. Add the details of your file type, using the example below as a guide. This example will add the .mobi extension (for a Kindle ebook) with the standard document icon.
3. Click to save the changes and you will see your new file type has been added to the list:
File types and Assignments
Tracker item: https://tracker.moodle.org/browse/MDL-39913
Discussion thread: https://moodle.org/mod/forum/discuss.php?d=217532
Removing a file type
- Clicking the X next to a file type will remove it from the site. You will be prompted to confirm before deletion.
Editing an existing file type
- Clicking the edit icon next to a file type will allow you to change certain details, for example the associated icon and description. If you don't wish to use the default description, you can specify your own custom description (with multi-language tags if your site supports multi-languages) or you can use an alternative language string from mimetypes.php.
Google docs and docx
Importing Google docs files as docx. See https://moodle.org/mod/forum/discuss.php?d=320144
See also
- HQ Youtube video tutorial: Dragging and dropping files into Moodle
- HQ Youtube video tutorial: Uploading files to Moodle
- File sharing explained blog post by Lewis Carr
- How to share a single file with students: File resource
- How to share a folder of files with students: Folder
- Questions about the file picker: File picker FAQ
- Restoring file aliases
- How teachers upload files in Moodle 2 video


