Folder resource settings: Difference between revisions
From MoodleDocs
Mary Cooch (talk | contribs) |
Mary Cooch (talk | contribs) mNo edit summary |
||
| Line 1: | Line 1: | ||
{{Folder}} | {{Folder}} | ||
==Adding a folder to your course== | ==Adding a folder to your course== | ||
*With the editing turned on, select "Add a resource" in the section you want your folder: | *With the editing turned on, select "Add a resource" in the section you want your folder: | ||
Revision as of 14:43, 11 August 2011
Adding a folder to your course
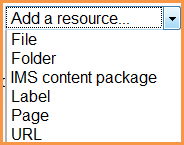
- With the editing turned on, select "Add a resource" in the section you want your folder:
- Select the Folder option.
- In the next screen, give your folder a name. (This will appear as the name on the course page.)
- Add a description if desired. (Note: By default, descriptions are required but they can be turned off by admin.)
- Now decide if you are uploading a pre-made folder from your computer or creating an empty folder to fill later.
Creating and uploading to a new folder
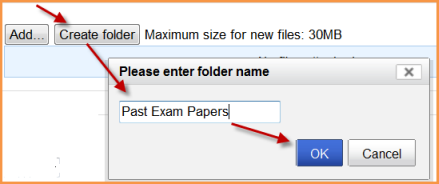
- Click "Create folder" and in the box that appears, give the folder a name.
- Click "OK"
- Click on the name of the new folder to get inside it.
- Click the "Add" button to upload files into this folder.
- For more information on file uploading, see here
- For each new file you wish to add to the folder, click the "Add button"
- Leave Common Module settings at "show" if you wish the folder to be visible.
- Click "Save and return to course".
Uploading a folder you have on your computer
- Note: Folders you wish to upload to Moodle have to be "zipped" or "compressed" first. The way you do this depends on your computer and operating system.
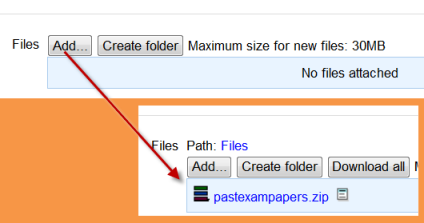
- Click the "Add" button and upload your zipped folder:
- For more information on uploading files and folders see here
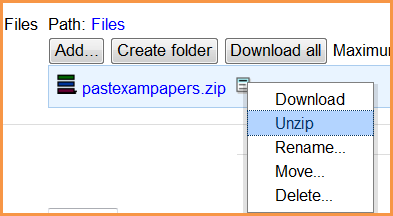
- Click the icon to the right of the zipped folder.
- Select the "unzip" option.
- The folder will appear in its normal state.
- To delete the original zipped folder, click the icon to its right and select the "delete" option.
- Leave Common module settings at "show" if you wish the folder to be visible.
- Click "Save and return to course".


