OAuth 2 Nextcloud service
Nextcloud configuration
As a prerequisite, you need Nextcloud in version 14.0.4 (or above). Otherwise, please upgrade to a recent Nextcloud version first. Then you need to register Moodle as an OAuth 2 client as follows:
- Log in to Nextcloud using the administrator account.
- Open the menu in the top-right corner and select Settings. On the next page, select the Security item in the "Administration" section on the left.

- At the top of the next page you see the list of registered clients (which is empty initially). Below "Add client", enter the name of your Moodle (e.g., "Mount Orange School Moodle") in the first field (Name). Note that the name that you enter here will be displayed to your Moodle users.
- In the second field (Redirection URI), enter the URL of your Moodle followed by /admin/oauth2callback.php (e.g., "https://school.demo.moodle.net/admin/oauth2callback.php").
- Click Add to save. Afterwards, the page looks similar to the screenshot below.
Moodle is now allowed to connect to Nextcloud using OAuth 2 authentication.
Moodle configuration
After you have set up Nextcloud, you can configure Moodle.
- Go to Site administration > Server > OAuth 2 services and click Create new Nextcloud service.
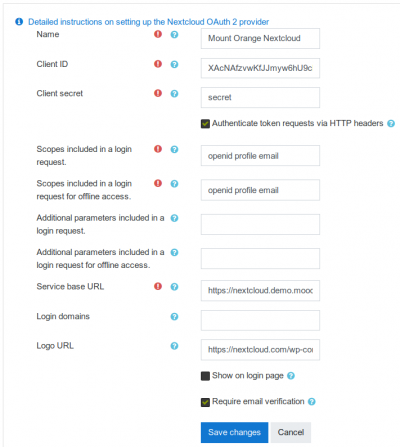
- On the next page, enter the Name of your Nextcloud, the Client ID and Client secret (as seen in the Nextcloud admin interface in the screenshot above) and the Service base URL which is the URL of your Nextcloud. If you use a custom Nextcloud Logo, specify its URL, too.

- You do not need to change any other settings. Click Save changes.
Afterwards, you can use the Nextcloud service from your Moodle, for example from the Nextcloud repository.
Troubleshooting
There are some configuration mistakes that might prevent Moodle from communicating with Nextcloud properly. Some of them are due to the fact that you can host Nextcloud on your own and that it is easy to make mistakes that are hard to spot at first. However, this list will help you resolve them.
- I cannot connect a system account.
- Log out from Nextcloud first. Make sure the Nextcloud account that you want to connect as a system account is different from all personal accounts. It has to be an account that belongs to Moodle, not to a person. Also, check the issuer settings. The checkbox Authenticate token requests via HTTP headers must be enabled!
- Authentication seems to have succeeded, but the filepicker shows "There are no files".
- It is possible that HTTPS is not configured correctly on the Nextcloud end. You need a valid and trusted certificate for your Nextcloud server! A self-signed certificate will not work. Unlike in the browser, you cannot manually "trust" a self-signed server certificate.
- After signing in with Nextcloud I get an error that says "This request is not valid. Please contact the administrator of [your Moodle Name] if this error persists.".
- You might have entered the wrong Redirect URI in Nextcloud. It is important that it ends with /admin/oauth2callback.php and that it corresponds exactly to the URL that Moodle is going to send to Nextcloud when attempting to authenticate!
- When I access an access controlled link I authorise Moodle but then cannot see the file.
- In older Nextcloud versions (prior to 14.0.1), when you authorise Moodle, your Nextcloud browser session ends. Upgrade to a recent Nextcloud version (see #Nextcloud configuration) to resolve this.
- Since I connected a system account, Moodle is very slow
- Nextcloud has a brute-force protection that was somewhat naïve (prior to 14.0.3). When enabled, it slows down some Moodle requests in some cases (even though the Moodle plugin is definitely not going to brute-force your Nextcloud!). First, upgrade to a recent Nextcloud version (see #Nextcloud configuration) to resolve this. As an additional measure, you can download the "Brute-force settings" app for Nextcloud. After installation, add the IP of your Moodle server to the whitelist.

