Choice settings: Difference between revisions
Mary Cooch (talk | contribs) (more updating) |
Mary Cooch (talk | contribs) m (→Other settings) |
||
| (51 intermediate revisions by 9 users not shown) | |||
| Line 1: | Line 1: | ||
{{Choice}} | {{Choice}} | ||
This page explores in more detail the settings for the Choice activity once you have added it to your course and also covers the Site administration settings. | |||
== | Note that if you want to edit an existing choice, click the Edit link to its right and choose the action you wish to take, eg 'Edit settings'. | ||
==General== | |||
In the Description, ask the question or make the statement from which students must make a choice. Check the box if you want these instructions to display on the course page. | |||
Display mode for the options relates to the display of the results. If you have only a few choices, choose to display the results horizontally; if you have a large number, choose to display them vertically. | |||
== | ==Options== | ||
;Allow choice to be updated | |||
:Students can change their mind and change their selection. | |||
;Allow more than one choice to be selected | |||
:If this is enabled then the checkboxes display as squares instead of round (radio) buttons: | |||
{| | |||
|[[File:choicesingle1.png|thumb|500px|Choose only one]] | |||
|[[File:choiceseveral.png|thumb|500px|More than one may be chosen]] | |||
|} | |||
;Limit the number of responses allowed | |||
:If learners are free to choose any option, leave 'Limit' at the default 0. If you want to restrict them to selecting a particular number, enter that number in the 'Limit' box. ' | |||
''Warning!!''' If you unintentionally check this box but don't add a number then your students won't be able to select any choices and will get confused! | |||
Note: If you use the choice in group mode, then any limit set is ''per group''. For example, if the limit is set to 5, then 5 members of each group can select the option. If there are 3 groups, this would mean that up to 5 x 3 = 15 participants could select the option. | |||
Now type in the choices you wish students to make. | |||
==Availability== | |||
Here you can set a start and/or end date for the Choice. | |||
Enabling Show preview will mean that students can view the choices before the time when they are allowed to make their selection. | |||
=== | ===Results=== | ||
Think carefully about whether (and how) you wish student to see the responses. | |||
;Publish | |||
:This simply means 'display results to students'. | |||
;Show column for unanswered | |||
:This might be useful if you need to quickly check who has not yet made a selection | |||
;Include responses from inactive/suspended users | |||
:This might or might not be useful to you depending on your organisation's policies. | |||
==== | ==Downloading results== | ||
A teacher may download the results of a Choice activity by clicking the 'View... responses' link and then on the next screen selecting from ODS, Excel or text format. | |||
[[File:pchoiceresult.png|center]] | |||
==Other settings== | |||
Depending on what is enabled for your site and course, you may also need to explore [[Common module settings]], [[Restrict access| Restrict access]], [[Activity completion]], [[Tags]] and [[Competencies]] | |||
If your Choice activity doesn't display as you wish, check the site settings below: | |||
If | |||
==Site administration settings== | ==Site administration settings== | ||
A description for the Choice may or may not be obligatory depending on ''Site administration > Plugins > Activity modules > Common settings,'' | |||
The following capabilities relate to the Choice activity: | |||
The following capabilities | *[[Capabilities/mod/choice:downloadresponses|Download choice responses]] | ||
*[[Capabilities/mod/choice:deleteresponses|Delete choice responses]] | |||
*[[Capabilities/mod/choice:downloadresponses| | *[[Capabilities/mod/choice:readresponses|Read choice responses]] | ||
*[[Capabilities/mod/choice:deleteresponses| | *[[Capabilities/mod/choice:choose|Record a choice]] | ||
*[[Capabilities/mod/choice:readresponses| | *[[Capabilities/mod/choice:addinstance|Add a new choice]] | ||
*[[Capabilities/mod/choice:choose|mod/choice: | |||
[[de:Abstimmung konfigurieren]] | |||
[[es:Configuraciones de elección]] | |||
[[fr:Ajouter/modifier un sondage]] | [[fr:Ajouter/modifier un sondage]] | ||
Latest revision as of 11:30, 28 August 2020
This page explores in more detail the settings for the Choice activity once you have added it to your course and also covers the Site administration settings.
Note that if you want to edit an existing choice, click the Edit link to its right and choose the action you wish to take, eg 'Edit settings'.
General
In the Description, ask the question or make the statement from which students must make a choice. Check the box if you want these instructions to display on the course page.
Display mode for the options relates to the display of the results. If you have only a few choices, choose to display the results horizontally; if you have a large number, choose to display them vertically.
Options
- Allow choice to be updated
- Students can change their mind and change their selection.
- Allow more than one choice to be selected
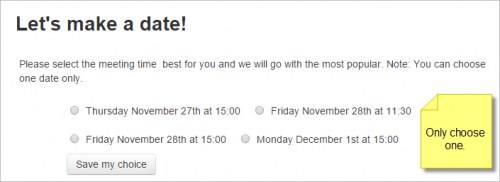
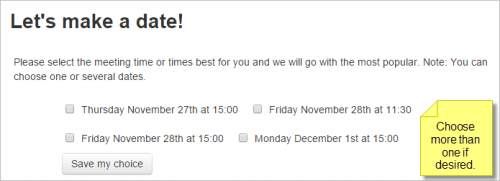
- If this is enabled then the checkboxes display as squares instead of round (radio) buttons:
- Limit the number of responses allowed
- If learners are free to choose any option, leave 'Limit' at the default 0. If you want to restrict them to selecting a particular number, enter that number in the 'Limit' box. '
Warning!!' If you unintentionally check this box but don't add a number then your students won't be able to select any choices and will get confused!
Note: If you use the choice in group mode, then any limit set is per group. For example, if the limit is set to 5, then 5 members of each group can select the option. If there are 3 groups, this would mean that up to 5 x 3 = 15 participants could select the option.
Now type in the choices you wish students to make.
Availability
Here you can set a start and/or end date for the Choice.
Enabling Show preview will mean that students can view the choices before the time when they are allowed to make their selection.
Results
Think carefully about whether (and how) you wish student to see the responses.
- Publish
- This simply means 'display results to students'.
- Show column for unanswered
- This might be useful if you need to quickly check who has not yet made a selection
- Include responses from inactive/suspended users
- This might or might not be useful to you depending on your organisation's policies.
Downloading results
A teacher may download the results of a Choice activity by clicking the 'View... responses' link and then on the next screen selecting from ODS, Excel or text format.
Other settings
Depending on what is enabled for your site and course, you may also need to explore Common module settings, Restrict access, Activity completion, Tags and Competencies
If your Choice activity doesn't display as you wish, check the site settings below:
Site administration settings
A description for the Choice may or may not be obligatory depending on Site administration > Plugins > Activity modules > Common settings,
The following capabilities relate to the Choice activity:


