OAuth2 Nextcloud Service: Unterschied zwischen den Versionen
Keine Bearbeitungszusammenfassung |
|||
| Zeile 11: | Zeile 11: | ||
# Klicken Sie auf ''Hinzufügen'' (''Add''). Danach sieht die Seite etwa so aus: | # Klicken Sie auf ''Hinzufügen'' (''Add''). Danach sieht die Seite etwa so aus: | ||
[[ | [[Image:nextcloud-moodle-client.png|none|frame|Registration of Moodle as an OAuth 2 client in Nextcloud|400px]] | ||
Nun kann Ihre Moodle-Site sich über eine OAuth2-Authentifzierung mit Nextcloud verbinden. | Nun kann Ihre Moodle-Site sich über eine OAuth2-Authentifzierung mit Nextcloud verbinden. | ||
Version vom 6. Februar 2019, 10:13 Uhr
Vorlage:Zum Überarbeiten
Neue Funktionalität
in Moodle 3.9!
Nextcloud-Konfiguration
Für die Integration von Nextcloud in Moodle benötigen Sie die Nextcloud Version 14.0.4 (oder neuer). Wenn Sie bislang eine ältere Version verwenden, müssen Sie erst Nextcloud aktualsieren. Danach müssen Sie Moodle als einen OAuth2 Client registrieren. Das geht folgendermaßen:
- Melden Sie sich als Administrator/in in Nextcloud an.
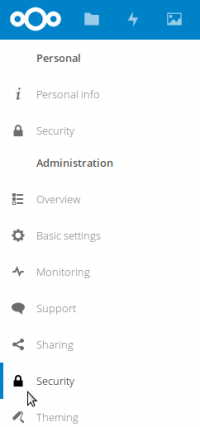
- Öffnen Sie das Menü oben rechts und wählen Sie die Option Einstellungen (Settings). Auf der nächsten Seite wählen Sie links im Abschnitt Administration den Eintrag Sicherheit (Security) On the next page, select the Security item in the "Administration" section on the left.

- Oben auf der nächsten Seite sehen Sie die Liste der registrierten Clients (anfangs ist dieseListe leer). Unter Client hinzufügen (Add client) geben Sie im Feld Name den Namen Ihrer Moodle-Site ein (z.B. "Mount Orange School Moodle"). Dieser Name wird Ihren Moodle-Nutzer/innen angezeigt.
- Im Feld Redirection URI geben Sie die URL Ihrer Moodle-Installation, gefolgt von /admin/oauth2callback.php (also z.B. "https://school.demo.moodle.net/admin/oauth2callback.php").
- Klicken Sie auf Hinzufügen (Add). Danach sieht die Seite etwa so aus:
Nun kann Ihre Moodle-Site sich über eine OAuth2-Authentifzierung mit Nextcloud verbinden.
Moodle-Konfiguration
After you have set up Nextcloud, you can configure Moodle.
- Go to Site administration > Server > OAuth 2 services and click Create new Nextcloud service.
- On the next page, enter the Name of your Nextcloud, the Client ID and Client secret (as seen in the Nextcloud admin interface in the screenshot above) and the Service base URL which is the URL of your Nextcloud. If you use a custom Nextcloud Logo, specify its URL, too.

- You do not need to change any other settings. Click Save changes.
Afterwards, you can use the Nextcloud service from your Moodle, for example from the Nextcloud repository.
Fehlerbehandlung
There are some configuration mistakes that might prevent Moodle from communicating with Nextcloud properly. Some of them are due to the fact that you can host Nextcloud on your own and that it is easy to make mistakes that are hard to spot at first. However, this list will help you resolve them.
- I cannot connect a system account.
- Log out from Nextcloud first. Make sure the Nextcloud account that you want to connect as a system account is different from all personal accounts. It has to be an account that belongs to Moodle, not to a person. Also, check the issuer settings. The checkbox Authenticate token requests via HTTP headers must be enabled!
- Authentication seems to have succeeded, but the filepicker shows "There are no files".
- It is possible that HTTPS is not configured correctly on the Nextcloud end. You need a valid and trusted certificate for your Nextcloud server! A self-signed certificate will not work. Unlike in the browser, you cannot manually "trust" a self-signed server certificate. You should also check that the Apache modules "rewrite", "headers" and "env" are installed and enabled in the Nextcloud server.
- After signing in with Nextcloud I get an error that says "This request is not valid. Please contact the administrator of [your Moodle Name] if this error persists.".
- You might have entered the wrong Redirect URI in Nextcloud. It is important that it ends with /admin/oauth2callback.php and that it corresponds exactly to the URL that Moodle is going to send to Nextcloud when attempting to authenticate!
- When I access an access controlled link I authorise Moodle but then cannot see the file.
- In older Nextcloud versions (prior to 14.0.1), when you authorise Moodle, your Nextcloud browser session ends. Upgrade to a recent Nextcloud version (see #Nextcloud configuration) to resolve this.
- Since I connected a system account, Moodle is very slow
- Nextcloud has a brute-force protection that was somewhat naïve (prior to 14.0.3). When enabled, it slows down some Moodle requests in some cases (even though the Moodle plugin is definitely not going to brute-force your Nextcloud!). First, upgrade to a recent Nextcloud version (see #Nextcloud configuration) to resolve this. As an additional measure, you can download the "Brute-force settings" app for Nextcloud. After installation, add the IP of your Moodle server to the whitelist.
- When I try to create an access controlled link I get a "Cannot download this file" error.
- This may happen if the system account is not connected. Go to Site administration > Server > OAuth 2 services and try to connect again the Nextcloud system account.

