Using Lesson: Difference between revisions
Mary Cooch (talk | contribs) |
Luca Bösch (talk | contribs) mNo edit summary |
||
| (43 intermediate revisions by 7 users not shown) | |||
| Line 1: | Line 1: | ||
{{Lesson}} | {{Lesson}} | ||
This page outlines how students and teachers interact with Moodle lessons once they have been created. For details on how to set up and then organise a lesson, see [[Lesson settings]] and [[Building Lesson]] | This page outlines how students and teachers interact with Moodle lessons once they have been created. For details on how to set up and then organise a lesson, see [[Lesson settings]] and [[Building Lesson]] | ||
== What the student sees == | == What the student sees == | ||
*A student clicking on a Lesson will see an introductory page with one or more buttons which they choose from to select the path they wish to take. | *A student clicking on a Lesson will see an introductory page with one or more buttons which they choose from to select the path they wish to take. | ||
*The display may vary according to how the teacher has set up the lesson in [[Lesson settings]]. For example; there may or may not be a list of pages down the side; there may or may not be an ongoing score. | *The display may vary according to how the teacher has set up the lesson in [[Lesson settings]]. For example; there may or may not be a list of pages down the side; there may or may not be an ongoing score. | ||
*Students progress through the lesson with either content pages (of information, which is not graded) or various types of question pages(which may be graded) When a question page is used, the following page gives the answer and feedback if offered: | *Students progress through the lesson with either content pages (of information, which is not graded) or various types of question pages (which may be graded). When a question page is used, the following page gives the answer and feedback if offered: | ||
[[File:studentviewoflesson.png]] | [[File:studentviewoflesson.png|500px]] | ||
*The lesson is ended when the student has met the criteria set by the teacher. This could be answering a certain number of questions correctly, accessing a certain number of pages with content (text, audio or video) or following a certain navigational path. A final page appears where the student can check their score, if applicable, and return to the main course page. | *The lesson is ended when the student has met the criteria set by the teacher. This could be answering a certain number of questions correctly, accessing a certain number of pages with content (text, audio or video) or following a certain navigational path. A final page appears where the student can check their score, if applicable, and return to the main course page. | ||
[[File:studentendoflesson.png]] | [[File:studentendoflesson.png|400px]] | ||
Note: If the gradebook is hidden from the student (via ''Course administration>Edit settings'') or if the lesson is a practice lesson, then the 'View grades' link will not be displayed. However, the score will still be displayed at the end of the lesson, unless it is a practice lesson: | |||
[[File:lessongradebookhidden.png|thumb|400px|center]] | |||
==What the teacher sees== | ==What the teacher sees== | ||
== | *A teacher clicking on a lesson will see tabs at the top offering them the chance to preview, edit, view reports or grade essays in the lesson: | ||
== | [[File:teacherviewoflesson.png|400px]] | ||
== | ===Preview=== | ||
*The lesson opens up in preview mode for the teacher. However, it will not show the score unless the teacher switches their role to a student. | |||
===Edit=== | |||
*The Edit tab allows teachers to alter the lesson once it has been set up. There are two views - Collapsed and Expanded. See [[Building Lesson]] for more details on editing the lesson. | |||
There | ===Reports=== | ||
*The reports tab shows the performance of students taking the lesson. There is a general "Overview" and a "Detailed Statistics" tab. | |||
====Overview==== | |||
[[File:lessonreportsoverview1.png|500px]] | |||
By clicking on the specific attempt, the teacher can view the student's answers to specific questions. It is also possible to delete a student attempt by checking the attempt and using the pull down menu to change "Choose" to "Delete". | |||
[[ | *Below the "Overview" can also be seen general statistics: Average score, Average time, High score, Low score, High time, Low time. | ||
[[File:lessonreportstatistics.png|500px]] | |||
=== | ====Detailed Statistics==== | ||
More detailed reports on individual questions are available from this tab, as in the following screenshot: | |||
[[File:lessonreportsdetailed.png|500px]] | |||
==Grading lessons== | |||
*Note that for a lesson to be graded, it must have at least one question where a student can receive a score and the lesson can not be a practice lesson. Grades are calculated when the student has completed a lesson. Grades are kept for every student attempt. | |||
===Grading lesson essays=== | |||
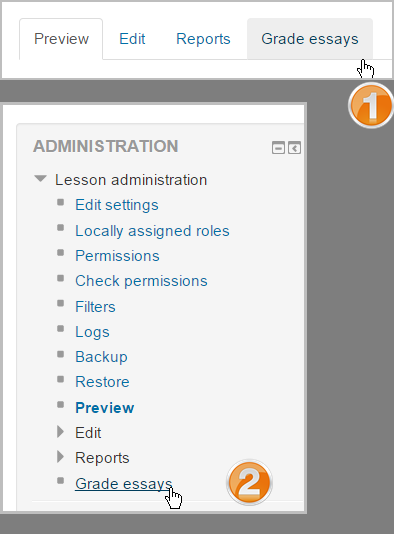
*If a lesson essay question has been included, the teacher can grade it from the Grade essays tab - #1 in the screenshot below - or from ''Lesson administration>Grade essays'' - #2 in the screenshot below. Media may be uploaded or audio or video recorded as part ofc the grading: | |||
[[File:gradelessonessays.png]] | |||
== | |||
=== | |||
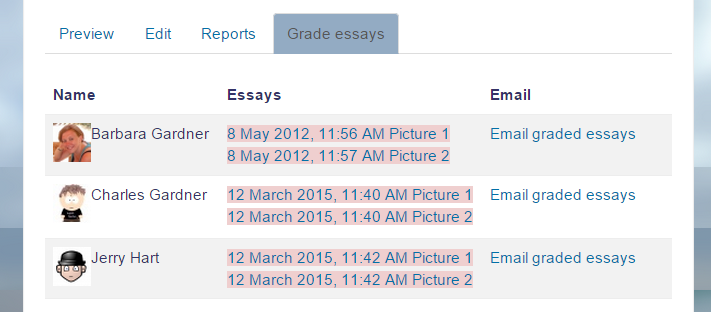
*Completed essays are listed next to the students' names: | |||
[[File:gradelessonessays1.png]] | |||
[[File: | *Ungraded essays are red in colour -#1 in the screenshot below: | ||
*When a teacher clicks on an essay and grades it, the colour changes to a yellow shade - #2 in the screenshot below: | |||
*When a teacher clicks 'Email graded essays' to notify the student, the colour changes to a green shade - #3 in the screenshot below: | |||
[[File:colourchangegradedessays.png|thumb|600px|center|Colour changes when grading essays]] | |||
==Understanding Flow control== | |||
*''Administration > Lesson administration > Edit settings > Flow control group'' | |||
*Here are some examples to help you understand the Lesson flow control settings. Please note: | |||
*"Allow student review" setting applies to the review of a whole Lesson, whereas | *"Allow student review" setting applies to the review of a whole Lesson, whereas | ||
*"Provide option to try a question again" setting applies to the review of an individual question page. When the student does not select the correct answer, 'Provide option to try a question again" setting will display 2 buttons. One will direct the student back to the question and the other to continue. | *"Provide option to try a question again" setting applies to the review of an individual question page. When the student does not select the correct answer, 'Provide option to try a question again" setting will display 2 buttons. One will direct the student back to the question and the other to continue. | ||
*"Maximum number of attempts" is designed to prevent a student from being stuck on "This page" where they continually put or select the wrong answer. It will override other settings, such as review or the option to try the question again. When exceeded, it will not allow a score to be recorded for that question. | *"Maximum number of attempts" is designed to prevent a student from being stuck on "This page" where they continually put or select the wrong answer. It will override other settings, such as review or the option to try the question again. When exceeded, it will not allow a score to be recorded for that question. | ||
===Case 1 === | ====Case 1 ==== | ||
The teacher wants the student to be able to attempt any question no more than 3 times and be given the chance to answer the question again. The teacher wants the student to see the response attached to their answer. | The teacher wants the student to be able to attempt any question no more than 3 times and be given the chance to answer the question again. The teacher wants the student to see the response attached to their answer. | ||
:Flow control settings | :Flow control settings | ||
::Allow student review'''Yes''' | ::Allow student review '''Yes''' | ||
::Provide option to try a question again '''No''' | ::Provide option to try a question again '''No''' | ||
::Maximum number of attempts '''3''' | ::Maximum number of attempts '''3''' | ||
| Line 95: | Line 78: | ||
:: "Continue" button | :: "Continue" button | ||
===Case 2 === | ====Case 2 ==== | ||
The teacher wants to allow the student 3 attempts at all questions but not see any feedback except the site default feedback for wrong answers. | The teacher wants to allow the student 3 attempts at all questions but not see any feedback except the site default feedback for wrong answers. | ||
*Flow control settings | *Flow control settings | ||
| Line 116: | Line 99: | ||
:: Response attached to the correct answer (if any) | :: Response attached to the correct answer (if any) | ||
=== Case 3 === | ==== Case 3 ==== | ||
"Speed bump for speed clickers". Teacher only wants the student to get once chance to record an answer on any question. They | "Speed bump for speed clickers". Teacher only wants the student to get once chance to record an answer on any question. They will only see the response the teacher provides for any question, or the default feedback if no response has been set for the answer the student selected. | ||
*Flow control settings | *Flow control settings | ||
::Allow student review'''No''' | ::Allow student review '''No''' | ||
::Provide option to try a question again | ::Provide option to try a question again '''No''' | ||
::Maximum number of attempts '''1''' | ::Maximum number of attempts '''1''' | ||
::Display default feedback '''Yes''' | ::Display default feedback '''Yes''' | ||
| Line 138: | Line 121: | ||
::"Continue" button | ::"Continue" button | ||
=== | ==Ideas for using Lessons== | ||
*Because of its "branching" nature, the lesson module lends itself to a wide variety of activities, not all of which need to be graded. In addition to merely working through a list of question pages, here are some other suggestions: | |||
=== | ====Self-directed learning of a new topic==== | ||
*Use the lesson to introduce a new topic. The learner starts out knowing nothing but can progress at his own pace, reviewing what he is not sure of and moving on when he feels ready. This can be much enhanced by... | |||
====Allow for different learning styles==== | |||
*When using the lesson to introduce a new topic, offer pages that deliver the content in different ways, according to how the students prefer to learn. For example the button "do you prefer to read?" goes to a page of text; "do you prefer to watch a video?" goes to a screencast ; "do you prefer to listen to instructions?" -goes to a podcast and so on. | |||
====Role play simulations/Decision-making exercises==== | |||
*Use the lesson to set up situations where the learner has to make a choice each time and the scenario changes according to their selection. This could be a medical emergency for example, deciding upon the correct treatment, or a customer relations exercise, learning how best to deal with an awkward client. In an educational establishment it could serve well in Humanities subjects considering moral/ethical issues. | |||
====Interactive fiction==== | |||
*For younger (and not so younger!) students, the lesson can be used to create a "choose your own ending" type of story where the student reads a page (or even watches a video/listens to an audio file) and then decides upon the character's next move. Apart from the entertainment value of this, it could be used to help guide pre-teens to behave responsibly by taking decisions for a character who is in a potentially dangerous situation. | |||
====Differentiated revision guides==== | |||
*Students can be taken to different sets of revision questions according to their answers, allowing them to progress from basic to intermediate to advanced according to their prior knowledge. | |||
== See also == | |||
[https://school.moodledemo.net/mod/lesson/view.php?id=432 A working example of a Lesson from the School demo site.] | |||
[[fr:Afficher une leçon]] | [[fr:Afficher une leçon]] | ||
[[de: | [[de:Lektion nutzen]] | ||
[[es:Usando Lección]] | |||
[[ja:レッスンの利用]] | |||
Latest revision as of 07:32, 20 April 2020
This page outlines how students and teachers interact with Moodle lessons once they have been created. For details on how to set up and then organise a lesson, see Lesson settings and Building Lesson
What the student sees
- A student clicking on a Lesson will see an introductory page with one or more buttons which they choose from to select the path they wish to take.
- The display may vary according to how the teacher has set up the lesson in Lesson settings. For example; there may or may not be a list of pages down the side; there may or may not be an ongoing score.
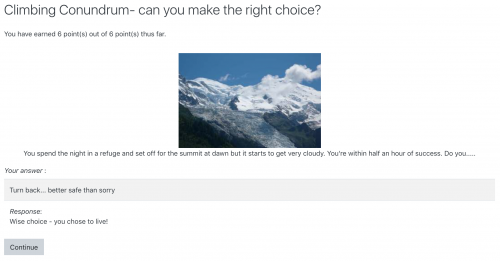
- Students progress through the lesson with either content pages (of information, which is not graded) or various types of question pages (which may be graded). When a question page is used, the following page gives the answer and feedback if offered:
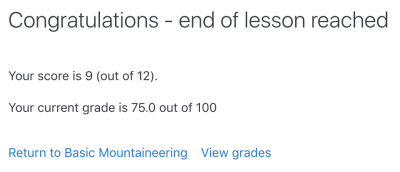
- The lesson is ended when the student has met the criteria set by the teacher. This could be answering a certain number of questions correctly, accessing a certain number of pages with content (text, audio or video) or following a certain navigational path. A final page appears where the student can check their score, if applicable, and return to the main course page.
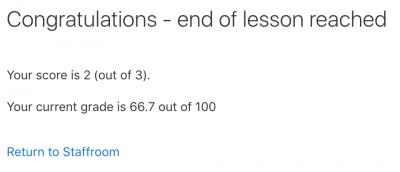
Note: If the gradebook is hidden from the student (via Course administration>Edit settings) or if the lesson is a practice lesson, then the 'View grades' link will not be displayed. However, the score will still be displayed at the end of the lesson, unless it is a practice lesson:
What the teacher sees
- A teacher clicking on a lesson will see tabs at the top offering them the chance to preview, edit, view reports or grade essays in the lesson:
Preview
- The lesson opens up in preview mode for the teacher. However, it will not show the score unless the teacher switches their role to a student.
Edit
- The Edit tab allows teachers to alter the lesson once it has been set up. There are two views - Collapsed and Expanded. See Building Lesson for more details on editing the lesson.
Reports
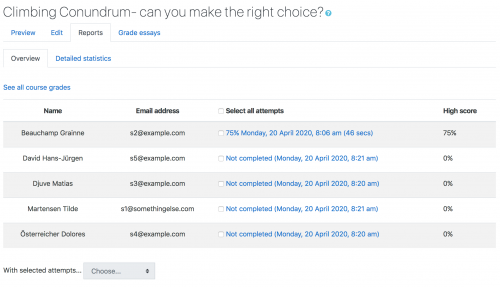
- The reports tab shows the performance of students taking the lesson. There is a general "Overview" and a "Detailed Statistics" tab.
Overview
By clicking on the specific attempt, the teacher can view the student's answers to specific questions. It is also possible to delete a student attempt by checking the attempt and using the pull down menu to change "Choose" to "Delete".
- Below the "Overview" can also be seen general statistics: Average score, Average time, High score, Low score, High time, Low time.
Detailed Statistics
More detailed reports on individual questions are available from this tab, as in the following screenshot:
Grading lessons
- Note that for a lesson to be graded, it must have at least one question where a student can receive a score and the lesson can not be a practice lesson. Grades are calculated when the student has completed a lesson. Grades are kept for every student attempt.
Grading lesson essays
- If a lesson essay question has been included, the teacher can grade it from the Grade essays tab - #1 in the screenshot below - or from Lesson administration>Grade essays - #2 in the screenshot below. Media may be uploaded or audio or video recorded as part ofc the grading:
- Completed essays are listed next to the students' names:
- Ungraded essays are red in colour -#1 in the screenshot below:
- When a teacher clicks on an essay and grades it, the colour changes to a yellow shade - #2 in the screenshot below:
- When a teacher clicks 'Email graded essays' to notify the student, the colour changes to a green shade - #3 in the screenshot below:
Understanding Flow control
- Administration > Lesson administration > Edit settings > Flow control group
- Here are some examples to help you understand the Lesson flow control settings. Please note:
- "Allow student review" setting applies to the review of a whole Lesson, whereas
- "Provide option to try a question again" setting applies to the review of an individual question page. When the student does not select the correct answer, 'Provide option to try a question again" setting will display 2 buttons. One will direct the student back to the question and the other to continue.
- "Maximum number of attempts" is designed to prevent a student from being stuck on "This page" where they continually put or select the wrong answer. It will override other settings, such as review or the option to try the question again. When exceeded, it will not allow a score to be recorded for that question.
Case 1
The teacher wants the student to be able to attempt any question no more than 3 times and be given the chance to answer the question again. The teacher wants the student to see the response attached to their answer.
- Flow control settings
- Allow student review Yes
- Provide option to try a question again No
- Maximum number of attempts 3
- Display default feedback No
- Number of pages to show 0
- Slideshow No
- Student selects wrong answer and will see:
- "Response for the wrong answer" (if any is shown)
- "Yes, I'd like to try again" button
- "Continue" button.
- Student selects correct answer and will see:
- "Response for the correct answer" (if any is shown)
- "Continue" button
Case 2
The teacher wants to allow the student 3 attempts at all questions but not see any feedback except the site default feedback for wrong answers.
- Flow control settings
- Allow student review No
- Provide option to try a question again Yes
- Maximum number of attempts 3
- Display default feedback No
- Number of pages to show 0
- Slideshow No
- Student selects wrong answer and will see:
- Not quite. Would you like to try again? as text over the
- "Yes, I'd like to try again" button
- '"No, I just want to go on to the next question" button
- Note: If the wrong answer jump is set to "This page" and the number of attempts is under the maximum, then the student will return to the question, regardless if they select "No, I just want to go on".
- Student selects correct answer and will see:
- "Your answer: {gives the student's answer)"
- Response attached to the correct answer (if any)
Case 3
"Speed bump for speed clickers". Teacher only wants the student to get once chance to record an answer on any question. They will only see the response the teacher provides for any question, or the default feedback if no response has been set for the answer the student selected.
- Flow control settings
- Allow student review No
- Provide option to try a question again No
- Maximum number of attempts 1
- Display default feedback Yes
- Number of pages to show 0
- Slideshow No
- Student selects wrong answer and will see:
- "Response for the wrong answer" (if any is shown)
- "Yes, I'd like to try again" button
- "Continue" button.
- Note: When teacher sets the Jump to "This page" for a wrong answer, they will return to the page but their score will not change.
- Student
- "Response for the correct answer" (if any is show)
- "Continue" button
Ideas for using Lessons
- Because of its "branching" nature, the lesson module lends itself to a wide variety of activities, not all of which need to be graded. In addition to merely working through a list of question pages, here are some other suggestions:
Self-directed learning of a new topic
- Use the lesson to introduce a new topic. The learner starts out knowing nothing but can progress at his own pace, reviewing what he is not sure of and moving on when he feels ready. This can be much enhanced by...
Allow for different learning styles
- When using the lesson to introduce a new topic, offer pages that deliver the content in different ways, according to how the students prefer to learn. For example the button "do you prefer to read?" goes to a page of text; "do you prefer to watch a video?" goes to a screencast ; "do you prefer to listen to instructions?" -goes to a podcast and so on.
Role play simulations/Decision-making exercises
- Use the lesson to set up situations where the learner has to make a choice each time and the scenario changes according to their selection. This could be a medical emergency for example, deciding upon the correct treatment, or a customer relations exercise, learning how best to deal with an awkward client. In an educational establishment it could serve well in Humanities subjects considering moral/ethical issues.
Interactive fiction
- For younger (and not so younger!) students, the lesson can be used to create a "choose your own ending" type of story where the student reads a page (or even watches a video/listens to an audio file) and then decides upon the character's next move. Apart from the entertainment value of this, it could be used to help guide pre-teens to behave responsibly by taking decisions for a character who is in a potentially dangerous situation.
Differentiated revision guides
- Students can be taken to different sets of revision questions according to their answers, allowing them to progress from basic to intermediate to advanced according to their prior knowledge.
