Parent role: Difference between revisions
Mary Cooch (talk | contribs) (reformatting and rephrasing parent role) |
Mary Cooch (talk | contribs) (reformatting and rephrasing parent role) |
||
| Line 28: | Line 28: | ||
==Assigning the parent to the student== | ==Assigning the parent to the student== | ||
*Access the child's profile page, via '''Site administration ► Users ► Accounts ► Browse list of users''' | *Access the child's profile page, via '''Site administration ► Users ► Accounts ► Browse list of users''' | ||
*Go to 'Profile settings for [username]' > 'Roles' >'Assign roles relative to this user' | |||
*Choose the role to assign i.e. Parent | *Choose the role to assign i.e. Parent | ||
*Select the parent in the potential users list and use the Add button to add it to the existing users list. | |||
*Select the parent in the potential users list | |||
[[ | {| | ||
| [[File:CustomRole08.png|thumb|Selecting the student]] | |||
| [[File:CustomRole09.png|thumb|"Assign roles relative to this user"]] | |||
| [[File:CustomRole10.png|thumb|Assining the parent to the student]] | |||
|} | |||
At this point you can return to the "Assign roles in user:" page and you should see that the parent name is now in the "Users with Role" column. | At this point you can return to the "Assign roles in user:" page and you should see that the parent name is now in the "Users with Role" column. | ||
:'''NOTE:'''The same parent may be assigned to several students, siblings or otherwise. | :'''NOTE:'''The same parent may be assigned to several students, siblings or otherwise. | ||
Revision as of 18:50, 21 October 2012
The role of Parent may be used to provide parents/mentors/tutors with permission to view certain information, such as activity reports, grades, blog entries and forum posts, about their children/mentees/tutees.
Creating a new role
- As an administrator, go to Settings > Site administration > Users > Permissions > Define roles and click the "Add a new role" button.
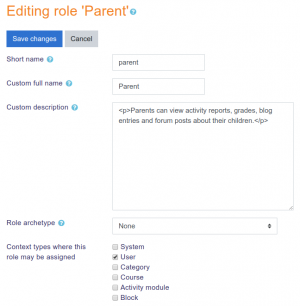
- Give the role a name (such as "Parent", but it can be anything appropriate, such as tutor/mentor) and assign it to the user context.
- Under the heading of Course
- Change moodle/user:viewdetails to allow - to access the student's profile
Under the heading of Users
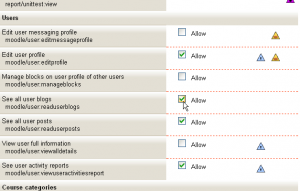
- Change moodle/user:viewalldetails to allow - to view all aspects of the student's profile
- Change any/all of the following capabilities to allow
- moodle/user:readuserblogs - to read the student's blog entries
- moodle/user:readuserposts - to read the student's forum posts
- moodle/user:viewuseractivitiesreport - to view the student's activity reports and grades
- moodle/user:editprofile - to edit the student's profile
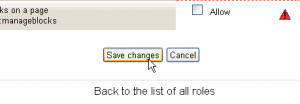
- Click the "Create this role" button.
Some permissions may already be set to "Allow", or the permissions granted here may not be the ones required for that Role. This set of Permissions mean that this Role allows anyone assigned to a Parent Role, then linked to the Student Role, to edit the profile or read the blogs of that Student - not everyone's profile or blogs.
Assigning the parent to the student
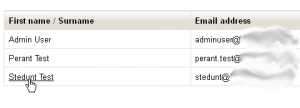
- Access the child's profile page, via Site administration ► Users ► Accounts ► Browse list of users
- Go to 'Profile settings for [username]' > 'Roles' >'Assign roles relative to this user'
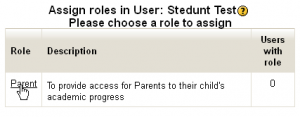
- Choose the role to assign i.e. Parent
- Select the parent in the potential users list and use the Add button to add it to the existing users list.
File:CustomRole09.png "Assign roles relative to this user" |
At this point you can return to the "Assign roles in user:" page and you should see that the parent name is now in the "Users with Role" column.
- NOTE:The same parent may be assigned to several students, siblings or otherwise.
Adding multiple role assignments at once
(if you are interested in assigning several parent roles en masse read the discussion at http://moodle.org/mod/forum/discuss.php?d=70539#p345127)
Adding the Mentee Block
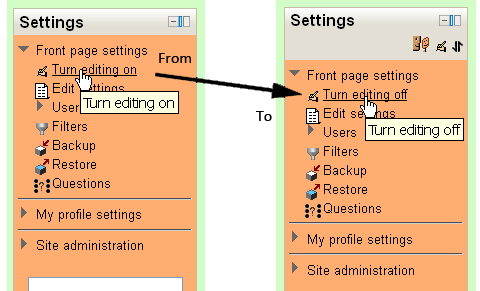
When at the Front Page, turn editing on.
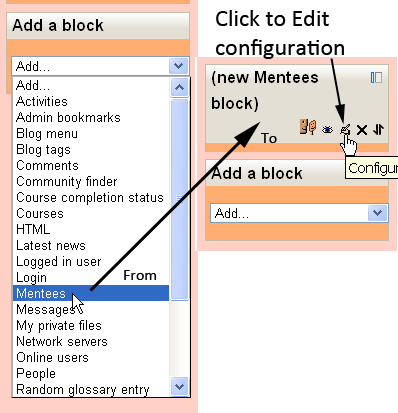
Go to the Add Blocks block and select the Mentees block and when it appears, click on the Configuration icon.
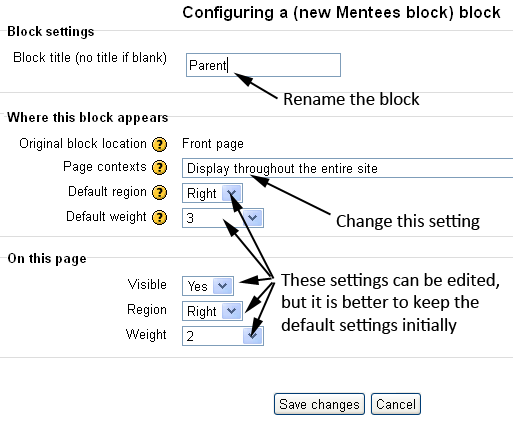
Edit the configuration settings to suit the needs of the site. When complete, save the changes and return to the Front Page.
- NOTE:Consider carefully what options really need be set. There may be a requirement to have more than one Mentee block, so giving each block an unambiguous title becomes important.
Once saved the block should be titled Parent and if you have made the assignments properly, it will work.
Viewing activity reports
If the capability moodle/user:viewuseractivitiesreport is set to allow then a parent/mentee may view their student's activity reports and grades via the student's Profile.
On the main Profile page, there will be a list of courses. Clicking on a course title will select that course. Then, under the Activities tab, the various report and grades sub-tabs will display information relevant to the selected course. You can easily change which course you are reviewing by selecting another one on the main Profile tab.
One small hack that can make the course list a bit more readable, especially for long course lists, is to change the format to a vertical list:
- Edit the moodle/user/view.php file and look for these lines (around line 302-304 in my 2.3.2 installation):
. $cfullname . "</a>, ";
               } else {
                   $courselisting .= $cfullname . ", ";
- and change that to :
. $cfullname . "</a>,
";
               } else {
                   $courselisting .= $cfullname . "
";;
- Then save
This will affect the profile view in a course.
- Edit the moodle/user/profile.php file and look for these lines (around line 3332 in my 2.3.2 installation):
$courselisting .= "<a href=\"{$CFG->wwwroot}/user/view.php?id={$user->id}&course={$mycourse->id}\" $class >" . format_string($mycourse->fullname) . "</a>,
";
- and change that to :
$courselisting .= "<a href=\"{$CFG->wwwroot}/user/view.php?id={$user->id}&course={$mycourse->id}\" $class >" . format_string($mycourse->fullname) . "</a>,
";
- Then save
This will affect the profile view from the main page.
See also
Using Moodle forum discussions:
