Backup restore: Difference between revisions
Ray Thompson (talk | contribs) |
Ray Thompson (talk | contribs) (→Backup) |
||
| Line 4: | Line 4: | ||
==Backup== | ==Backup== | ||
[[Image:Backup icon link.JPG]] | Selecting the backup icon ([[Image:Backup icon link.JPG]]), will give the user with the correct privileges 3 screens. | ||
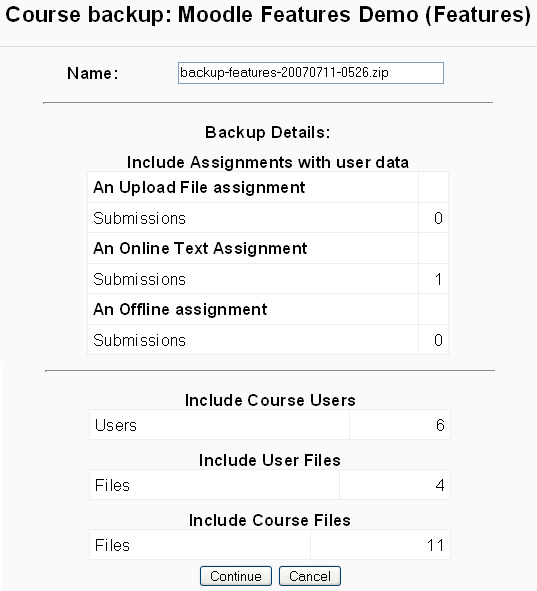
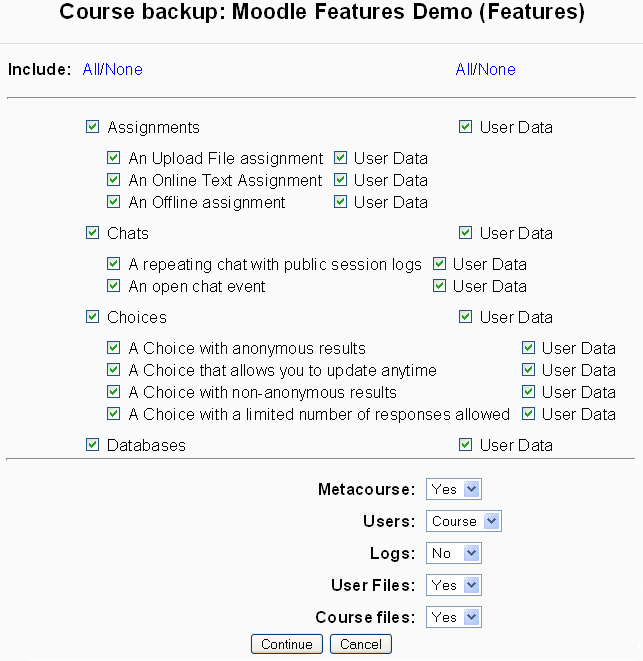
*Screen | [[Image:Course_backup.jpg|frame|center|*Screen 1 provides options to select which activities and resources should be backed up. This screen also includes an option to include student data for each of these activities and resources. The bottom of screen 1 asks how to handled meta courses, users, log files, user files and course files. The continue button starts the backup process.]] | ||
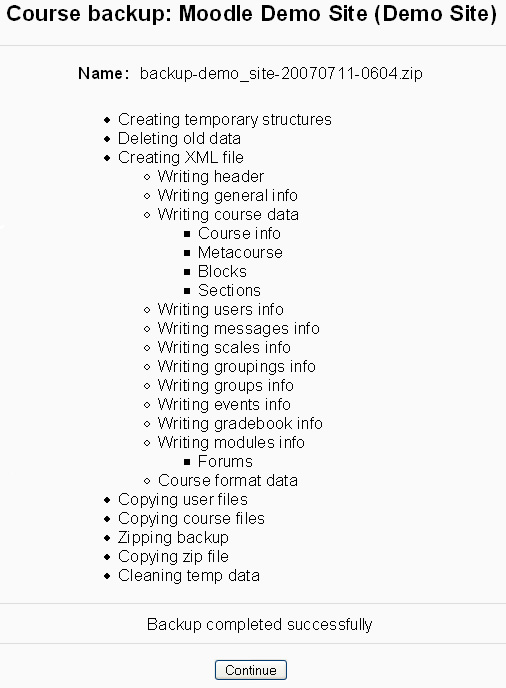
*Screen 3 displays the progress of the backup, reports if it was successful and has a continue button. Any errors or corrupted files will be reported on this screen. After clicking continue you will be taken to a file manager screen where you can download the backup. | [[Image:Course_backup_s2.jpg|frame|center|*Screen 2 suggests a name for the backup file, which can be edited, and informs the user what is actually going to be backed up. For example, the number of users and course files and which modules.]] | ||
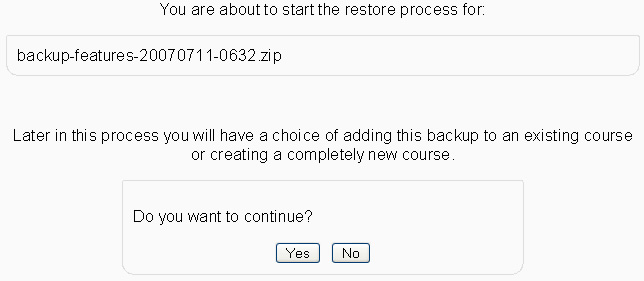
[[Image:Course_backup_s3.jpg|frame|center|*Screen 3 displays the progress of the backup, reports if it was successful and has a continue button. Any errors or corrupted files will be reported on this screen. After clicking continue you will be taken to a file manager screen where you can download the backup.]] | |||
==Restore== | ==Restore== | ||
Revision as of 23:16, 11 July 2007
Moodle has a course backup and restore process. Each successive version of Moodle has offered more options in this process. Many Moodle site administrators turn on an automated backup function, which does a full course backup on a schedule. The on demand backup and restore functions can be found in the administrative block of a course.
An administrator or user with appropriate permissions can use the backup restore functions to create, transfer or restore parts of an existing course or a whole course.
Backup
Selecting the backup icon (File:Backup icon link.JPG), will give the user with the correct privileges 3 screens.
Restore
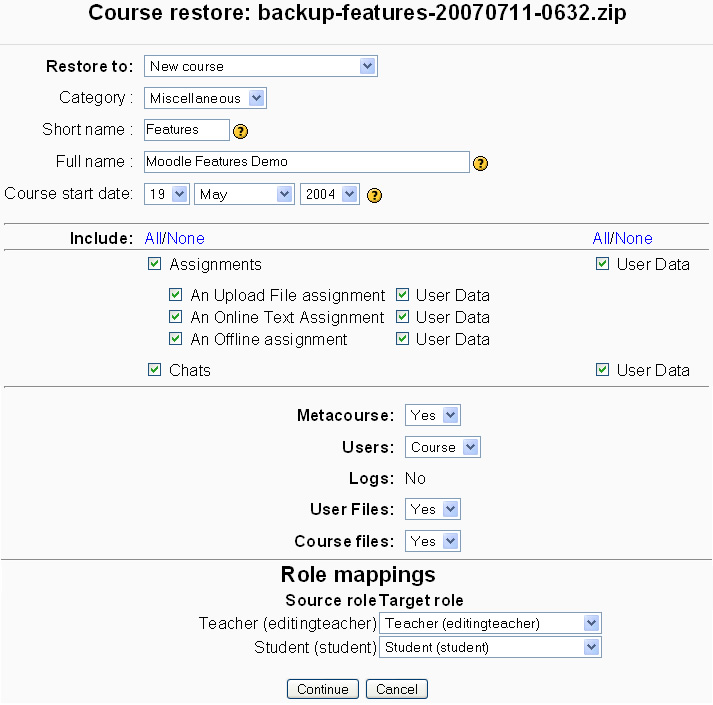
- Restore to: new course, copy over a course or add to a course.
- Include: This section allows you to select the individual elements you wish to restore.
- User data: This must be included if you wish to retain student files.
- Users: This option will transfer enrolled users into the course. This option must be selected if you wish to retain the user data.
- Course files: These are image and resource files
**Administrators and Course Creators options in 1.6 are:
Restore to an existing course either by adding to the course (keeping existing data) or deleting all existing data; or through the creation of a new course.
**Editing Teachers options in 1.6 are:
Restore to an existing course either adding to the course (keeping existing data) or deleting all existing data.
Role mappings
Template:Moodle 1.7 The procedure of restoring a 1.6 or older course to a 1.7 site requires additional role mapping information to be entered (on Screen 3). Since Moodle 1.7 has a dynamic roles system, it is possible to map the old roles (i.e. editing teachers, non-editing teachers and students) onto any new roles. By default, Moodle 1.7 looks for legacy roles to map intelligently, for example students in 1.6 are mapped onto the 1.7 legacy student role.
When restoring a 1.7 course to a 1.7 site, Moodle compares the role shortname string and pre-selects the same for you. As a result, if you are restoring within the same site, you don't have to worry about selecting what roles to map onto.
Role options are determined by what you can assign in the current context (course or site). For example, if you have the teacher role in a 1.7 course, you will not be able to map students onto admins in the restored course. There is also an option to create new roles to map onto.
See also
- Restore how to restore a backup of a course
- Roll courses forward, how to repeat a course again
- Import course data from your other courses. 1.6 feature in Moodle
