Windows installation using Git
This page is for non-technical Windows users who would like to be able to keep a copy of Moodle on their computers that they can easily and regularly update.
NOTE: These guidelines are intended for a Standard Moodle installation on a Windows PC for a private or test Moodle installation, NOT a production (public) site or service. If you wish to install Moodle on a public site using Git then please see Git for Administrators. If you wish to contribute fixes or improvements using Git please see Development: Git for developers
What you need to install Moodle on your Windows pc
- somewhere on your pc to house it and keep it working,with a database to maintain its records. We will use WAMP server
- the Moodle files themselves. We will use Github for Windows
What is Git and why use it?
Git allows Moodlers not only to quickly download the latest versions of Moodle but also to
download and test out fixes by developers and to share with others their own changes which may potentially get integrated into Moodle for the benefit of everyone. In this page we are merely going to use the system to download Moodle onto our computer- (see the cycle in yellow in the screenshot)Git makes it easy for us to update Moodle when new versions come out each week, and it gives you the potential when more familiar with it to grab other changes and help test it. However, if you merely want to have Moodle on your Windows pc to practise and try things out and are NOT really interested in having all the latest changes then it might be easier for you to use the All in one Windows Installer package instead.
Getting the WAMP server
1. Go to Wampserver and click the Download button
2. You will probably need to click the button Wampserver (64 bits &PHP 5.3) 2.2E but to be sure, here is how to check if your pc is 64 bit or 32 bit)
3. You may get a warning You must install Visual C++ 2010 SP1 Redistributable Package x86 or x64 - download the appropriate package for you. This may take some time.
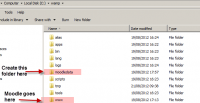
4. When it is done, come back to Wampserver and click the Download button again. Download, save and run the program, making sure you keep a note of where it has installed it on your computer. It will be in a folder called wamp. as in the screenshot to the left.
Making the database
Once wampserver is installed you will see a W icon, either on your desktop, start menu or taskbar (according to what you selected when installing.) Click it to bring up its options and then click PhpMyadmin as in Screenshot A below.
Tip: You can also reach this screen by typing into your browser: http://localhost/phpmyadmin/
1.Make sure that Server connection collation says "utf8_general_ci" (1 in Screenshot B below)
2.Click "databases" - (2 in Screenshot B below)
3. Type a name for your database (how about "moodle"?) Make sure you remember its name. Ensure Collation is set to utf8_general-ci. Click "Create".

4.Click the "check privileges" to the right of your database name and then click "add user".
5. Add your details as the database administrator. Make sure you remember the name and password you set. Tick (check) all privileges and save.
Preparing to install Moodle
Along with the folder containing all the Moodle files, we need another folder to hold all the resources and user data once Moodle is up and running. This is traditionally called the "moodledata" folder. We need to create a new folder for this before downloading Moodle.
- Find your wampserver on your computer - for instance, in C:\wamp.
- Note there is a folder called "www". We will install Moodle into there.
- Create a new folder called "moodledata" in the wampserver folder, as in the screenshot.
Getting hold of Git
- Go to Github for Windows and click the download button (currently in green, top right)
- You don't need to make an account but if you do, it will help you later if you wish to use Git at a more advanced level.
- Let Windows do its work; save it and run it. It might take some time.
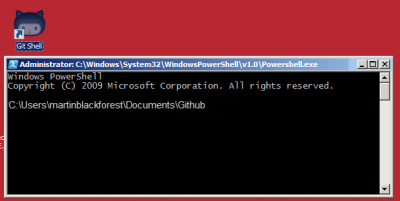
- Once it is installed, you will have two cat-like creature icons on your desktop, taskbar or start menu (depending on what you selected)
- Click the one called "Git shell". It will bring up a black box:
Getting hold of Moodle
The file path shown in your black box ("Windows power shell") is where Git has made your personal repository. You can download Moodle into there if you wish, but you will then have to copy the Moodle folder into your wampserver directory. Instead, we will download Moodle straight into the www folder of our wampserver directory.
1. Type cd: C\wamp\www (or whatever the path is to your wampserver directory and where you want to put Moodle)
2. Type git clone -b MOODLE_23_STABLE git://git.moodle.org/moodle.git (If you want a different version, see the FAQ below.)
3. Wait! Lots of lines will appear and it might take a while. At the end you should see "Checking out files:100% done"
Installing Moodle
- In your browser, type localhost/moodle
- The Moodle set up screen will appear.
- Much of this is straightforward form-filling. Pay attention to:
- the paths -does it know where to find your wampserver folder for Moodle and moodledata?
- the database details (which you should have remembered when setting up in section 4 above)
- the server check.
What are server checks?
Moodle needs to ensure our wampserver has all the features ("extensions") enabled to run it successfully.
Anything in green is fine. Anything in yellow is OK (but would be better in green). Anything in red will stop us installing Moodle.
- Make a note of the ones in yellow or red (names are under the Information column)
- Click your W wampserver icon and click "php extensions" (screenshot 1 below)
- Tick those extensions you noted were yellow or red (screenshot 2 below)
Note: If you have problems enabling the curl extension, see the FAQ below.
Completing the installation
- Once your server checks page shows all green or all green with some yellow, you can click "Continue"
- Complete details for your admin username and password (and remember them!)
- Complete details for your front page (name of your Moodle, etc)
- Give yourself a pat on the back!
Updating your Moodle
You can get a newer version of Moodle every Thursday. To do this using Git:
- Click the Git shell avatar to open up the Windows powershell black box.
- If it shows a different directory from where you installed Moodle, change the path by typing in
C:\wamp\www\moodleor wherever the path to your Moodle folder is. - You will see it now displays the name of the Moodle version you installed (Screenshot 1 below)
- Type
git pull - Lines will appear and your Moodle will update itself automatically!
- Note that
git pullwill also tell you if your version is currently up to date (Screenshot 2 below)


