Blockeinstellungen
- Blöcke verwalten
- Blockeinstellungen
- Administratorlesezeichen
- Aktivitäten
- Aktivitätsergebnisse
- Aktuelle Termine
- Bearbeitungsstand
- Blogmenü
- Blog-Tags
- Community-Suche
- Eigenes Profil
- Einstellungen
- Favorisierte Kurse
- Feedback
- Flickr
- Globale Suche
- Glossareintrag
- Hauptmenü
- Kalender
- Kommentare
- Kursabschnitte
- Kursbeschreibung
- Kursliste
- Kurs abschließen
- Kursübersicht
- Lernpläne
- Letzte Badges
- Login
- Meine Dateien
- Mentoren
- Navigation
- Netzwerk-Server
- Neue Aktivitäten
- Neue Ankündigungen
- Neue Blogeinträge
- Personen online
- RSS Feeds
- Soziale Aktivitäten
- Suche in Foren
- Tags-Block
- Textblock
- Youtube-Block
- Zeitleiste
- Zuletzt besuchte Kurse
- Zuletzt genutzte Objekte
- Block FAQ
![]() Diese Seite muss übersetzt werden. Greif zu!
Diese Seite muss übersetzt werden. Greif zu!
Wenn du dich um diesen Artikel kümmern willst, dann kennzeichne das, indem du die Vorlage {{Übersetzen}} durch die Vorlage {{ÜbersetzenVergeben}} ersetzt.
Wenn du mit deiner Arbeit fertig bist, dann entferne die Vorlage aus dem Artikel.
Danke für deine Mitarbeit!
Einen Block zu einer Seite hinzufügen
Blöcke können über das Auswahlmenü Block hinzufügen zu jeder Moodle-Seite hinzugefügt werden. Schalten Sie dazu die Moodle-Seite in den Bearbeitungsmodus.
Auf der Seite Blöcke finden Sie eine Übersicht, welche Blöcke es in Moodle gibt.
Hinweis: Die Funktionalität, einen Block auf einer Seite hinzuzufügen, wird über die addinstance Fähigkeit gesteuert, also z.B. für den Kommentare-Block über die Fähigkeit block/comment:addinstance.
Blockkonfiguration
Wenn Sie einen Block auf einer Moodle-Seite hinzugefügt haben, klicken Sie auf das Bearbeiten-Symbol ![]() in der Kopfzeile des Blocks und nehmen Sie die für diesen Block spezifischen Einstellungen vor.
in der Kopfzeile des Blocks und nehmen Sie die für diesen Block spezifischen Einstellungen vor.
Blockeinstellungen
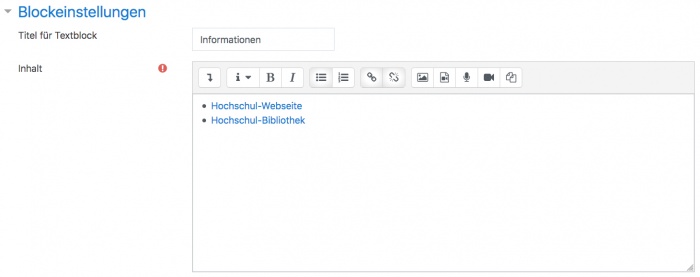
Bei einigen Blocktypen können Sie spezifische Einstellungen vornehmen Z.B. können Sie bei einem Textblock den Titel des Blocks eintragen; dieser erscheint dann in der Kopfzeile.
Wo dieser Block erscheint
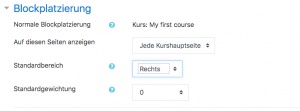
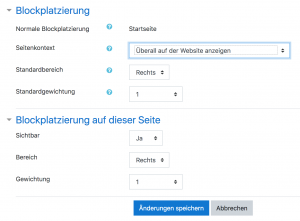
In Abhängigkeit vom Kontext (Bereich in Moodle) und den Rechten, die Sie haben, können Sie in diesem Bereich der Blockeinstellungen festlegen, wo der Block angezeigt wird.
- Originale Platzierung: Gibt eine Information darüber, wo der Block ursprünglich angelegt wurde.
- Auf diesen Seiten anzeigen: hier können Sie den Kontext festlegen, in dem der Block angezeigt wird. Welche Optionen Sie hier auswählen können, hängt von Ihren Rechten ab. Als Administrator/in können Sie hier z.B. auswählen, dass der Block auf jeder Seite oder auf jeder Kurshauptseite erscheint, als Trainer/in dagegen kann es sein, dass Sie nur Jede Kursseite auswählen können.
- Standardbereich: Normalerweise können Sie hier wählen, ob der Block in der rechten oder linken Spalte angezeigt werden soll.
- Standardgewichtung: Damit legen Sie fest, wo innerhalb der gewählten Spalte ein Block erscheint: -10 bedeutet ganz oben, 10 bedeutet ganz unten in der Spalte.
Siehe Nutzerprofil für eine Anleitung, wie man einen Block anlegt, der auf allen Nutzerprofilseiten angezeigt wird.
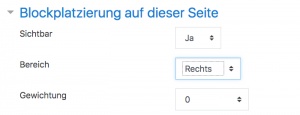
Auf dieser Seite
- Sichtbar - Ja oder Nein
- Bereich - Hier können Sie den Standardbereich für den Block für diese Moodle-Seite überschreiben.
- Gewichtung - Hier können Sie die Standardgewichtung für den Block für diese Moodle-Seite überschreiben.
'Sticky blocks'
The term 'sticky' block was used in older versions of Moodle to mean blocks which the admin added either site-wide or to the Dashboard and which could not be deleted by regular users. Although the term is no longer used, it is still possible to make blocks 'sticky' and in a wider variety of locations.
If an admin deletes a "sticky" block in a course, they receive a warning of the site-wide consequences of this action before it is deleted.
Here are a few examples:
Making a block sticky throughout the whole site
The Moodle administrator might wish for example to display support contact details site-wide using an HTML block called 'Helpdesk':
- As an administrator, turn on the editing on the front page and add the block you wish to make sticky.
- For Where this block appears > Page contexts, choose 'Display throughout the entire site'.
- Decide other settings according to your preference and save.
- The block will now appear on all pages of your Moodle.
Making a block sticky throughout a course
A teacher might wish to display a block, such as the comments block, on the course page and all activity pages.
- As a teacher in the course, turn on the editing on the course main page and add the block you wish to make sticky.
- For Display on page types, choose 'Any page'.
- Decide other settings according to your preferences and save.
- The block will now appear on all pages of the course.
Making a block sticky in a category
A user with category rights might for instance wish to display a Remote RSS feeds block in all of the courses within a particular category, such as a Head of Science adding Science news feeds to the Physics, Biology and Chemistry courses.
Making a block sticky in a resource or an activity
A teacher might wish to display a block in one particular resource or activity, for example a Head of Faculty might make create a Book for departmental policies and wish to add the comments block to every chapter/page of a book so colleagues can give quick feedback. (Note that such a comments block would be the same block on each chapter/page)
- As a teacher in the course, turn on the editing and click into the resource/activity -in this case a Book and add the block.
- For Display on page types, you will see (for example) 'mod-book*'
- Decide other settings according to your preferences and save.
- The block will now appear on all related screens.
Adding a block to all user profile pages
See User profiles.
Adding a block to the dashboard for all users
See Dashboard. Note that such a block would not be truly 'sticky', in that users can customise their dashboard and could, if wished, delete the block.
Block-Rechte
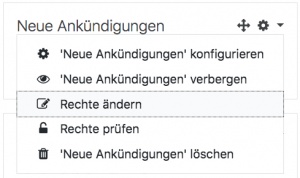
Rollen und Rechte für einen Block werden geändert, indem Sie auf das Rollen-Symbol ![]() klicken und dann im Block Einstellungen auf Block: XXX > Rechte klicken.
klicken und dann im Block Einstellungen auf Block: XXX > Rechte klicken.
Siehe Block FAQ für detaillierte Informationen darüber, wie man einen Block auf der Startseite vor nicht angemeldeten Nutzer/innen verbirgt.
