atto filterws: Difference between revisions
Daniel Palou (talk | contribs) |
Daniel Palou (talk | contribs) No edit summary |
||
| Line 19: | Line 19: | ||
While creating/editing some content using the Atto editor, select the text to filter and click the "WS" button. In the popup window, select the Origin and the User Agent (optional) you want to apply to the filter. Click "Insert" and the tags will be added to the content. | While creating/editing some content using the Atto editor, select the text to filter and click the "WS" button. In the popup window, select the Origin and the User Agent (optional) you want to apply to the filter. Click "Insert" and the tags will be added to the content. | ||
Example: In the following image we have some content we want to filter. As you can see, a new button was added to the toolbar: | Example: In the following image we have some content that we want to filter. As you can see, a new button was added to the toolbar: | ||
[[File:attofilterws_toolbar.png|thumb]] | [[File:attofilterws_toolbar.png|thumb]] | ||
Revision as of 08:48, 21 January 2019
Introduction
Atto plugin which makes it easier to add WebService filter tags to some content. For more information about the WebService filter plugin please see this documentation.
Installation
The Atto plugin for the WebService filter isn't in the plugins directory yet, but you can download it from this repository. It can be installed using any of the methods supported by Moodle. If you are unsure, please visit this page.
To install it manually, unzip the plugin in the moodle .../lib/editor/atto/plugins/ directory.
Add the button to the Atto toolbar
The button created by this plugin has to be added to the Atto toolbar before it can be used by users.
Please visit Site administration > Plugins > Text editors > Atto HTML editor > Atto toolbar settings.
There, please add the "filterws" keyword to one of the lines in the "editor_atto | toolbar" setting according to your needs.
How to use
Once enabled, a new button will appear in the toolbar of the Atto editor.
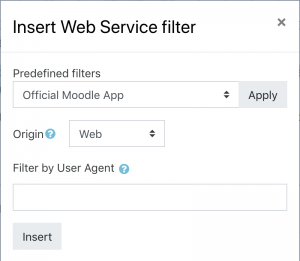
While creating/editing some content using the Atto editor, select the text to filter and click the "WS" button. In the popup window, select the Origin and the User Agent (optional) you want to apply to the filter. Click "Insert" and the tags will be added to the content.
Example: In the following image we have some content that we want to filter. As you can see, a new button was added to the toolbar:
We select the text we want to filter and click the button. A new popup window appears:
We select the options we want (in this case, Web and no User Agent) and click Insert. This will add the tags to the content, as you can see in the following screenshot:
Predefined filters
The site admin can create some predefined filters that users will be able to apply, that way they don't need to remember the Origin and User Agent to apply. By default, this plugin includes a predefined filter to display some content in the official Moodle app.
To define these prdefined plugins, go to "Site Administration > Plugins > Text editors > WebService Filter settings > Predefined filters".


