Messaging: Difference between revisions
From MoodleDocs
Graham Clark (talk | contribs) m (Changed 'person may obtained' to 'person may be obtained' in the "Message history" section) |
(In Moodle 3.7 'Enable messaging system' and 'Allow site-wide messaging' were moved from 'Advanced features') |
||
| (58 intermediate revisions by 7 users not shown) | |||
| Line 1: | Line 1: | ||
{{ | {{More features}} | ||
Unless disabled by the administrator (in Site administration > Messaging > Messaging settings), teachers, students and other users may send and receive private messages via Moodle. This is in addition to receiving [[Notifications|notifications]] about assignments, forum discussions etc. | |||
{{MediaPlayer | url = https://youtu.be/-hycmrpw0xA | desc = 3.7 New messaging features}} | |||
*A number at the top of the screen reflects the number of people who have sent new messages. | |||
*Clicking the icon displays the messaging drawer, divided into starred messages, group messages and personal messages. | |||
*Contacts and contact requests may be accessed from the Contacts link. | |||
*A star may be added by clicking the three dots when viewing a message | |||
{{New features}} | |||
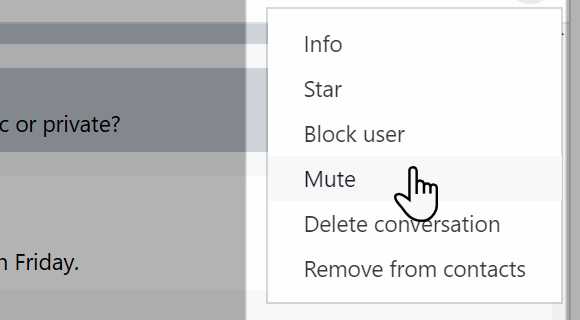
*From the three dots, messages may be muted, so that email notifications of new messages are no longer sent: | |||
[[File:SmallMuteMessages.png]] | |||
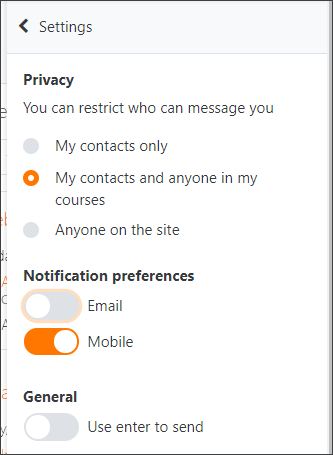
*Clicking the cog icon displays privacy settings, notification preferences and the option to press enter to send messages. | |||
[[File:36messagingprivacysettings.png]] | |||
== | ==Personal messaging space== | ||
{{New features}} | |||
Each user now has their own starred area where they can add draft messages, links and notes for later use: | |||
[[File:SmallPersonalSpace.png]] | |||
==Deleting messages== | |||
*Messages may be deleted by clicking them, ensuring they are selected (with a visible checkmark) and then clicking the bin/trash can icon at the bottom of the messaging drawer. | |||
*Note that messages are only deleted for that particular user, not others involved in the conversation. | |||
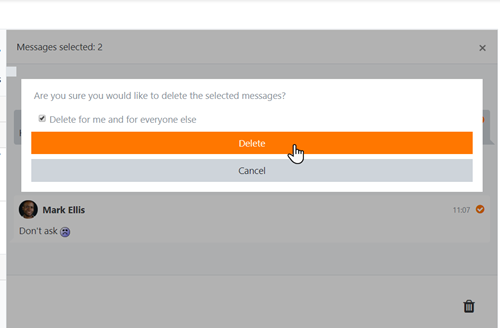
*'''New in 3.7''' Teachers may delete the messages of others in a group conversation if they are given the capability [[Capabilities/moodle/site:deleteanymessage| moodle/site:deleteanymessage]] | |||
[[File:DeleteAnyMessage.png]] | |||
[[ | |||
== | ==Restricting who can message you== | ||
*By default when clicking the cog icon, a user has the option to restrict messages to their contacts only or to their contacts and others in their courses. | |||
*However the administrator can enable site wide messaging, thus giving visibility to all users, from a setting in Site administration > Messaging > Messaging settings. | |||
==Group messaging== | |||
* A teacher or user with the capability [[Capabilities/moodle/course:creategroupconversations | moodle/course:creategroupconversations]] can enable group messaging when setting up a course group. The group will then appear in the group messaging section of the messaging drawer. | |||
== | ==Sending a message to selected course participants== | ||
A | A teacher can send a message to course participants as follows: | ||
# Go to the Participants page. | |||
# Select participants from the list or use the "Select all" button at the bottom of the list. | |||
# Choose "Add/send message" from the "With selected users..." drop-down menu. | |||
# Assuming you are satisfied with the message, click the "Send" button. | |||
Administrators can also send a message to users in many courses via [[Bulk user actions]]. | |||
==See also== | ==See also== | ||
*[[Notifications]] | |||
*[[Messaging settings]] | |||
*[[Messaging FAQ]] | *[[Messaging FAQ]] | ||
[[Category:Messaging]] | |||
[[es:Mensajería]] | [[es:Mensajería]] | ||
Latest revision as of 17:26, 12 November 2019
Unless disabled by the administrator (in Site administration > Messaging > Messaging settings), teachers, students and other users may send and receive private messages via Moodle. This is in addition to receiving notifications about assignments, forum discussions etc.
- A number at the top of the screen reflects the number of people who have sent new messages.
- Clicking the icon displays the messaging drawer, divided into starred messages, group messages and personal messages.
- Contacts and contact requests may be accessed from the Contacts link.
- A star may be added by clicking the three dots when viewing a message
- From the three dots, messages may be muted, so that email notifications of new messages are no longer sent:
- Clicking the cog icon displays privacy settings, notification preferences and the option to press enter to send messages.
Personal messaging space
Each user now has their own starred area where they can add draft messages, links and notes for later use:
Deleting messages
- Messages may be deleted by clicking them, ensuring they are selected (with a visible checkmark) and then clicking the bin/trash can icon at the bottom of the messaging drawer.
- Note that messages are only deleted for that particular user, not others involved in the conversation.
- New in 3.7 Teachers may delete the messages of others in a group conversation if they are given the capability moodle/site:deleteanymessage
Restricting who can message you
- By default when clicking the cog icon, a user has the option to restrict messages to their contacts only or to their contacts and others in their courses.
- However the administrator can enable site wide messaging, thus giving visibility to all users, from a setting in Site administration > Messaging > Messaging settings.
Group messaging
- A teacher or user with the capability moodle/course:creategroupconversations can enable group messaging when setting up a course group. The group will then appear in the group messaging section of the messaging drawer.
Sending a message to selected course participants
A teacher can send a message to course participants as follows:
- Go to the Participants page.
- Select participants from the list or use the "Select all" button at the bottom of the list.
- Choose "Add/send message" from the "With selected users..." drop-down menu.
- Assuming you are satisfied with the message, click the "Send" button.
Administrators can also send a message to users in many courses via Bulk user actions.


