External tool settings
A teacher can add an external tool from their course page and an administrator can make an external tool available to all teachers on the site.
Adding a new external tool to a course
- With the editing turned on,in the section you wish to add your external tool, click the "Add an activity or resource" link (or, if not present, the "Add an activity" drop down menu )and choose External tool
- This will take you to the settings page titled "Adding a new external tool".
- If the external tool has not been configured by the administrator, you will need to have in advance the correct URL, consumer key and secret. These should have been provided to you by the managers of the LTI compliant website you are going to be connecting to. Click "show advanced" to access the consumer key and secret fields.

General settings
- Activity name - give the title you wish the students to see on the course page
- External tool type -this is how Moodle communicates with the tool provider. If in doubt, leave as default. If your administrator has made a tool available sitewide, you will be able to select it here:

- Launch URL - This is the URL for connecting to site.
- Launch container- this is how the external tool will be displayed.
- Default -if in doubt; leave as default
- Embed - the external tool will be embedded in the Moodle course page with blocks and navigation bar
- Embed without blocks - the external tool will be embedded in the Moodle course page but without blocks
- New Window - the external tool will open in a new window. Warning! Your students may have popups blocked and this might prevent them from accessing the link. If you choose "New window", add a note on the course page reminding students to unblock popups.
Privacy settings
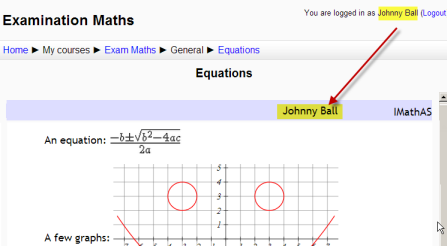
- Share launcher's name with the tool - this means that the student's name will be displayed on the connected site as in this example
- Share launcher's email with the tool - this means that the student's email will be displayed on the connected site as in this example
- Accept grades from the tool - if this is checked, the connecting site will send back grades to Moodle's gradebook. See Using External tool for more information on this.
Advanced settings
The settings below are revealed by clicking the "show advanced" button
- Activity description - give a short description here
- Display description on course page - choose to show the description along with the activity name
- Display activity name when launched - have this appear when the student clicks the link.
- Display activity description when launched - have this appear when the student clicks the link.
- Secure launch URL -
- Consumer key -
- Shared secret -
- Custom parameters -
- Icon URL -
- Secure Icon URL -
Common module settings
The Common module settings section appears in many modules besides External tool. It sets Groups interactions levels and the ID number.
Restrict access settings
The Restrict access area becomes visible in Moodle activities and resource settings if Conditional Activities have been enabled.
Site administration settings
An administrator can configure external tools in Settings > Site administration > Plugins > Activity modules > External tool so that they are available across the site. There are tabs to add an external tool, to view those which are pending and to view those which have been rejected:
