Buttons course format: Difference between revisions
From MoodleDocs
| Buttons course format | |
|---|---|
| Type | Course format |
| Set | N/A |
| Downloads | https://moodle.org/plugins/format_buttons |
| Issues | https://github.com/brandaorodrigo/moodle-format_buttons/issues |
| Discussion | https://github.com/brandaorodrigo/moodle-format_buttons |
| Maintainer(s) | Rodrigo Brandão |
(Added 300px) |
(tidy up) |
||
| (20 intermediate revisions by the same user not shown) | |||
| Line 1: | Line 1: | ||
{{ | {{Infobox plugin | ||
The Buttons course format is a contributed code module. It creates a menu with buttons in JavaScript to access the sections, one by one. It has features to create group of sections (example: modules, period) and change the button | |type = Course format | ||
|entry = https://moodle.org/plugins/format_buttons | |||
|tracker = https://github.com/brandaorodrigo/moodle-format_buttons/issues | |||
|discussion = https://github.com/brandaorodrigo/moodle-format_buttons | |||
|maintainer = [[User:Rodrigo Brandão|Rodrigo Brandão]] | |||
|float = right | |||
}} | |||
{{Courses}} | |||
The Buttons course format is a contributed code module. It creates a menu with buttons in JavaScript to access the sections, one by one. It has features to create group of sections (example: modules, period) and change the button colours. | |||
At any time, only one section is visible and the user can change the current section by clicking on the corresponding button. | |||
== Download == | == Download == | ||
| Line 9: | Line 17: | ||
== Installing == | == Installing == | ||
After downloading the ZIP file, put it in your ...\moodle\course\format directory. The folder name must be 'buttons'. | * For recent Moodle versions, you can install this plugin automatically from the [https://moodle.org/plugins/format_buttons Moodle plugins database]. | ||
Vist the ' Admin ► Site administration ► Notifications ' page to finish the instalation. | * You can manually download the ZIP file from the [https://moodle.org/plugins/format_buttons Moodle plugins database]. | ||
**After downloading the ZIP file, expand it and put it's contents in your ...\moodle\course\format directory. | |||
** The folder name must be 'buttons'. | |||
* Vist the ' Admin ► Site administration ► Notifications ' page to finish the instalation. | |||
== Usage == | == Usage == | ||
*When creating a new course, | *When creating a new course, select ' Buttons format ' in the ' Course format ' dropdown menu. | ||
''' | |||
* To select the format, simply choose it from the list of course formats in the [https://docs.moodle.org/en/Course_settings course settings]. | * To select the format, simply choose it from the list of course formats in the [https://docs.moodle.org/en/Course_settings course settings]. | ||
| Line 25: | Line 33: | ||
* Choose the number of sections, or leave the default of 10 sections. | * Choose the number of sections, or leave the default of 10 sections. | ||
* Choose where you want the first section positioned: Either ' Above the list buttons ' or ' Below the visible section '. | * Choose where you want the first (zero) section (which has the default 'Announcements' forum) positioned: Either ' Above the list buttons ' or ' Below the visible section '. | ||
* Write the titles for all the groupings you will use and the number of sections that each one will have. | * Write the titles for all the groupings you will use and the number of sections that each one will have. If a group has only one section, the icon will be (...). | ||
* Write the hexadecimal | * Write the [https://en.wikipedia.org/wiki/Web_colors hexadecimal colour] for the current section button and the visible section button (or leave it empty to use the dafult value). | ||
== A new empty course== | == A new empty course== | ||
* A new, empty course in the buttons format will | * A new, empty course in the buttons format will show the (number of) buttons, that lead to nowhere... | ||
[[File:Buttons course format empty course.png|600px]] | [[File:Buttons course format empty course.png|600px]] | ||
| Line 36: | Line 44: | ||
[[File:Buttons course format 9 buttons.png|600px]] | [[File:Buttons course format 9 buttons.png|600px]] | ||
* The image below shows the settings | * The image below shows the settings used to produce the above image: | ||
[[File:Buttons course format 9 buttons details.png|300px]] | [[File:Buttons course format 9 buttons details.png|300px]] | ||
== Populating the sections inside your course== | |||
* When you build each section inside your buttons format course, remember that the very first section will be the first section inside grouping 1. In this example, the introduction: | |||
[[File:Buttons course format 9 buttons section 1.png|300px]] | |||
* And each course section will be used for each remaining section for each existing grouping. | |||
* So, in the above example, the Section # 2 of the course will actually be the part 1 of module 1: | |||
[[File:Buttons course format 9 buttons section 2.png|400px]] | |||
== FAQ == | == FAQ == | ||
* How can I know the hexadecimal code for the ______ colour that I want for the buttons? | |||
Look at a [https://en.wikipedia.org/wiki/Web_colors colours table in the wikipedia]. | |||
... | ... | ||
== Credits == | == Credits == | ||
Plugin author: [https://moodle.org/user/profile.php?id=969214 Rodrigo Brandão]. | |||
... | |||
==See also== | ==See also== | ||
* [[Course formats]] | * [[Course formats]] | ||
[[es: | [[es:Formato de curso Botones]] | ||
Latest revision as of 14:52, 12 August 2016
The Buttons course format is a contributed code module. It creates a menu with buttons in JavaScript to access the sections, one by one. It has features to create group of sections (example: modules, period) and change the button colours.
At any time, only one section is visible and the user can change the current section by clicking on the corresponding button.
Download
You can download the format from the Modules and Plugins Database
Installing
- For recent Moodle versions, you can install this plugin automatically from the Moodle plugins database.
- You can manually download the ZIP file from the Moodle plugins database.
- After downloading the ZIP file, expand it and put it's contents in your ...\moodle\course\format directory.
- The folder name must be 'buttons'.
- Vist the ' Admin ► Site administration ► Notifications ' page to finish the instalation.
Usage
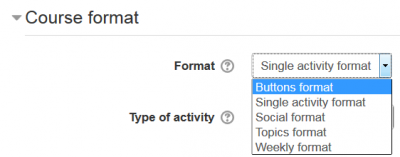
- When creating a new course, select ' Buttons format ' in the ' Course format ' dropdown menu.
- To select the format, simply choose it from the list of course formats in the course settings.
- Fill the available options:
- Choose the number of sections, or leave the default of 10 sections.
- Choose where you want the first (zero) section (which has the default 'Announcements' forum) positioned: Either ' Above the list buttons ' or ' Below the visible section '.
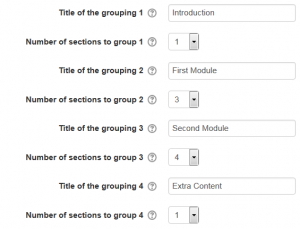
- Write the titles for all the groupings you will use and the number of sections that each one will have. If a group has only one section, the icon will be (...).
- Write the hexadecimal colour for the current section button and the visible section button (or leave it empty to use the dafult value).
A new empty course
- A new, empty course in the buttons format will show the (number of) buttons, that lead to nowhere...
- The 'number of sections' is actually the number of buttons that will be visible, e g, 9 in the following example:
- The image below shows the settings used to produce the above image:
Populating the sections inside your course
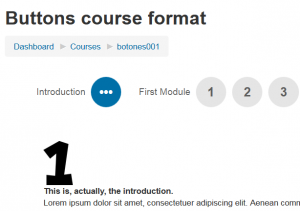
- When you build each section inside your buttons format course, remember that the very first section will be the first section inside grouping 1. In this example, the introduction:
- And each course section will be used for each remaining section for each existing grouping.
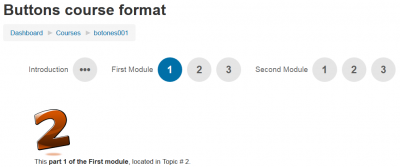
- So, in the above example, the Section # 2 of the course will actually be the part 1 of module 1:
FAQ
- How can I know the hexadecimal code for the ______ colour that I want for the buttons?
Look at a colours table in the wikipedia. ...
Credits
Plugin author: Rodrigo Brandão.


