Building Database: Difference between revisions
Helen Foster (talk | contribs) (How to use the database activity module moved from Database activity module) |
Mary Cooch (talk | contribs) (combined info from another page) |
||
| Line 10: | Line 10: | ||
** Click the 'Add Entry' tab | ** Click the 'Add Entry' tab | ||
** At the bottom of the page there is a link 'Upload entries from a file' which provides help in assigning data in a csv file to the relevant fields in your database. | ** At the bottom of the page there is a link 'Upload entries from a file' which provides help in assigning data in a csv file to the relevant fields in your database. | ||
You can add many kinds of fields to your database. After you have created some fields, you will be able to add information to the database. | |||
==Creating a single entry== | |||
Go to the "Add entry" tab and fill in the form. | |||
==Importing many entries== | |||
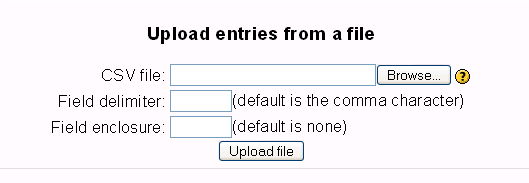
At the bottom of the page "Add a database entry", you'll find a place to upload a csv file, though there are no help documents on what the CSV is supposed to look like. Please test and post your results. | |||
[[image:Upload_entries.png]] | |||
Here's a sample of what a very simple file will look like. | |||
[[Image:Upload_csv_sample.png]] | |||
Do not put spaces after your commas or upload will fail! | |||
After upload page import.php comes back blank if it failed. | |||
If successful you'll read a message like, "1 entries saved". | |||
==See also== | |||
* [[Database export]] | |||
Revision as of 13:30, 26 September 2011
This page really needs improving. Please see the page comments for suggestions of what to include, then remove this template when you're done.
After creating a database, as explained in Database activity settings...
- Next you define the kind of fields that define the information you wish to collect. For example a database of famous paintings may have a picture field called painting, for uploading an image file showing the painting, and two text fields called artist and title for the name of the artist and the painting.
- It is then optional to edit the database templates to alter the way in which the database displays entries.
- Note that if you later edit the fields in the databases you must use the Reset template button, or manually edit the template, to ensure the new fields are added to the display
- The teacher and/or students can start entering data and (optionally) commenting on and grading other submissions. These entries can be viewed alone, viewed as a list or searched and sorted.
- Data can be uploaded into the database from a .csv file:
- Click the 'Add Entry' tab
- At the bottom of the page there is a link 'Upload entries from a file' which provides help in assigning data in a csv file to the relevant fields in your database.
You can add many kinds of fields to your database. After you have created some fields, you will be able to add information to the database.
Creating a single entry
Go to the "Add entry" tab and fill in the form.
Importing many entries
At the bottom of the page "Add a database entry", you'll find a place to upload a csv file, though there are no help documents on what the CSV is supposed to look like. Please test and post your results.
Here's a sample of what a very simple file will look like.
Do not put spaces after your commas or upload will fail!
After upload page import.php comes back blank if it failed. If successful you'll read a message like, "1 entries saved".

