Audio: Difference between revisions
Mary Cooch (talk | contribs) (updating audio page) |
No edit summary |
||
| (31 intermediate revisions by 6 users not shown) | |||
| Line 1: | Line 1: | ||
{{Working with media}} | {{Working with media}} | ||
''Note:'' This page covers audio (sound files) which are added to a course by the teacher for students to listen to. See '''[[Speech tools |Speech tools]]''' if you are looking for ways to allow your students or teachers to record directly into Moodle or engage in audio conferencing. | |||
Audio is a very powerful tool to use in a Moodle course, allowing students, for example to catch up on lectures they missed, learn from podcasts, or improve their language skills by listening to native speakers interact. To use audio in Moodle to best effect, the [[Multimedia plugins filter]] must be enabled. For hints on creating your own audio files, see the [https://docs.moodle.org/32/en/Advanced_Audio Advanced Audio] page. | |||
==Types of audio (sound) files== | ==Types of audio (sound) files== | ||
*Moodle will | *Moodle's default [[VideoJS player]] will play the following audio files: mp3, .aac, .flac, .m4a, .oga, .ogg, .wav | ||
==Ways of displaying audio== | |||
== | ===Linking to a sound file online elsewhere=== | ||
* | *If your audio file is hosted elsewhere online you can simply link to the relevant page by choosing [[URL]] from 'Add an activity or resource' and pasting in the relevant link given you by the site. | ||
*Note that, in an establishment where certain sharing sites might be banned, your students might not be able to access your sound file through Moodle. | |||
== | ===Uploading audio === | ||
*If your browser allows resources to be dragged and dropped, then you can turn on the editing and drag the audio file directly onto the course page. | |||
* | *A box will then appear for you to decide whether you want the audio embedded in a label, or added as a clickable file resource: | ||
* | [[File:33dragdropmp3.png]] | ||
* | *Alternatively, you can upload the audio file by turning the editing on and choosing ''Add an activity or resource>[[File|File]]'' | ||
===Embedding a sound file in its own player=== | ===Embedding a sound file in its own player=== | ||
*Moodle includes a built-in | *Moodle includes a built-in audio player. If the relevant [[Multimedia plugins filter]] is enabled by the administrator and within the course, sound files embedded into the text editor will play inline. | ||
*Anywhere that Moodle's | *Anywhere that Moodle's text editor is available, it is possible to embed a sound file, for example in a [[Label|label]] or a [[Page|page]], a course topic summary, a [[Description_question_type| quiz description]] or a [[Lesson|lesson]]. The next section explains how: | ||
====Using the Moodle media icon==== | ====Using the Moodle media icon==== | ||
*With your editing turned on, click into the HTML editor where you wish to embed your sound file. | |||
*With your editing turned on, click into the HTML editor where you wish to embed your sound file. (It needs to be mp3.) | |||
*Click the Moodle media icon as in the following screenshot: | *Click the Moodle media icon as in the following screenshot: | ||
[[File:Addmedia.png]] | [[File:Addmedia.png]] | ||
*Click ''Find | *If your sound file is online, paste its URL in the Source URL box in the Link tab | ||
* | *If you want to upload an audio file, click the Audio tab. | ||
[[File: | [[File:DocsVideoInsertMedia.png]] | ||
*Click the Browse repositories button to locate and upload your audio file from the repository where it is stored. (What you see depends on what the admin has enabled.) If you have it in more than one file type, then you can upload an alternative video by clicking 'Add alternative source'. This helps make your sound file play on more browsers and devices. | |||
*'''Advanced settings''' allows you to decide how the file will play | |||
*'''Subtitles and captions''' allows you to add subtitle files (VTT) in different languages and/or caption files, with descriptions, chapters and metadata. Subtitles, captions, chapters and descriptions can be added to videos and audios using WebVTT file format. These files can be created using caption making software or just plain text editor. Find out more about WebVTT format here (https://w3c.github.io/webvtt/) | |||
*Click the Insert media button when you are ready. | |||
*Your sound file will appear but not yet play: | |||
[[File:NewSoundFileDisplay.png]] | |||
*Onced saved, your file will display in its own player: | |||
[[File:NewSoundFilePlay.png]] | |||
====Using a hyperlink==== | |||
(Note - this method has no advantage over using the media icon, but was popular in older versions of Moodle) | |||
*With your editing turned on, click into the HTML editor where you wish to embed your mp3 file. | |||
*Type some blank spaces and select them. | |||
*Click the hyperlink icon as in the following screenshot.(The icon will only be clickable if you have selected text or spaces) | |||
[[File:Hyperlinkicon.png]] | |||
*Click "Browse repositories": | |||
[[File:Linkurl.png]] | |||
*This takes you to the file picker. Follow the instructions for uploading/selecting your sound file as for using the Moodle media icon. | |||
*When your file is chosen, it will appear in the link URL box as below. Click ''Create link" | |||
[[File:Insertvideo.png]] | |||
*'''''Don't panic!''''' You will now only get a blue line in the HTML editor: | |||
[[File:Audiopreview2.png]] | |||
*When you click ''save changes'' to return to the main course page, your mp3 file will display. | |||
====Using embed code to display online audio==== | |||
*Some sites provide embed code/widgets that will enable you to play their mp3 files on your Moodle. First - go to your chosen site and copy this code of the mp3 file you wish to use. | |||
*With your editing turned on, click into the HTML editor where you wish to embed the file. | |||
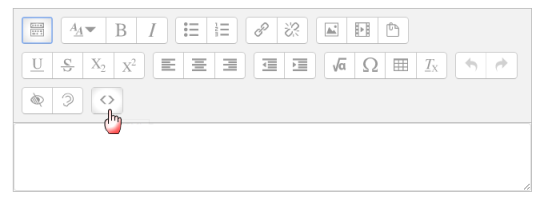
*Click the HTML code icon as in the following screenshot: | |||
[[File:AttoEmbedCode.png]] | |||
*Paste your embed code into the box: | |||
*Scroll down and click "update". | |||
*The mp3 file will be previewed in the HTML editor. Click ''save changes'' for it to display on the page | |||
====RecordRTC==== | |||
[[RecordRTC]] is a set of plugins for the [https://moodle.org/plugins/atto_recordrtc Atto editor] and [https://moodle.org/plugins/tinymce_recordrtc TinyMCE editor], enabling users to add audio and video annotations to text, anywhere a text editor is present. This plugin adds buttons for recording audio or video (with audio) to the editor's toolbar. [[File:recordrtc_buttons.png]]. See [[RecordRTC]]. | |||
==See also== | ==See also== | ||
*[[Media FAQ]] | |||
*[[Speech tools]] | |||
[[Category:Audio]] | |||
[[Category:Language teaching]] | |||
[[ | [[fr:Audio]] | ||
[[ | [[de:Audio]] | ||
[[es:Audio]] | |||
Revision as of 15:38, 24 April 2019
Note: This page covers audio (sound files) which are added to a course by the teacher for students to listen to. See Speech tools if you are looking for ways to allow your students or teachers to record directly into Moodle or engage in audio conferencing.
Audio is a very powerful tool to use in a Moodle course, allowing students, for example to catch up on lectures they missed, learn from podcasts, or improve their language skills by listening to native speakers interact. To use audio in Moodle to best effect, the Multimedia plugins filter must be enabled. For hints on creating your own audio files, see the Advanced Audio page.
Types of audio (sound) files
- Moodle's default VideoJS player will play the following audio files: mp3, .aac, .flac, .m4a, .oga, .ogg, .wav
Ways of displaying audio
Linking to a sound file online elsewhere
- If your audio file is hosted elsewhere online you can simply link to the relevant page by choosing URL from 'Add an activity or resource' and pasting in the relevant link given you by the site.
- Note that, in an establishment where certain sharing sites might be banned, your students might not be able to access your sound file through Moodle.
Uploading audio
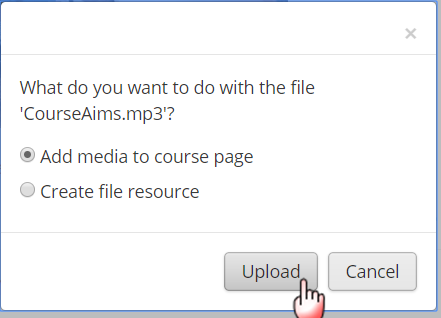
- If your browser allows resources to be dragged and dropped, then you can turn on the editing and drag the audio file directly onto the course page.
- A box will then appear for you to decide whether you want the audio embedded in a label, or added as a clickable file resource:
- Alternatively, you can upload the audio file by turning the editing on and choosing Add an activity or resource>File
Embedding a sound file in its own player
- Moodle includes a built-in audio player. If the relevant Multimedia plugins filter is enabled by the administrator and within the course, sound files embedded into the text editor will play inline.
- Anywhere that Moodle's text editor is available, it is possible to embed a sound file, for example in a label or a page, a course topic summary, a quiz description or a lesson. The next section explains how:
Using the Moodle media icon
- With your editing turned on, click into the HTML editor where you wish to embed your sound file. (It needs to be mp3.)
- Click the Moodle media icon as in the following screenshot:
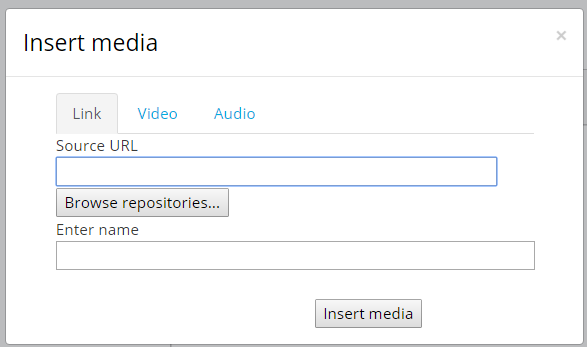
- If your sound file is online, paste its URL in the Source URL box in the Link tab
- If you want to upload an audio file, click the Audio tab.
- Click the Browse repositories button to locate and upload your audio file from the repository where it is stored. (What you see depends on what the admin has enabled.) If you have it in more than one file type, then you can upload an alternative video by clicking 'Add alternative source'. This helps make your sound file play on more browsers and devices.
- Advanced settings allows you to decide how the file will play
- Subtitles and captions allows you to add subtitle files (VTT) in different languages and/or caption files, with descriptions, chapters and metadata. Subtitles, captions, chapters and descriptions can be added to videos and audios using WebVTT file format. These files can be created using caption making software or just plain text editor. Find out more about WebVTT format here (https://w3c.github.io/webvtt/)
- Click the Insert media button when you are ready.
- Your sound file will appear but not yet play:
- Onced saved, your file will display in its own player:
Using a hyperlink
(Note - this method has no advantage over using the media icon, but was popular in older versions of Moodle)
- With your editing turned on, click into the HTML editor where you wish to embed your mp3 file.
- Type some blank spaces and select them.
- Click the hyperlink icon as in the following screenshot.(The icon will only be clickable if you have selected text or spaces)
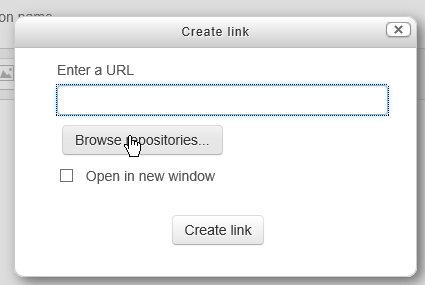
- Click "Browse repositories":
- This takes you to the file picker. Follow the instructions for uploading/selecting your sound file as for using the Moodle media icon.
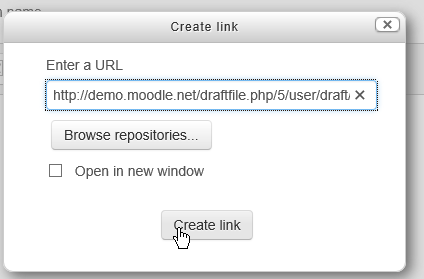
- When your file is chosen, it will appear in the link URL box as below. Click Create link"
- Don't panic! You will now only get a blue line in the HTML editor:
- When you click save changes to return to the main course page, your mp3 file will display.
Using embed code to display online audio
- Some sites provide embed code/widgets that will enable you to play their mp3 files on your Moodle. First - go to your chosen site and copy this code of the mp3 file you wish to use.
- With your editing turned on, click into the HTML editor where you wish to embed the file.
- Click the HTML code icon as in the following screenshot:
- Paste your embed code into the box:
- Scroll down and click "update".
- The mp3 file will be previewed in the HTML editor. Click save changes for it to display on the page
RecordRTC
RecordRTC is a set of plugins for the Atto editor and TinyMCE editor, enabling users to add audio and video annotations to text, anywhere a text editor is present. This plugin adds buttons for recording audio or video (with audio) to the editor's toolbar. ![]() . See RecordRTC.
. See RecordRTC.
