filter ws: Difference between revisions
Daniel Palou (talk | contribs) (Created page with "==Introduction== With the WebService filter plugin you can choose if some content should be visible only in web (browser) or only in a WebService client like the Moodle apps....") |
Daniel Palou (talk | contribs) No edit summary |
||
| (3 intermediate revisions by the same user not shown) | |||
| Line 3: | Line 3: | ||
==Installation== | ==Installation== | ||
You can download this plugin from [https://moodle.org/plugins/filter_ws the Moodle plugins directory] or from [https://github.com/dpalou/moodle-filter_ws the source repository]. It can be installed using any of the methods supported by Moodle. If you are unsure, please visit [https://docs.moodle.org/en/Installing_plugins#Installing_a_plugin this page]. | |||
To install it manually, unzip the plugin in the moodle .../filter/ directory. | To install it manually, unzip the plugin in the moodle .../filter/ directory. | ||
| Line 9: | Line 9: | ||
==Enabling/Disabling the filter on your site== | ==Enabling/Disabling the filter on your site== | ||
The WebService filter must be enabled before it can be used on your Moodle site (it is disabled by default, after installation). To enable (or disable) the plugin site-wide, visit Site Administration > Plugins > Filters > Manage Filters, locate the 'WebService' filter and click on the dropdown box to enable it (or disable it). | The WebService filter must be enabled before it can be used on your Moodle site (it is disabled by default, after installation). To enable (or disable) the plugin site-wide, visit Site Administration > Plugins > Filters > Manage Filters, locate the 'WebService' filter and click on the dropdown box to enable it (or disable it). | ||
==How to use== | ==How to use== | ||
You need to enclose the content you want to filter between {fws} tags. Inside the opening {fws} you should specify if you want the content to be displayed in browser (web), in a WS client (ws) or in both of them (any). | You need to enclose the content you want to filter between {fws} tags. Inside the opening {fws} you should specify if you want the content to be displayed in browser (web), in a WS client (ws) or in both of them (any). | ||
<code> | <code> | ||
| Line 18: | Line 19: | ||
{fws any}content for any request{fws} | {fws any}content for any request{fws} | ||
</code> | </code> | ||
Example: We edit a SCORM description and put the content in the following screenshot: | |||
[[File:filterws_editor.png]] | |||
You can see we have 3 pieces of content. The first one doesn't have any special tag, so it will be displayed everywhere. The second block has the "web" keyword, so it will only be displayed if the user is using a browser. Finally, the last block will only be displayed in a WS client (in our case, the Moodle app). You can see the result in the following screenshots: | |||
[[File:filterws_web.png|1000px]] | |||
[[File:filterws_app.png|320px]] | |||
===Filtering by User Agent=== | ===Filtering by User Agent=== | ||
Latest revision as of 07:39, 28 January 2019
Introduction
With the WebService filter plugin you can choose if some content should be visible only in web (browser) or only in a WebService client like the Moodle apps. The main purpose of this plugin is to be able to display/hide some content only for the Moodle app.
Installation
You can download this plugin from the Moodle plugins directory or from the source repository. It can be installed using any of the methods supported by Moodle. If you are unsure, please visit this page.
To install it manually, unzip the plugin in the moodle .../filter/ directory.
Enabling/Disabling the filter on your site
The WebService filter must be enabled before it can be used on your Moodle site (it is disabled by default, after installation). To enable (or disable) the plugin site-wide, visit Site Administration > Plugins > Filters > Manage Filters, locate the 'WebService' filter and click on the dropdown box to enable it (or disable it).
How to use
You need to enclose the content you want to filter between {fws} tags. Inside the opening {fws} you should specify if you want the content to be displayed in browser (web), in a WS client (ws) or in both of them (any).
   {fws web}content only for web{fws}
   {fws ws}content only for ws{fws}
   {fws any}content for any request{fws}
Example: We edit a SCORM description and put the content in the following screenshot:
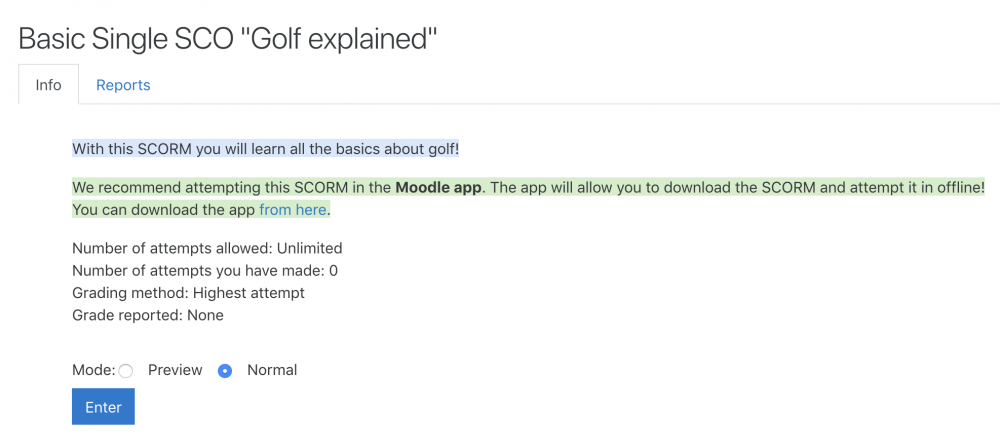
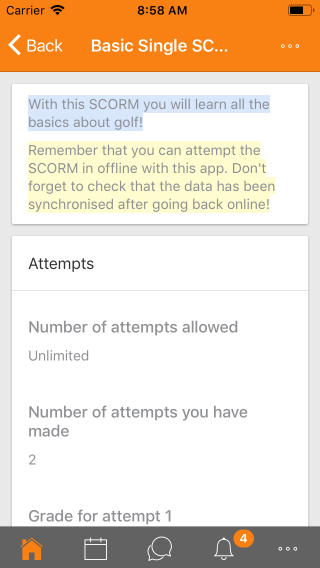
You can see we have 3 pieces of content. The first one doesn't have any special tag, so it will be displayed everywhere. The second block has the "web" keyword, so it will only be displayed if the user is using a browser. Finally, the last block will only be displayed in a WS client (in our case, the Moodle app). You can see the result in the following screenshots:
Filtering by User Agent
The filter also lets you filter by User Agent, so the content will only be displayed if the User Agent accessing the content contains a certain text. To do so, you need to add a'ua="MY_REGEXP"' attribute to the {fws} tag, where MY_REGEXP is the regular expression you want to check (without starting and ending slashes). Please notice that the regular expression is case sensitive. Example:
   {fws ws ua="MoodleMobile\s?$" }content only for the official Moodle app{fws}
   {fws any ua="iPhone|iPad|iPod"}content only for iOS devices{fws}
Atto plugin
There is a plugin to add this filter using an Atto button. You can see the documentation in here.


