Course backup: Difference between revisions
From MoodleDocs
No edit summary |
Helen Foster (talk | contribs) (creating a course backup, screenshots moved from Backup restore) |
||
| Line 3: | Line 3: | ||
Generally, you will not have to worry about '''course backups''', as the primary Moodle administrator will have set a schedule of site wide backups. However, as a teacher with editing privileges, it is good practice to download a recent backup to your own computer for additional protection. | Generally, you will not have to worry about '''course backups''', as the primary Moodle administrator will have set a schedule of site wide backups. However, as a teacher with editing privileges, it is good practice to download a recent backup to your own computer for additional protection. | ||
== | ==Creating a course backup== | ||
[[Image:Course_backup.jpg|thumb|Creating a course backup - page 1]][[Image:Course_backup_s2.jpg|thumb|Creating a course backup - page 2]][[Image:Course_backup_s3.jpg|thumb|Creating a course backup - page 3]] | |||
To create a course backup: | |||
#Click Backup in the Administration block. | |||
#Choose which activities you want to include in the backup, and whether to include user data, by using the Include All/None links at the top of the page and/or by selecting the checkboxes next to each module or activity name. User data consists of all student files, submissions, forum postings, glossary entries, etc. | |||
#Select backup options (see below), then click the Continue button to start the backup process. | |||
#On the next page, you can preview the files and users that Moodle will include in the backup and, if you wish, change the suggested backup filename, which is backup-COURSESHORTNAME-DATE-TIME.zip. | |||
#Click the Continue button. | |||
#On the next page, the progress of the backup is displayed together with a report if it was successful. You should see the message "Backup completed successfully" at the bottom of the page. Click the Continue button. | |||
#You will then be taken to the backupdata directory in the files area for your course. Click the filename of the backup file to download it to your desktop. | |||
==Backup options== | |||
* Metacourse - If you are backing up the content of a [[Metacourses|metacourse]], you may enable this option so that that relations between the courses will be exported and the restore process will try to rebuild them in the destination server. | * Metacourse - If you are backing up the content of a [[Metacourses|metacourse]], you may enable this option so that that relations between the courses will be exported and the restore process will try to rebuild them in the destination server. | ||
* Users - Whether you want to backup the content concerning all the registered students in your site, only course students or no students at all. | * Users - Whether you want to backup the content concerning all the registered students in your site, only course students or no students at all. | ||
* Logs | * Logs - This backs up all course activity logs. | ||
* User files - | * User files - This backs up all student submissions for assignments and other file uploads. | ||
* Course files | * Course files - This backs up any file stored in the [[Files|files]] area for the course. | ||
==Creative uses== | ==Creative uses== | ||
| Line 30: | Line 29: | ||
==See also== | ==See also== | ||
*[[Restore]] | *[[Restore]] | ||
*[[Backup settings]] - for administrators | |||
*[[Backup FAQ]] | *[[Backup FAQ]] | ||
*[[Roll courses forward]] | *[[Roll courses forward]] | ||
Revision as of 15:07, 31 July 2008
Generally, you will not have to worry about course backups, as the primary Moodle administrator will have set a schedule of site wide backups. However, as a teacher with editing privileges, it is good practice to download a recent backup to your own computer for additional protection.
Creating a course backup
To create a course backup:
- Click Backup in the Administration block.
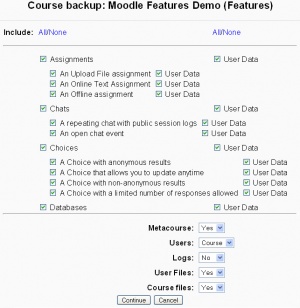
- Choose which activities you want to include in the backup, and whether to include user data, by using the Include All/None links at the top of the page and/or by selecting the checkboxes next to each module or activity name. User data consists of all student files, submissions, forum postings, glossary entries, etc.
- Select backup options (see below), then click the Continue button to start the backup process.
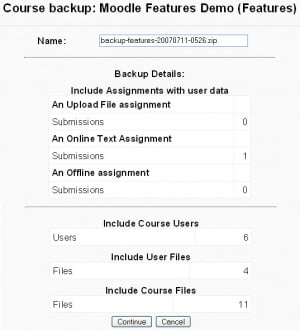
- On the next page, you can preview the files and users that Moodle will include in the backup and, if you wish, change the suggested backup filename, which is backup-COURSESHORTNAME-DATE-TIME.zip.
- Click the Continue button.
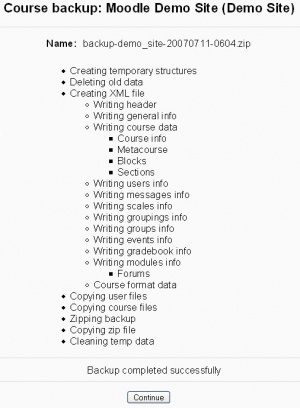
- On the next page, the progress of the backup is displayed together with a report if it was successful. You should see the message "Backup completed successfully" at the bottom of the page. Click the Continue button.
- You will then be taken to the backupdata directory in the files area for your course. Click the filename of the backup file to download it to your desktop.
Backup options
- Metacourse - If you are backing up the content of a metacourse, you may enable this option so that that relations between the courses will be exported and the restore process will try to rebuild them in the destination server.
- Users - Whether you want to backup the content concerning all the registered students in your site, only course students or no students at all.
- Logs - This backs up all course activity logs.
- User files - This backs up all student submissions for assignments and other file uploads.
- Course files - This backs up any file stored in the files area for the course.
Creative uses
The backup and restore processes can offer the teacher and administrators many creative solutions.
- Duplicating courses or specific activities in one course to another course
- Updating a production Moodle site course, with material from a localhost site course
- In earlier versions of Moodle, a way of rolling a course forward without past student activity
See also
- Restore
- Backup settings - for administrators
- Backup FAQ
- Roll courses forward
- Front Page trick to backup Front page in earlier version of Moodle
- Creating course backups video
- Using Moodle Location of Backup Files forum discussion


