Email-based self-registration: Difference between revisions
No edit summary |
Helen Foster (talk | contribs) (self registration warning) |
||
| Line 1: | Line 1: | ||
Location: ''Administration > Users > Authentication'' | Location: Settings link in ''Administration > Users > [[Authentication]]'' | ||
This authentication method enables users to create their own accounts. They then receive an email at the address they specified in their account profile to confirm their account. | |||
Email-based self-registration should be selected from the self registration drop-down menu in the common settings section on the authentication page. | Email-based self-registration should be selected from the self registration drop-down menu in the common settings section on the authentication page. | ||
Warning: Enabling self registration results in the possibility of spammers creating accounts in order to use forum posts, blog entries etc. for spam. This risk can be minimized by limiting self registration to particular email domains with the allowed email domains setting in ''Administration > Users > Authentication > [[Authentication|Manage authentication]]'' (or in ''Administration > Server > [[Email settings|Email]]'' prior to Moodle 1.9). Alternatively, self registration may be enabled for a short period of time to allow users to create accounts, and then later disabled. | |||
Note: The Email-based self-registration authentication plugin must be enabled to allow users who previously self-registered to login. Selecting Email-based self-registration as the self registration method allows potential users to self register. | |||
==Enable reCAPTCHA element== | ==Enable reCAPTCHA element== | ||
Revision as of 12:58, 22 July 2008
Location: Settings link in Administration > Users > Authentication
This authentication method enables users to create their own accounts. They then receive an email at the address they specified in their account profile to confirm their account.
Email-based self-registration should be selected from the self registration drop-down menu in the common settings section on the authentication page.
Warning: Enabling self registration results in the possibility of spammers creating accounts in order to use forum posts, blog entries etc. for spam. This risk can be minimized by limiting self registration to particular email domains with the allowed email domains setting in Administration > Users > Authentication > Manage authentication (or in Administration > Server > Email prior to Moodle 1.9). Alternatively, self registration may be enabled for a short period of time to allow users to create accounts, and then later disabled.
Note: The Email-based self-registration authentication plugin must be enabled to allow users who previously self-registered to login. Selecting Email-based self-registration as the self registration method allows potential users to self register.
Enable reCAPTCHA element
A CAPTCHA is a program that can tell whether its user is a human or a computer. CAPTCHAs are used by many websites to prevent abuse from bots, or automated programs usually written to generate spam. No computer program can read distorted text as well as humans can, so bots cannot navigate sites protected by CAPTCHAs.
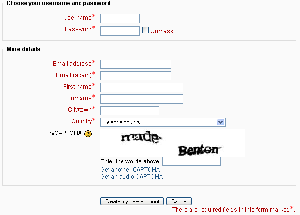
Template:Moodle 1.9From Moodle 1.9.1 onwards, spam protection may be added to the email-based self-registration new account form with a CAPTCHA element - a challenge-response test used to determine whether the user is human.
In addition to enabling the reCAPTCHA element, email-based self-registration should be set as the self registration authentication plugin and reCAPTCHA keys should be set in the manage authentication common settings.
See also
- No Email
- Using Moodle Admin approving self registrations? forum discussion
- Using Moodle Sending the email confirmation again forum discussion
