Attendance activity: Difference between revisions
| Attendance activity | |
|---|---|
| Type | Activity module and optional block |
| Set | N/A |
| Downloads | https://moodle.org/plugins/browse.php?list=set&id=36 |
| Issues | https://github.com/danmarsden/moodle-mod_attendance/issues |
| Discussion | https://moodle.org/mod/forum/view.php?id=741 |
| Maintainer(s) | Dan Marsden |
Helen Foster (talk | contribs) (tidy up, archive info and dev notes moved to Talk:Attendance_activity) |
Hugo Ribeiro (talk | contribs) |
||
| (11 intermediate revisions by 4 users not shown) | |||
| Line 10: | Line 10: | ||
==About the Attendance activity== | ==About the Attendance activity== | ||
The '''Attendance activity''' is designed for ''teachers to be able take attendance'' during class, and for ''students to be able to view their own attendance record''. | The '''Attendance activity''' is designed for ''teachers to be able to take attendance'' during class, and for ''students to be able to view their own attendance record''. | ||
A teacher can mark the attendance status of a student as "Present", "Absent", "Late", or "Excused". These status descriptions are configurable, and more can be added. The teacher adds Attendance as an activity of a course, and then sets up the sessions | A teacher can mark the attendance status of a student as "Present", "Absent", "Late", or "Excused". These status descriptions are configurable, and more can be added. The teacher adds Attendance as an activity of a course, and then sets up the sessions for which attendance is to be tracked. | ||
The Attendance activity can generate reports for either the entire class or for individual students. Students may also see their own attendance record if the activity is not hidden. | The Attendance activity can generate reports for either the entire class or for individual students. Students may also see their own attendance record if the activity is not hidden. | ||
| Line 32: | Line 32: | ||
== Setting Attendance categories and grading options== | == Setting Attendance categories and grading options== | ||
Now it is time to set your attendance options. Select your attendance activity and you will see a bar of tabs, the last of which is "Settings." Select " | Now it is time to set your attendance options. Select your attendance activity and you will see a bar of tabs, the last of which is "Settings." Select "Status set" and you are presented with acronyms, attendance status descriptions, and grade (points) to assign. By default, the status descriptions are "Present", "Absent", "Late", and "Excused". | ||
You may prefer to change the descriptions (for example, by changing "Late" to "Tardy"), change the way points are counted, or add new status descriptions. To do the latter, fill in the fifth line and click the ''Add'' button. Important: when you hit the ''Add'' button, any changes made to existing options that were made after the last time the ''Update'' button was used will be lost. Likewise, when you hit the ''Update'' button, any changes made to the ''Add'' after the last time the ''Add'' button was | You may prefer to change the descriptions (for example, by changing "Late" to "Tardy"), change the way points are counted, or add new status descriptions. To do the latter, fill in the fifth line and click the ''Add'' button. Important: when you hit the ''Add'' button, any changes made to existing options that were made after the last time the ''Update'' button was used will be lost. Likewise, when you hit the ''Update'' button, any changes made to the ''Add'' after the last time the ''Add'' button was used will be lost. | ||
Finally, when you are done changing items on this page, be sure to click the ''Update'' button to register the changes. | Finally, when you are done changing items on this page, be sure to click the ''Update'' button to register the changes. | ||
| Line 40: | Line 40: | ||
== Adding sessions == | == Adding sessions == | ||
Next, it is time to add sessions. To add class sections, click the ''Add'' tab (second from left) at the top of the Attendance page. Alternatively, you can click the ''Add'' button from the Attendance block (if you've installed it) to directly navigate to the page for adding sessions. If you chose "No groups", or have not defined groups, then the Session type will be forced to "Common." If you have defined groups and have chosen to use them in your course's Attendance activity, then you will have the option to create sessions for a group or all students. | Next, it is time to add sessions. To add class sections, click the ''Add session'' tab (second from left) at the top of the Attendance page. Alternatively, you can click the ''Add'' button from the Attendance block (if you've installed it) to directly navigate to the page for adding sessions. If you chose "No groups", or have not defined groups, then the Session type will be forced to "Common." If you have defined groups and have chosen to use them in your course's Attendance activity, then you will have the option to create sessions for a group or all students. | ||
You have two options for adding sessions | You have two options for adding sessions: adding a single session or adding multiple sessions. The single session is self-explanatory as well as time-consuming to use when you have many class sessions, so we will go straight to the more useful option. | ||
Check the ''Create multiple sessions'' button. Select the date and time for the first session you wish to add, followed by the duration of the session. Then, enter the date for the last session you wish to add. Since most classes do not meet seven days a week, select the checkboxes for days the class meets. The final option, frequency, may look confusing but it is actually straightforward: if your class meets every week, as is typical, then you want a frequency of 1 week, which is the default. If your class meets every other week, then select a frequency of 2 weeks, and so on. If you wish, you may type a description for the sessions you are creating. If you leave the description field blank, it will default to "Regular class session". Finally, click the ''Add multiple sessions'' button to create your sessions. You will see a message confirming this. | Check the ''Create multiple sessions'' button. Select the date and time for the first session you wish to add, followed by the duration of the session. Then, enter the date for the last session you wish to add. Since most classes do not meet seven days a week, select the checkboxes for days the class meets. The final option, frequency, may look confusing but it is actually straightforward: if your class meets every week, as is typical, then you want a frequency of 1 week, which is the default. If your class meets every other week, then select a frequency of 2 weeks, and so on. If you wish, you may type a description for the sessions you are creating. If you leave the description field blank, it will default to "Regular class session". Finally, click the ''Add multiple sessions'' button to create your sessions. You will see a message confirming this. | ||
=== Adding Sessions in Bulk === | |||
The admin - and the admin only at this stage - is able to create sessions in bulk for several courses by uploading a CSV file. The option 'Import Sessions' is available in the 'Attendance settings' in Site administration. The standard headers are: ''course, groups, sessiondate, from, to, description, repeaton, repeatevery, repeatuntil, studentscanmark, passwordgrp, randompassword, subnet, automark, autoassignstatus, absenteereport, preventsharedip, preventsharediptime, calendarevent, includeqrcode, rotateqrcode''. However, the tool offers a mapping functionality in the next step so you can connect headers and Session options. Also, the date/time format depends on the selected language. | |||
At the time of writing there are some known issues about ''repeaton'' functionality not working and Password not saving so use with care. | |||
== Editing sessions == | == Editing sessions == | ||
Click on the ''Attendance'' tab. <!-- Attendance tab of what page? --> Here, you will see the list of all attendance sessions you have added. You can delete an individual session by clicking the X on the session rectangle's right-hand side. Alternatively, you can check the checkboxes of each session you wish to delete, and then choose "Delete" from the | Click on the ''Attendance'' tab. <!-- Attendance tab of what page? --> Here, you will see the list of all attendance sessions you have added. You can delete an individual session by clicking the X on the session rectangle's right-hand side. Alternatively, you can check the checkboxes of each session you wish to delete, and then choose "Delete" from the drop-down menu at the bottom right-hand corner of the page to delete all the selected sessions. | ||
You can edit a session — for example, to change its date or description — by clicking the hand icon on the session rectangle's right-hand side. | You can edit a session — for example, to change its date or description — by clicking the hand icon on the session rectangle's right-hand side. | ||
| Line 54: | Line 58: | ||
== Taking attendance == | == Taking attendance == | ||
Finally, we get to using the activity for its intended purpose. You can take attendance for a session by clicking on the green radio button on the session rectangle's right-hand side. Those sessions | Finally, we get to using the activity for its intended purpose. You can take attendance for a session by clicking on the green radio button on the session rectangle's right-hand side. Those sessions for which attendance has already been taken, do not have the green button. However, the description is a link that takes you to a screen for modifying the attendance record for that session. | ||
Note that when taking attendance, the column headings for attendance status are links. If you click one of these column headings, all students will have their status changed to the status you selected. Thus, if everyone is present, you can merely click the ''P'' column header to change everyone's status to "Present". If only one person is absent, you could first click ''P'' to set everyone's status to "Present", and then set the absent student's status to "Absent". | Note that when taking attendance, the column headings for attendance status are links. If you click one of these column headings, all students will have their status changed to the status you selected. Thus, if everyone is present, you can merely click the ''P'' column header to change everyone's status to "Present". If only one person is absent, you could first click ''P'' to set everyone's status to "Present", and then set the absent student's status to "Absent". | ||
Enter remarks as appropriate — for example, the reason for an absence if known, or the number of minutes a student was late — and click the ''OK'' button to record the information. | Enter remarks as appropriate — for example, the reason for an absence if known, or the number of minutes a student was late — and click the ''OK'' button to record the information. | ||
=== Self-recording attendance === | |||
Students can also record their own attendance if you configure it in the settings. Each session is assigned a unique password, and you can display this password to students to allow them mark themselves as present. | |||
<gallery> | |||
SelfRecordingAttendance.png|Key icon to display password to students | |||
</gallery> | |||
In addition, you can display a QR code containing a URL that students can scan with a mobile device, which brings them directly to the page where they record their attendance, and fills in the password for them too. Then they only need to select the status "Present", and record their attendance. In this case, the remarks contain the text "Self-recorded". | |||
<gallery> | |||
PasswordQRCode.png|Display password and QR code to students | |||
</gallery> | |||
== Reports == | == Reports == | ||
| Line 70: | Line 86: | ||
* Your browser will now probably ask you to either display or save the file. | * Your browser will now probably ask you to either display or save the file. | ||
One teacher's style of using the Attendance module, useful in those (probably frequent) situations where there's no access to Moodle in the classroom, is to | One teacher's style of using the Attendance module, useful in those (probably frequent) situations where there's no access to Moodle in the classroom, is first to take attendance on paper, and then to transfer the information to Moodle later. To ease this task, one can print a monthly report before the start of the month and use the printout for recording attendance during class. This method has the added advantage of having a picture on the printed report for each student who has uploaded their photo to Moodle. '''(as of 4 Aug. 2012, can't see this feature working)''' | ||
== FAQ == | |||
Why do some use users appear in red and across all groups even though only one group is selected? | |||
Check your temporary users. Usually such users are created either by design or accident as temporary users and may appear as described. If unwanted, just delete these temporary users and you shouldn't have this problem anymore. | |||
[[es:Actividad de asistencia]] | |||
[[ja:出欠]] | [[ja:出欠]] | ||
Latest revision as of 10:28, 14 March 2021
About the Attendance activity
The Attendance activity is designed for teachers to be able to take attendance during class, and for students to be able to view their own attendance record.
A teacher can mark the attendance status of a student as "Present", "Absent", "Late", or "Excused". These status descriptions are configurable, and more can be added. The teacher adds Attendance as an activity of a course, and then sets up the sessions for which attendance is to be tracked.
The Attendance activity can generate reports for either the entire class or for individual students. Students may also see their own attendance record if the activity is not hidden.
The optional Attendance block allows teachers quick access to the Attendance functionality, and allows students quick access to a summary report for their own attendance.
Adding an Attendance activity
An Attendance activity can be added to a course in the same way as any other activity:
- Turn editing on
- Click 'Add an activity or resource'
- Select Attendance
Note that you may now add as many Attendance instances as you like, and that each instance may have multiple sections. Be sure to give the instance a name that indicates what it will be used for; for example, "Lecture Attendance". If you will be using groups in your course, set the Group mode accordingly, because even if groups exist in the course, you will not be able to use them within the Attendance activity if you select No groups.
Once you have added an attendance instance, you are ready to start taking attendance during classes.
Setting Attendance categories and grading options
Now it is time to set your attendance options. Select your attendance activity and you will see a bar of tabs, the last of which is "Settings." Select "Status set" and you are presented with acronyms, attendance status descriptions, and grade (points) to assign. By default, the status descriptions are "Present", "Absent", "Late", and "Excused".
You may prefer to change the descriptions (for example, by changing "Late" to "Tardy"), change the way points are counted, or add new status descriptions. To do the latter, fill in the fifth line and click the Add button. Important: when you hit the Add button, any changes made to existing options that were made after the last time the Update button was used will be lost. Likewise, when you hit the Update button, any changes made to the Add after the last time the Add button was used will be lost.
Finally, when you are done changing items on this page, be sure to click the Update button to register the changes.
Adding sessions
Next, it is time to add sessions. To add class sections, click the Add session tab (second from left) at the top of the Attendance page. Alternatively, you can click the Add button from the Attendance block (if you've installed it) to directly navigate to the page for adding sessions. If you chose "No groups", or have not defined groups, then the Session type will be forced to "Common." If you have defined groups and have chosen to use them in your course's Attendance activity, then you will have the option to create sessions for a group or all students.
You have two options for adding sessions: adding a single session or adding multiple sessions. The single session is self-explanatory as well as time-consuming to use when you have many class sessions, so we will go straight to the more useful option.
Check the Create multiple sessions button. Select the date and time for the first session you wish to add, followed by the duration of the session. Then, enter the date for the last session you wish to add. Since most classes do not meet seven days a week, select the checkboxes for days the class meets. The final option, frequency, may look confusing but it is actually straightforward: if your class meets every week, as is typical, then you want a frequency of 1 week, which is the default. If your class meets every other week, then select a frequency of 2 weeks, and so on. If you wish, you may type a description for the sessions you are creating. If you leave the description field blank, it will default to "Regular class session". Finally, click the Add multiple sessions button to create your sessions. You will see a message confirming this.
Adding Sessions in Bulk
The admin - and the admin only at this stage - is able to create sessions in bulk for several courses by uploading a CSV file. The option 'Import Sessions' is available in the 'Attendance settings' in Site administration. The standard headers are: course, groups, sessiondate, from, to, description, repeaton, repeatevery, repeatuntil, studentscanmark, passwordgrp, randompassword, subnet, automark, autoassignstatus, absenteereport, preventsharedip, preventsharediptime, calendarevent, includeqrcode, rotateqrcode. However, the tool offers a mapping functionality in the next step so you can connect headers and Session options. Also, the date/time format depends on the selected language.
At the time of writing there are some known issues about repeaton functionality not working and Password not saving so use with care.
Editing sessions
Click on the Attendance tab. Here, you will see the list of all attendance sessions you have added. You can delete an individual session by clicking the X on the session rectangle's right-hand side. Alternatively, you can check the checkboxes of each session you wish to delete, and then choose "Delete" from the drop-down menu at the bottom right-hand corner of the page to delete all the selected sessions.
You can edit a session — for example, to change its date or description — by clicking the hand icon on the session rectangle's right-hand side.
Taking attendance
Finally, we get to using the activity for its intended purpose. You can take attendance for a session by clicking on the green radio button on the session rectangle's right-hand side. Those sessions for which attendance has already been taken, do not have the green button. However, the description is a link that takes you to a screen for modifying the attendance record for that session.
Note that when taking attendance, the column headings for attendance status are links. If you click one of these column headings, all students will have their status changed to the status you selected. Thus, if everyone is present, you can merely click the P column header to change everyone's status to "Present". If only one person is absent, you could first click P to set everyone's status to "Present", and then set the absent student's status to "Absent".
Enter remarks as appropriate — for example, the reason for an absence if known, or the number of minutes a student was late — and click the OK button to record the information.
Self-recording attendance
Students can also record their own attendance if you configure it in the settings. Each session is assigned a unique password, and you can display this password to students to allow them mark themselves as present.

Key icon to display password to students
In addition, you can display a QR code containing a URL that students can scan with a mobile device, which brings them directly to the page where they record their attendance, and fills in the password for them too. Then they only need to select the status "Present", and record their attendance. In this case, the remarks contain the text "Self-recorded".
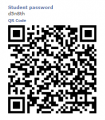
Display password and QR code to students

Reports
You can generate attendance reports on sessions:
- Select the Attendance activity of the course and session you're interested in.
- Click on the Export tab near the top.
- Change the export settings if you wish.
- From the Format pull-down menu, select the file format you'd like to export the attendance report in.
- Click on the OK button.
- Your browser will now probably ask you to either display or save the file.
One teacher's style of using the Attendance module, useful in those (probably frequent) situations where there's no access to Moodle in the classroom, is first to take attendance on paper, and then to transfer the information to Moodle later. To ease this task, one can print a monthly report before the start of the month and use the printout for recording attendance during class. This method has the added advantage of having a picture on the printed report for each student who has uploaded their photo to Moodle. (as of 4 Aug. 2012, can't see this feature working)
FAQ
Why do some use users appear in red and across all groups even though only one group is selected? Check your temporary users. Usually such users are created either by design or accident as temporary users and may appear as described. If unwanted, just delete these temporary users and you shouldn't have this problem anymore.