Block settings: Difference between revisions
- Managing blocks
- Block settings
- Accessibility review
- Activities
- Activity results
- Admin bookmarks
- Administration
- Blog menu
- Blog tags
- Calendar
- Comments
- Course completion status
- Course overview
- Course/site summary
- Courses
- Feedback
- Flickr
- Global search
- HTML
- Latest announcements
- Latest badges
- Learning plans
- Login
- Logged in user
- Main menu
- Mentees
- Navigation
- Network servers
- Online users
- Private files
- Quiz results
- Random glossary entry
- Recent activity
- Recent blog entries
- Recently accessed courses
- Recently accessed items
- Remote RSS feeds
- Search forums
- Section links
- Self completion
- Social activities
- Starred courses
- Tags
- Timeline
- Upcoming events
- YouTube
- Blocks FAQ
(Lets talk sticky context and give some clues :)) |
(→Block heading menu: Assign roles is an icon) |
||
| Line 10: | Line 10: | ||
==Block heading menu== | ==Block heading menu== | ||
The block header icons will allow the user to [[Dock|docked]], hide, delete, or move the block up and down in the column order. Student maybe allowed to dock blocks, but will not have the other editing icons. Block position can also be set in the block configuration menu. | The block header icons will allow the user to [[Dock|docked]], hide, delete, or move the block up and down in the column order or assign roles for the block. Student maybe allowed to dock blocks, but will not have the other editing icons. Block position can also be set in the block configuration menu. | ||
==Configuring a block== | ==Configuring a block== | ||
Revision as of 13:24, 18 September 2011
Managing blocks is a 2 step process. First a block must be added. Second the block must be configured.
Adding a block to a page
Blocks can be added to a page by turning editing on then using the 'Add a block' drop-down menu.
Please see Blocks for a list of all the blocks in a standard Moodle install. Your site may have added contributed blocks and or your site administrator has disabled specific blocks on your site.
The block header icons will allow the user to docked, hide, delete, or move the block up and down in the column order or assign roles for the block. Student maybe allowed to dock blocks, but will not have the other editing icons. Block position can also be set in the block configuration menu.
Configuring a block
After a block has been added, you will need to give it content and determine where it will appear.
Block settings
Some blocks allow the user to add content. The configuration page will have a content area when this is an option. The HTML block has a content area in "Block settings" , the Comment block does not show a "Block settings" area.
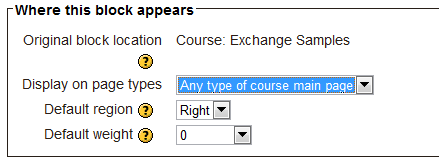
Where this block appears
Depending upon the context and users permissions, this area determines where initially this block will appear.
- Original block location: provides information about where the block was initially created.
- Display on page types: allows the user to set the context that the block can appear in. These options will vary depending upon the permissions of the user. For example a site administrator might see a setting that will allow the block to appear on Any page, or any type of course main page, while a teacher may only see the option to place it on every page in the course.
- Default region: Usually a right column or left column option
- Default weight: Where in the column do you want it to appear if there are other blocks in that column. -10 will put it at the top, 10 will put it at the bottom. A zero is neutral.
On this page
- Visible - Yes or No.
- Region - Here you can override the column preference on this page.
- Weight - Here you can override the default setting on this page.
