Using certainty-based marking: Difference between revisions
From MoodleDocs
Mary Cooch (talk | contribs) (adding Tony M-G's CBM notes to the docs) |
Mary Cooch (talk | contribs) (adding Tony M-G's CBM notes to the docs) |
||
| Line 17: | Line 17: | ||
*Students need to pay attention if they make confident wrong answers: think,reflect, learn! | *Students need to pay attention if they make confident wrong answers: think,reflect, learn! | ||
*Efficient study requires constantly questioning how our ideas arise and how reliable they are. | *Efficient study requires constantly questioning how our ideas arise and how reliable they are. | ||
[[File:lplconf.gif|link=|]] | |||
==How to decide on the best certainty level== | |||
*If you're sure, obviously you do best with C=3. But you will lose twice over (-6) if you are actually wrong! | |||
*If unsure, you should avoid any risk of penalty by choosing C=1 | |||
*In between, you are best to use C=2: you gain 2 or lose 2 depending on whether you are right. | |||
*The graph below shows how the average mark at each C level depends on the probability that your answer will be right. | |||
**Suppose you think you only have a 50% chance of being right: The highest graph for 50% on the bottom scale is black, for C=1. So you will expect to boost your marks on average most by acknowledging your low certainty (C=1). | |||
**If you think you can justify your answer well, with less than an 80% chance of being correct, then the red graph is highest, for C=3. Opt for this. | |||
[[File:cfgraphs3.gif|link=|]] | |||
Revision as of 10:41, 11 November 2013
Certainty-Based marking (CBM)
- After each answer, you say how sure you are that your answer is correct.
- This is on a 3-point scale: C=1 (low), C=2 (mid) or C=3 (high)
- We don't rely on words like 'sure' or 'very sure' because these mean different things to different people
- The mark scheme and the risk of a penalty determine when you should use each C level:
How CBM works

- Certainty levels 1, 2, 3 always give you marks 1, 2, or 3 when you are correct
- If you are wrong, then unless you opted for C=1 you will lose marks: -2 at C=2 and -6 at C=3
Why use CBM?
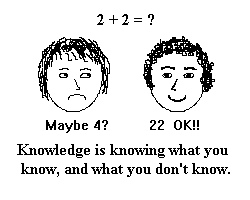
- To make students think about how reliable their answer is
- To encourage students to try to understand the issues,not just react immediately to a question
- To challenge: if a student won't risk losing marks if wrong then they don't really know the answer
- If a student is a careful thinker but not very confident. they will gain in confidence
- It is more fair - a thoughtful and confident correct answer deserves more marks than a lucky hunch
- Students need to pay attention if they make confident wrong answers: think,reflect, learn!
- Efficient study requires constantly questioning how our ideas arise and how reliable they are.

How to decide on the best certainty level
- If you're sure, obviously you do best with C=3. But you will lose twice over (-6) if you are actually wrong!
- If unsure, you should avoid any risk of penalty by choosing C=1
- In between, you are best to use C=2: you gain 2 or lose 2 depending on whether you are right.
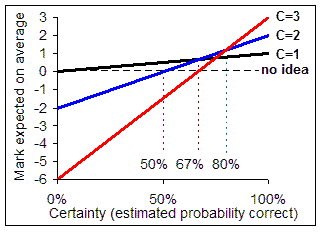
- The graph below shows how the average mark at each C level depends on the probability that your answer will be right.
- Suppose you think you only have a 50% chance of being right: The highest graph for 50% on the bottom scale is black, for C=1. So you will expect to boost your marks on average most by acknowledging your low certainty (C=1).
- If you think you can justify your answer well, with less than an 80% chance of being correct, then the red graph is highest, for C=3. Opt for this.
