Webinar module: Difference between revisions
No edit summary |
No edit summary |
||
| Line 37: | Line 37: | ||
1. Click the 'Add an activity or resource' link: | 1. Click the 'Add an activity or resource' link: | ||
[[Image:MoodleDocs add_webinar_activity_1.png|frame | [[Image:MoodleDocs add_webinar_activity_1.png|frame|center|1. Add webinar activity]] | ||
2. Select the 'Webinar' radio button and then click 'Add': | 2. Select the 'Webinar' radio button and then click 'Add': | ||
[[Image:MoodleDocs add_webinar_activity_2.png|frame | [[Image:MoodleDocs add_webinar_activity_2.png|frame|center|2. Add webinar activity]] | ||
You will then be taken to the 'Add a new Webinar' screen. Where you need to enter the name of your webinar. There are also fields for 'description' and 'Agenda' but these are optional. | You will then be taken to the 'Add a new Webinar' screen. Where you need to enter the name of your webinar. There are also fields for 'description' and 'Agenda' but these are optional. | ||
[[Image:MoodleDocs adding_new_webinar_screen.png|frame | [[Image:MoodleDocs adding_new_webinar_screen.png|frame|center|Adding a new webinar screen]] | ||
===Editing Webinar activity=== | ===Editing Webinar activity=== | ||
To edit the activity you need either turn editing on or select 'Edit settings' from the 'course settings' panel. You are then taken to the 'Updating Webinar' page: | To edit the activity you need either turn editing on or select 'Edit settings' from the 'course settings' panel. You are then taken to the 'Updating Webinar' page: | ||
[[Image:MoodleDocs updating_webinar_screen.png|frame | [[Image:MoodleDocs updating_webinar_screen.png|frame|center|Updating webinar screen]] | ||
===Delete Webinar activity=== | ===Delete Webinar activity=== | ||
To delete the activity you need to turn editing on and select the 'x' symbol and you will then be given the option to confirm the deletion of the activity: | To delete the activity you need to turn editing on and select the 'x' symbol and you will then be given the option to confirm the deletion of the activity: | ||
[[Image:MoodleDocs select_delete_webinar_screen.png|frame | [[Image:MoodleDocs select_delete_webinar_screen.png|frame|center|Delete webinar]] | ||
===View Webinar activity=== | ===View Webinar activity=== | ||
| Line 57: | Line 57: | ||
Manager View: | Manager View: | ||
[[Image:MoodleDocs view_webinar_page_user.png|frame | [[Image:MoodleDocs view_webinar_page_user.png|frame|center|User view webinar page]] | ||
User View: | User View: | ||
[[Image:MoodleDocs view_webinar_page_manager.png|frame | [[Image:MoodleDocs view_webinar_page_manager.png|frame|center|Manager view webinar page]] | ||
===Adding a new session=== | ===Adding a new session=== | ||
To add a new session click the 'Add a new session' link on the 'view webinar' page. | To add a new session click the 'Add a new session' link on the 'view webinar' page. | ||
[[Image:MoodleDocs add_new_session_link.png|frame | [[Image:MoodleDocs add_new_session_link.png|frame|center|Add a new session link]] | ||
On the 'Adding a new session' page you then need to fill in the appropriate details: | On the 'Adding a new session' page you then need to fill in the appropriate details: | ||
| Line 72: | Line 72: | ||
#Start date/time | #Start date/time | ||
#Finish date/time | #Finish date/time | ||
[[Image:MoodleDocs add_a_new_session_page.png| | [[Image:MoodleDocs add_a_new_session_page.png|framecenter|Add a new session page]] | ||
===Editing a session=== | ===Editing a session=== | ||
To edit a session open the view webinar page and click the edit icon next to any of the sessions listed. You are then taken to the edit page, when you can change the details as needed. | To edit a session open the view webinar page and click the edit icon next to any of the sessions listed. You are then taken to the edit page, when you can change the details as needed. | ||
[[Image:MoodleDocs edit_session_icon_link.png|frame | [[Image:MoodleDocs edit_session_icon_link.png|frame|center|Edit session link]] | ||
[[Image:MoodleDocs edit_session_screen.png|frame | [[Image:MoodleDocs edit_session_screen.png|frame|center|Edit session screen]] | ||
===Delete a session=== | ===Delete a session=== | ||
To delete a session simply select the 'x' icon for the session in question on the view webinar page. You will then be prompted to confirm the deletion. | To delete a session simply select the 'x' icon for the session in question on the view webinar page. You will then be prompted to confirm the deletion. | ||
[[Image:MoodleDocs delete_session_icon.png|frame | [[Image:MoodleDocs delete_session_icon.png|frame|center|Delete session link]] | ||
[[Image:MoodleDocs confirm_delete_session.png|frame | [[Image:MoodleDocs confirm_delete_session.png|frame|center|Delete session confirmation]] | ||
===View/Add attendees=== | ===View/Add attendees=== | ||
| Line 90: | Line 90: | ||
First from the view webinar page click on the 'Attendees link': | First from the view webinar page click on the 'Attendees link': | ||
[[Image:MoodleDocs attendees_link.png|frame | [[Image:MoodleDocs attendees_link.png|frame|center|Add attendees link ]] | ||
You are then taken to the 'Attendees' page where you can view the attendees and also have the option to add or remove them from the session: | You are then taken to the 'Attendees' page where you can view the attendees and also have the option to add or remove them from the session: | ||
[[Image:MoodleDocs view_attendees_screen.png|frame | [[Image:MoodleDocs view_attendees_screen.png|frame|center|View attendees screen]] | ||
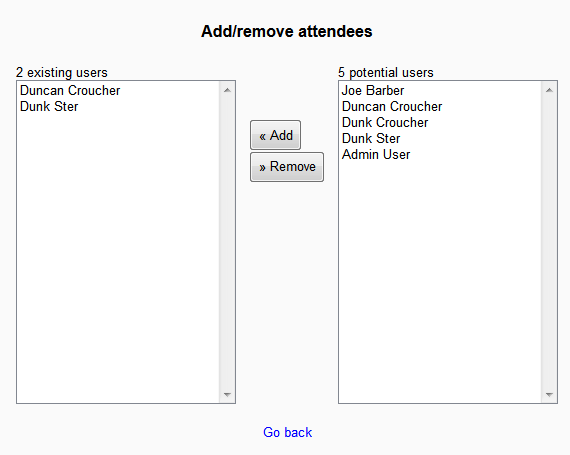
Clicking on the 'Add/remove attendees' link then takes you to a standard Moodle add and remove users page: | Clicking on the 'Add/remove attendees' link then takes you to a standard Moodle add and remove users page: | ||
[[Image:MoodleDocs add_remove_attendees_screen.png|frame | [[Image:MoodleDocs add_remove_attendees_screen.png|frame|center|Add and Remove attendees screen]] | ||
The users added or deleted are then sent an email Moodle confirming this action. The mail can be configured in the usual way with the language strings: | The users added or deleted are then sent an email Moodle confirming this action. The mail can be configured in the usual way with the language strings: | ||
[[Image:MoodleDocs example_registration_email.png|frame | [[Image:MoodleDocs example_registration_email.png|frame|center|An example registration email]] | ||
===User registration=== | ===User registration=== | ||
Revision as of 11:24, 20 August 2012
Overview and Installation
Summary
This is an activity module for web conferencing which enables Adobe Connect webinar sessions to be added as an activity to any course.
Description
The Webinar activity module enables Adobe Connect hosted webinars to be added as an activity to any course. This is intended for hosted Adobe deployments, not on-premise deployments - see http://www.adobe.com/products/adobeconnect.html
The Webinar activity module includes the following functionality:
- Add/edit/delete webinar session
- Assign a host user to a session - based on 'teacher' system role
- Register for session / assign students to a session
- Unregistered for session / unassign students from a session
- Automated email notifications to registered students
- Join session
- View / record webinar
- Run attendance report
All webinar administration is done from within Moodle from setting up webinar sessions, registering users on webinar sessions and joining sessions. Only when the student clicks on Join Session do they leave Moodle and view the webinar in the Adobe Connect Player window. Upon exiting the webinar session they will be returned to the Moodle course page.
It has been tested using Adobe Connect Pro 8 hosted accounts, using the Adobe Connect Web Services API - see http://help.adobe.com/en_US/connect/8.0/webservices/index.html.
Requirements
- Moodle 2.3 or Moodle 2.2
- An Adobe Connect account - register for a 30-day free trial at http://www.adobe.com/uk/products/acrobatconnectpro/trial/
- All users attending session will be required to have Flash Player 10.1 or higher, with the ability to install Adobe Connect Add-Ins in order to share their screen.
Installation
- Unpack the module into your Moodle install in order to create a mod/webinar directory.
- Visit the /admin/index.php page to trigger the database installation.
- (Optional) Change the default options in the activity modules configuration.
- (Optional) Assign roles of teacher or non-editing teacher to one or more users to be able to assign them as webinar hosts.
User Guide
Adding Webinar activity
To add an webinar activity, go to a course you have created and turn editing on and then select add an activity:
This is a two step process.
1. Click the 'Add an activity or resource' link:
2. Select the 'Webinar' radio button and then click 'Add':
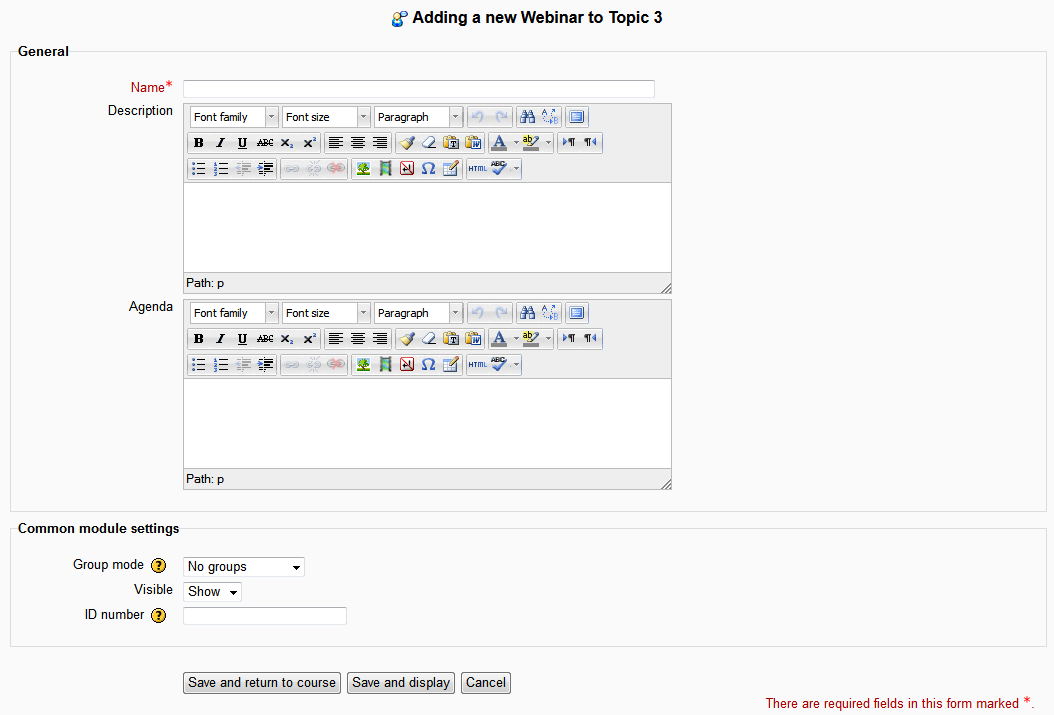
You will then be taken to the 'Add a new Webinar' screen. Where you need to enter the name of your webinar. There are also fields for 'description' and 'Agenda' but these are optional.
Editing Webinar activity
To edit the activity you need either turn editing on or select 'Edit settings' from the 'course settings' panel. You are then taken to the 'Updating Webinar' page:
Delete Webinar activity
To delete the activity you need to turn editing on and select the 'x' symbol and you will then be given the option to confirm the deletion of the activity:
View Webinar activity
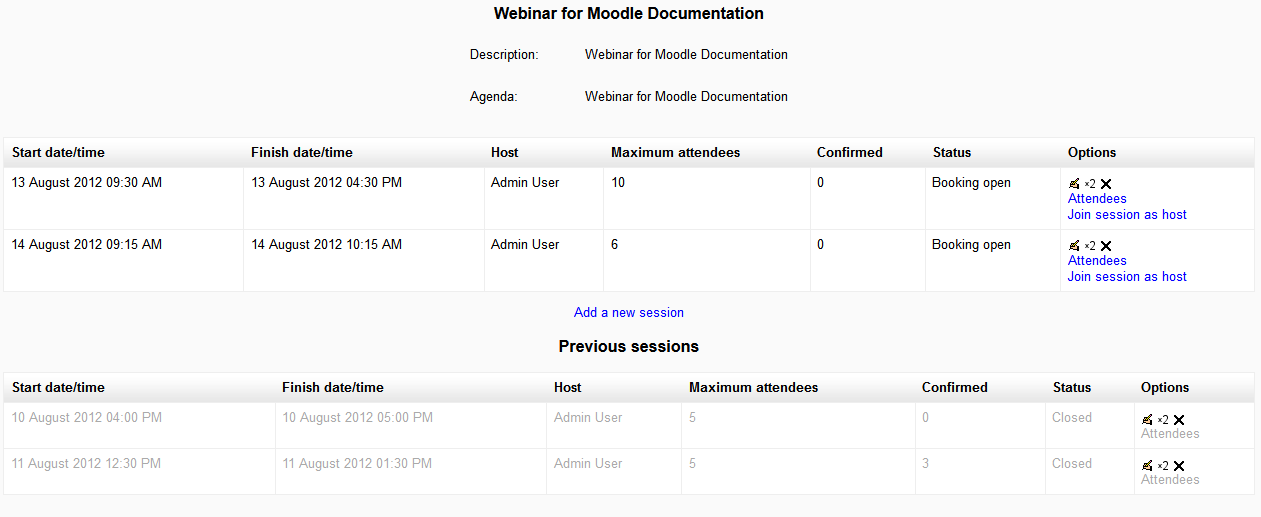
To view the webinar activity you just need to click on the activity link on your course page. You will then be taken to the view page which displays the title, description and webinar session information:
Manager View:
User View:
Adding a new session
To add a new session click the 'Add a new session' link on the 'view webinar' page.
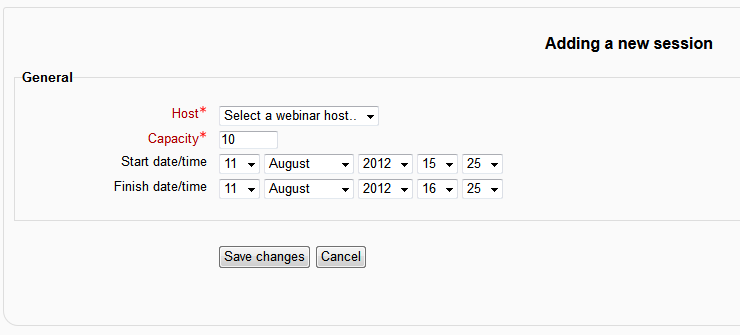
On the 'Adding a new session' page you then need to fill in the appropriate details:
- Host - This is a dropdown list of all the people than can be hosts. This will be anyone who has the role of admin, teacher or non editing teacher for the course in question.
- Capacity - The maximum amount of users you want to be able to attend the webinar
- Start date/time
- Finish date/time
Editing a session
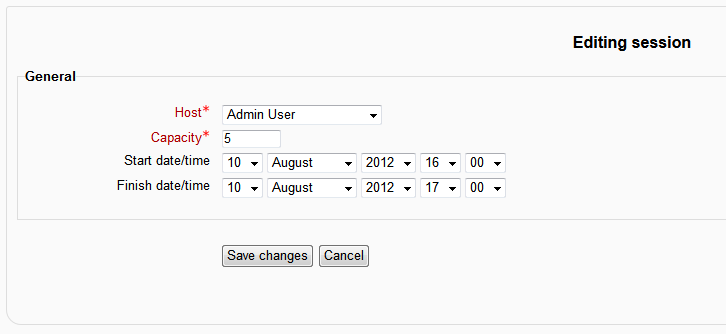
To edit a session open the view webinar page and click the edit icon next to any of the sessions listed. You are then taken to the edit page, when you can change the details as needed.
Delete a session
To delete a session simply select the 'x' icon for the session in question on the view webinar page. You will then be prompted to confirm the deletion.
View/Add attendees
As a manager for the webinar (administrator, teacher or non editing teacher) you can view the users that have registered for the session and also have the option to add users yourself, these users will then be emailed by Moodle to say they have been registered on the session.
First from the view webinar page click on the 'Attendees link':
You are then taken to the 'Attendees' page where you can view the attendees and also have the option to add or remove them from the session:
Clicking on the 'Add/remove attendees' link then takes you to a standard Moodle add and remove users page:
The users added or deleted are then sent an email Moodle confirming this action. The mail can be configured in the usual way with the language strings:


