Course homepage: Difference between revisions
Mary Cooch (talk | contribs) (jncrease/reduce course sections→Moving sections or blocks on your course's homepage) |
Helen Foster (talk | contribs) m (Protected "Course homepage": Page frequently edited by mistake ([Edit=Allow only administrators] (indefinite) [Move=Allow only administrators] (indefinite))) |
||
| (97 intermediate revisions by 18 users not shown) | |||
| Line 1: | Line 1: | ||
{{Courses}} | {{Courses}} | ||
== | ===Parts of a course homepage=== | ||
Watch the screencasts '''[https://www.youtube.com/watch?v=FKikDYMW_po&index=3&list=PLxcO_MFWQBDebq7Jly4p0s85GeAGRVQDk What is a course?]''' and '''[https://www.youtube.com/watch?v=CNrKtMjQ_8s&index=4&list=PLxcO_MFWQBDebq7Jly4p0s85GeAGRVQDk Course layout]''' for an introduction on setting up your course homepage. | |||
A Moodle course can look very different according to the theme and course format (layout). Here is a blank course page using the default 'Clean' theme and standard weekly format: | |||
[[File:example_course.png|thumb|600px|center]] | |||
1.[[Navigation block]] | |||
Normally visible on all pages, this block helps you find your way around the course and site. | |||
2.[[Administration block]] | |||
Again, normally visible on all pages, this block gives different levels of access to teachers and students. | |||
3.[[Course formats|Course sections]] | |||
Here is where the learning materials are displayed. This element may be arranged in one or multiple weeks, topics, forums or other (non-standard) layouts. | |||
4.[[Blocks|Side blocks]] | |||
Which blocks you see depend on what the administrator has selected and what you as teacher choose to add. | |||
'' | |||
{{New features}} | ===To edit a course section=== | ||
{{New features}} | |||
[[File: | # Turn editing on | ||
# Click the edit link (1 in screenshot below) to the right of the section. | |||
# Topic sections will display an edit menu as in (2) and weekly sections as in (3): | |||
[[File:new2editsection.png|thumb|center|500px|Section editing menu]] | |||
If [[Restrict access]] is enabled for the site, access to the section (including all activities and resources within it) may be restricted. | |||
[[File: | Click the plus or minus icons [[File:increasereduce.png]] at the bottom of the page (with editing on) to change the number of sections. | ||
===To move a course section=== | |||
#Turn editing on | |||
#Click the up/down arrow or the crosshairs icon to move the section | |||
#Drag the section to where you want to position it and let go | |||
Note: The ability to move course sections is controlled by the capability [[Capabilities/moodle/course:movesections|moodle/course:movesections]], which is allowed for the default role of teacher. | |||
===To delete a course section=== | |||
With the editing turned on, click the 'Edit' link to the right of the course section you wish to delete and then, from the menu that displays, click 'X Delete'. You will be prompted to confirm your wish to delete the section and its contents. Note that all activities inside the section and their user data will also be deleted. This operation cannot be reversed. | |||
===To link course sections=== | |||
An admin setting ''Always link course sections'' can be enabled from ''Site administration > Appearance > Navigation'' and will link course sections so that when a course section name is clicked in the navigation block or the central content area, it will go directly to that section. | |||
==Blocks== | |||
Blocks are displayed in the right and/or left columns of the course page. | |||
To add a block to the course page | |||
#Turn on the editing by clicking the button top right or the link in "Administration > Course administration'' | |||
#Select a block from the "Add block" dropdown menu (usually situated bottom right of the page) | |||
To move a block | |||
#Ensure editing is turned on then click onto the block title until the crosshair icon appears | |||
#While keeping the block selected, drag it to where you want to position it and let go. | |||
Alternatively | |||
#Click on the up/down arrow | |||
#Click on the place holder (a zone with a dashed border) where you want the block to appear. | |||
{| | |||
| [[File:moveblocksnew.png|thumb|Crosshair icon for moving a block]] | |||
| [[File:Moveblocks.png|thumb|Up/down arrow icon for moving a block]] | |||
|} | |||
==Activities and resources== | |||
To add an activity or resource to the course | |||
#Turn on the editing by clicking the button top right or the link in ''Administration > Course administration.'' | |||
#Click 'Add an activity or resource' to open the new activity chooser. Select an activity or resource then click the Add button, or simply double-click on the activity or resource name. | |||
Find out more about the activity chooser in the screencast [https://youtu.be/yWo0o4tG9YQ What is the activity chooser?] | |||
The | If desired, the activity chooser can be switched off via ''Administration > Course administration > Activity chooser off''. Activities and resources can then be added using dropdown menus. (The setting appears only when editing is turned on.) | ||
:[[ | '''Note:''' The Moodle admin can switch this off by default in ''Administration > Site administration > Appearance > AJAX and Javascript''. | ||
{| | |||
| [[File:activity chooser.png|thumb|The activity chooser]] | |||
|} | |||
: | Alternatively, certain resources and activities may be added using drag and drop: | ||
*To add a [[File|file]], simply drag and drop it onto the course section where you'd like it to appear | |||
*To add a [[Folder|folder of files]], simply zip the folder then drag and drop it onto the course section where you'd like it to appear, answer 'Unzip files and create folder' to the popup dialogue, then click the upload button | |||
*To add a [[SCORM module|SCORM package]], simply drag and drop it onto the course section where you'd like it to appear, answer 'Add a SCORM package' to the popup dialogue, then click the upload button | |||
==Editing elements on your course homepage== | |||
With the editing turned on, activities, resources and blocks will have icons performing different functions such as edit/move/copy/delete/hide. | |||
''Note:''' ''Your theme may have icons different from these below:'' | |||
:[[Image:pencil.png]] - the pencil icon allows you to edit inline the title of the resource / activity | |||
:[[Image:26actionicon.png|150px]] - this icon groups actions together for easier editing on smaller screens. Click to reveal the options. | |||
[[ | :[[Image:moveajax24.png]]- the move icon allows you to move items or sections by dragging and dropping. (If you have many activities to scroll through while moving, see the Tips and Tricks section below for a useful suggestion.) | ||
:[[Image:movenoajaz241.png]] - this move icon appears if you don't have Ajax enabled. | |||
:[[File:groups24.png]] - the groups icon allows you to change between no groups or separate/visible groups | |||
:[[Image:movenoajax24.png]] - the move here icon appears when moving a course element without Ajax. Click into the box to re-locate your item. | |||
:[[File:topicmove24.png]] - the up/down arrows allow you to move course sections up or down and appear if you do not have Ajax enabled. | |||
==Tips and tricks== | ==Tips and tricks== | ||
===Moving items in a course with many activities=== | |||
If you click and drag an activity or resource on a course page which has many items, this might cause you difficulties with "scroll of death" issues. Instead of dragging the activity to move it, click on it. It will display a list of all the items on your page and you just need to click to select where on the course page you want the item to be moved to. | |||
[[File:alternativemovemethod.png|thumb|center|500px]] | |||
*Make your course home page look more like a webpage - see [[Course FAQ]] | *Make your course home page look more like a webpage - see [[Course FAQ]] | ||
*Activity and resource descriptions can be displayed on the course page just below the link to the activity or resource by clicking the 'Display description on course page' checkbox in the activity or resource settings. | |||
==Course homepage capabilities== | ==Course homepage capabilities== | ||
| Line 117: | Line 129: | ||
*[[Capabilities/moodle/course:setcurrentsection|Set current section]] | *[[Capabilities/moodle/course:setcurrentsection|Set current section]] | ||
[[es: | [[es:Página principal del curso]] | ||
[[fr:Page de cours]] | [[fr:Page d'accueil de cours]] | ||
[[ja:コースホームページ]] | [[ja:コースホームページ]] | ||
[[de:Kursseite]] | [[de:Kursseite]] | ||
Latest revision as of 17:09, 13 April 2016
Parts of a course homepage
Watch the screencasts What is a course? and Course layout for an introduction on setting up your course homepage.
A Moodle course can look very different according to the theme and course format (layout). Here is a blank course page using the default 'Clean' theme and standard weekly format:

Normally visible on all pages, this block helps you find your way around the course and site.
Again, normally visible on all pages, this block gives different levels of access to teachers and students.
Here is where the learning materials are displayed. This element may be arranged in one or multiple weeks, topics, forums or other (non-standard) layouts.
Which blocks you see depend on what the administrator has selected and what you as teacher choose to add.
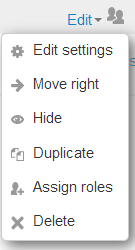
To edit a course section
New feature
in Moodle 3.0!
- Turn editing on
- Click the edit link (1 in screenshot below) to the right of the section.
- Topic sections will display an edit menu as in (2) and weekly sections as in (3):

If Restrict access is enabled for the site, access to the section (including all activities and resources within it) may be restricted.
Click the plus or minus icons  at the bottom of the page (with editing on) to change the number of sections.
To move a course section
- Turn editing on
- Click the up/down arrow or the crosshairs icon to move the section
- Drag the section to where you want to position it and let go
Note: The ability to move course sections is controlled by the capability moodle/course:movesections, which is allowed for the default role of teacher.
To delete a course section
With the editing turned on, click the 'Edit' link to the right of the course section you wish to delete and then, from the menu that displays, click 'X Delete'. You will be prompted to confirm your wish to delete the section and its contents. Note that all activities inside the section and their user data will also be deleted. This operation cannot be reversed.
To link course sections
An admin setting Always link course sections can be enabled from Site administration > Appearance > Navigation and will link course sections so that when a course section name is clicked in the navigation block or the central content area, it will go directly to that section.
Blocks
Blocks are displayed in the right and/or left columns of the course page.
To add a block to the course page
- Turn on the editing by clicking the button top right or the link in "Administration > Course administration
- Select a block from the "Add block" dropdown menu (usually situated bottom right of the page)
To move a block
- Ensure editing is turned on then click onto the block title until the crosshair icon appears
- While keeping the block selected, drag it to where you want to position it and let go.
Alternatively
- Click on the up/down arrow
- Click on the place holder (a zone with a dashed border) where you want the block to appear.


Activities and resources
To add an activity or resource to the course
- Turn on the editing by clicking the button top right or the link in Administration > Course administration.
- Click 'Add an activity or resource' to open the new activity chooser. Select an activity or resource then click the Add button, or simply double-click on the activity or resource name.
Find out more about the activity chooser in the screencast What is the activity chooser?
If desired, the activity chooser can be switched off via Administration > Course administration > Activity chooser off. Activities and resources can then be added using dropdown menus. (The setting appears only when editing is turned on.)
Note: The Moodle admin can switch this off by default in Administration > Site administration > Appearance > AJAX and Javascript.

Alternatively, certain resources and activities may be added using drag and drop:
- To add a file, simply drag and drop it onto the course section where you'd like it to appear
- To add a folder of files, simply zip the folder then drag and drop it onto the course section where you'd like it to appear, answer 'Unzip files and create folder' to the popup dialogue, then click the upload button
- To add a SCORM package, simply drag and drop it onto the course section where you'd like it to appear, answer 'Add a SCORM package' to the popup dialogue, then click the upload button
Editing elements on your course homepage
With the editing turned on, activities, resources and blocks will have icons performing different functions such as edit/move/copy/delete/hide.
Note:' Your theme may have icons different from these below:
 - the pencil icon allows you to edit inline the title of the resource / activity
 - this icon groups actions together for easier editing on smaller screens. Click to reveal the options.

 - the move icon allows you to move items or sections by dragging and dropping. (If you have many activities to scroll through while moving, see the Tips and Tricks section below for a useful suggestion.)

 - this move icon appears if you don't have Ajax enabled.

 - the groups icon allows you to change between no groups or separate/visible groups

 - the move here icon appears when moving a course element without Ajax. Click into the box to re-locate your item.

 - the up/down arrows allow you to move course sections up or down and appear if you do not have Ajax enabled.

Tips and tricks
Moving items in a course with many activities
If you click and drag an activity or resource on a course page which has many items, this might cause you difficulties with "scroll of death" issues. Instead of dragging the activity to move it, click on it. It will display a list of all the items on your page and you just need to click to select where on the course page you want the item to be moved to.

- Make your course home page look more like a webpage - see Course FAQ
- Activity and resource descriptions can be displayed on the course page just below the link to the activity or resource by clicking the 'Display description on course page' checkbox in the activity or resource settings.