Glossary settings: Różnice pomiędzy wersjami
Mary Cooch (dyskusja | edycje) (added permissions section) |
(moving sections to Using Glossary) |
||
| Linia 1: | Linia 1: | ||
{{Glossary}} | {{Glossary}} | ||
==Auto-linking options== | ==Auto-linking options== | ||
| Linia 58: | Linia 31: | ||
==Glossary permissions== | ==Glossary permissions== | ||
Role permissions for the activity can be changed in ''Settings > Glossary administration > Permissions.'' | Role permissions for the activity can be changed in ''Settings > Glossary administration > Permissions.'' | ||
==Site administration settings== | ==Site administration settings== | ||
| Linia 81: | Linia 55: | ||
To hide or show any of these entries, simply click on the "eye" icon next to the entry. Clicking on the "writing hand" icon will take you to the settings page for that entry. | To hide or show any of these entries, simply click on the "eye" icon next to the entry. Clicking on the "writing hand" icon will take you to the settings page for that entry. | ||
[[Category: | [[Category:Site administration]] | ||
[[de:Glossareintrag_anlegen]] | [[de:Glossareintrag_anlegen]] | ||
[[ja:用語集エントリを追加/編集する]] | [[ja:用語集エントリを追加/編集する]] | ||
Wersja z 14:35, 12 paź 2011
Auto-linking options
Note: To be able to turn on this feature, site-wide glossary auto-linking should be enabled by an administrator (see Filters for further details).
This entry should be automatically linked
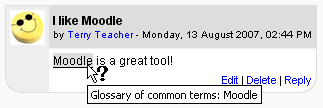
Turning this feature on will allow the entry to be automatically linked, whenever the concept words and phrases appear throughout the rest of the same course. This includes forum postings, internal resources, week summaries and so on. When you click on the word, a new window with the glossary entry will pop-up.
Note: If you do not want particular text to be linked (in a forum posting, say) then you should add <nolink> and </nolink> tags around the text.
This entry is case sensitive
This setting specifies whether matching exact upper and lower case is necessary when performing automatic linking to these entries. For example, if this is turned on, then a word like "html" in a forum posting will NOT be linked to a glossary entry called "HTML".
Match whole words only
If automatic linking is enabled, then turning this setting on will force only whole words to be linked. For example, a glossary entry named "construct" will not create a link inside the word "constructivism".
Deleting an attachment
The easiest way to delete an attachment is to delete the glossary entry and add a new one.
To export glossary entries
- Follow the "Export entries" link at the top right of the main glossary page.
- Click the "Export entries to file" button.
- Save the automatically generated XML file on your computer.
A copy of a glossary may also be made by backing up the activity.
Glossary permissions
Role permissions for the activity can be changed in Settings > Glossary administration > Permissions.
Site administration settings
The glossary module has additional settings which may be changed by an administrator in Settings > Site administration > Plugins > Activity modules > Glossary.
Glossary level default settings
- glossary_entbypage - Number of Glossary entries shown per page. Default is set to 10.
- glossary_dupentries - Whether or not the Glossary will allow duplicate entries. Default is set to "No".
- glossary_allowcomments - Whether or not the Glossary will accept user comments on its entries. Default is set to "No".
- glossary_linkbydefault - Whether or not a glossary should be automatically linked. Default is set to "Yes".
- glossary_defaultapproval - Whether or not the Glossary will define the approval status of an entry posted by a student. Default is set to "Yes".
- glossary_enablerssfeeds - Enabling of RSS feeds for all glossaries. Default is set to "No". Note: feeds will still need to be turned on manually in the settings for each glossary.
Entry level default settings
- glossary_linkentries - Whether or not glossary entries should be automatically linked. Default is set to "No".
- glossary_casesensitive - Whether or not an entry is case sensitive when linked. Default is set to "No".
- glossary_fullmatch - Whether or not an entry should match the case in the target text by default when linked. Default is set to "No".
Display Formats Setup
To hide or show any of these entries, simply click on the "eye" icon next to the entry. Clicking on the "writing hand" icon will take you to the settings page for that entry.
