Using Quiz: diferència entre les revisions
(copied content from other page) |
|||
| Línia 136: | Línia 136: | ||
==See also== | ==See also== | ||
* [[Effective quiz practices]] | |||
* [[Quiz results]] for teachers reviewing an untaken quiz | * [[Quiz results]] for teachers reviewing an untaken quiz | ||
* [[Quiz reports]] once students take a quiz, more tools are available | * [[Quiz reports]] once students take a quiz, more tools are available | ||
Revisió del 13:56, 30 set 2011
This page really needs improving. Please see the page comments for suggestions of what to include, then remove this template when you're done.
This page contains general instructions for taking a quiz. Teachers may use different quiz settings, so these instructions are general.
Student perspective
This page contains general instructions for viewing a completed quiz and taking a quiz. Teachers
Process of taking a quiz
- Click on the quiz link on the course homepage
- Read the information about the quiz to make sure it is the correct quiz
- Click on "Attempt quiz now" button - you will start the attempt
- Click on the "Next" button at the bottom of the page to see the next page of questions
- Click on the "flag" in the box next to the question to put a temporary marker on it
- Notice the Quiz navigation block in the upper right corner
- You can jump to any question using it
- Any flagged questions will have a "red corner" in their box
- The question boxes for the current page are in bold
- To finish the exam
- Click "Finish attempt" in the Quiz navigation block
- Or click on the "Next" button on the last page of the exam
- The "Summary of attempt" page - reviews the questions
- It will tell you if you "have not yet answered" a question
- It will show you any questions that are still flagged
- Click on any question page number to return to the quiz
- Click on "Submit all and finish" to have your quiz scored
- A warning will pop up "Once you submit, you will no longer be able to change your answers for this attempt.
- There is a button to "Cancel"
- There is a button to "Submit all and finish".
Most quizzes will give a student some sort of review of what they did.
- Notice in the Quiz navigation block:
- Those questions that were scored as correct are in "green",
- Those missed are in "red".
- Any questions flagged, will probably still be marked.
- "Show all questions on one page" link
- "Finish review" link
- Questions answered correctly will have a green check mark next to your correct answer
- Questions missed will have a red X mark next to your answer
- The teacher may have the quiz
- Tell you the correct answer
- Give specific feedback to your answer on any question
- Give you general feedback on a question
- Give you overall feedback on your overall score
Pictures of what students might see
- Click to enlarge
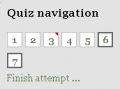
Navigation block, see flagged question
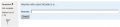
Unanswered question
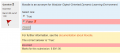
Missed question
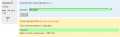
Correctly answered question
Question flagged

Quiz score summary


Teacher's perspective
Taking a Quiz
After clicking on a quiz name the student will be taken to page that displays the quiz name and the quiz introduction. Usually the introduction will tell the student more about the purpose of the quiz and how it will be assessed. If applicable the page will also show the quiz opening and closing dates and times. The student will not be able to access the quiz questions until the opening time. The student must make sure that they submit all answers before the closing time. Late answers will not usually be marked.
Retaking a Quiz
If a student has already attempted the quiz, they will see a table listing all their previous attempts together with the time the student completed them and the marks and grades. Notice that there may be a difference between the "Marks" and "Grade" column. The teacher may have wanted the grade for the quiz to be out of a certain number of points and the Grade column therefore will contain a rescaling of the Marks column to achieve this.
Continuing an uncompleted quiz
A student may be allowed to return to a quiz or the quiz settings might be set to count the return as a new attempt. If there is no button for starting a new attempt then the student has used the maximum number of attempts allowed for the quiz.
Submitting and saving a quiz
The students have several options for saving a quiz. (These need updating for 2.0).
Students should also know that every time they change pages in a quiz, Moodle will store their answers. :Typically if their computer or the network crashes, they will be able to enter the quiz and Moodle will still have their answers and consider they are still on their first attempt.
- Save without submitting - which, as its name says, saves the answers without submitting them
- Submit all and finish - which saves the whole quiz
Viewing a completed quiz
See Quiz reports for more ways to view a completed quiz.
Student viewing completed quiz
The teacher may allow the student to go back into a completed quiz to see the quiz pages, questions, the student answers, the correct answer and the score the student received on each question. The teacher can also see each student's quiz.
Remember that in some quizzes, the answers and even the questions can appear in a different order for each students. For those who are used to paper tests, this could require some adjustment in discussing the quiz.
Teacher viewing completed quiz
Once the first student has attempted the quiz, the edit screen looks different. It will not be possible to add or delete questions from the quiz. The teacher can still edit questions.

- Tip: After changing the marks on a question, the teacher can regrade a quiz after a student views it. For example, mark more than one answer as being correct. When a student views the quiz after a regrade, they will see the changes to their marks.
This section explains how Administrators can let teachers share questions between courses in Moodle 1.9.
What you need to do
As usual, you create a new role by going to Administration -> Users -> Permissions -> Define roles. Then click 'Add a new role'.
You can use whatever Name and Short name you like for the role. Set the 'Legacy role type' to None.
In Moodle 2.0 and later, set the role to be assignable in the System and Category contexts.
Set the following capabilities to Allow:
moodle/question:add
moodle/question:editall
moodle/question:managecategory
moodle/question:moveall
moodle/question:viewall
moodle/question:useall
Now click the 'Add a new role' button at the bottom of the page.
N.B. Teachers have similar permissions, but it is not a good idea simply to assign the role of teacher in the System context to members since those teachers will show up as teachers for every single course in the entire system (as noted in Moodle when you're changing the settings above).
2. Assign the new role in the System context
Any user who you wish to be able to access the shared areas of the question bank must have the new role assigned in the System context. (Administration -> Users -> Permissions -> Assign system roles)
Or, for more control, you can assign this role in a course category. That lets the user share questions only between the courses in that category.
What teachers need to do
Once you have done the above steps. Teachers who have the Question sharer role will be able to see the shared areas of the question bank when they are editing quizzes, or when they click on the 'Questions' link in the course administration block.
Any questions they store in the shared areas of the question bank will be visible in all their courses.
Why does this work?
See: Question permissions explained with diagrams.
See also
- Effective quiz practices
- Quiz results for teachers reviewing an untaken quiz
- Quiz reports once students take a quiz, more tools are available
- Friction-less Learning with Quizzes in Moodle by Joseph Thibault