Database presets: diferència entre les revisions
(→Importing a preset: list all overwritable settings) |
m (→Importing a preset: corrected wording) |
||
| Línia 8: | Línia 8: | ||
# On the database page, click the Presets tab. | # On the database page, click the Presets tab. | ||
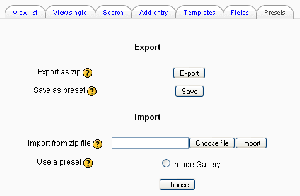
# The usual way to import a preset is clicking the "Choose file" button and browsing to the ZIP file containing the preset (eg. "preset.zip") stored on the server. If there does not yet exist a preset ZIP file on the server, upload it from your local machine. Choose the desired preset file by clicking on its "Choose | # The usual way to import a preset is clicking the "Choose file" button and browsing to the ZIP file containing the preset (eg. "preset.zip") stored on the server. If there does not yet exist a preset ZIP file on the server, upload it from your local machine. Choose the desired preset file by clicking on its action "Choose". Finally, press the "Import" button. | ||
# Alternatively, you can choose a previously loaded preset. | # Alternatively, you can choose a previously loaded preset. | ||
# After the import, you can start to add or import entries. All the hard work of setting up the fields and templates has been done for you. If you desire, you can still customize the fields and templates. | # After the import, you can start to add or import entries. All the hard work of setting up the fields and templates has been done for you. If you desire, you can still customize the fields and templates. | ||
Revisió del 18:55, 15 maig 2008
Plantilla:Databases To avoid the necessity of always having to create a new database from scratch, the database module has a presets feature (in Moodle 1.7 onwards). An image gallery preset is currently included in the database module to help get you started. You can create your own presets as well and share them with others.
Importing a preset
To use a preset:
- On the database page, click the Presets tab.
- The usual way to import a preset is clicking the "Choose file" button and browsing to the ZIP file containing the preset (eg. "preset.zip") stored on the server. If there does not yet exist a preset ZIP file on the server, upload it from your local machine. Choose the desired preset file by clicking on its action "Choose". Finally, press the "Import" button.
- Alternatively, you can choose a previously loaded preset.
- After the import, you can start to add or import entries. All the hard work of setting up the fields and templates has been done for you. If you desire, you can still customize the fields and templates.
Plantilla:Moodle 1.9In Moodle 1.9.1 onwards, you will see a "Overwrite current settings" checkbox after the "Import" button has been pressed. If checked, the database activity overwrites some of its current general settings by those stored in the preset:
- the "Introduction" HTML text
- "Required entries"
- "Entries required before viewing"
- "Maximum entries"
- "Comments"
- "Require approval?"
- rssarticles
Exporting a preset
If you wish to share your database presets with others, you have two options:
- Export as a ZIP file, which can then be imported to another course or Moodle site.
- Save as a preset, which publishes the database for other teachers on your site to use. It will then appear in the preset list. (You can delete it from the list at any time.)
Note: Only the fields and templates of the database are copied when exporting or saving it as a preset, not the entries.
See also
Using Moodle forum discussions:
- Can't get columns to line up in list view including moodle.org presets for download
- New preset, please review, and make suggestions! including FAQ preset for download
- Issue 53: Encyclopedia database preset including encyclopedia-style preset for download
- Issue 51 - Design a Database Preset for Document Sharing including preset for download
